
Manage Jobs as Code (Source Control Management)
Manage Jobs as Code (Source Control Management)
The Rundeck Git plugin allows organizations to manage Rundeck jobs as source code by versioning, exporting, or importing their definitions using a remote Git repository. Managing jobs in this way takes advantage of your existing code review processes to ensure that only approved job code is allowed in production projects or instances. Users can backup, manage, and approve changes to their Rundeck jobs using any Git solution like Github/Gitlab/BitBucket, centralizing the job code in one place.
Enable SCM (Source Control Management) for managing Job definitions on a per-project basis. The SCM plugin can be configured to either import or export. This approach can be applied in any way that matches an organization’s code review processes but is often configured with a development project where jobs can be modified and developed for export to an experimental branch in Git and a production project that imports jobs from the approved and stable branch.
Background
There are two integration modes for the SCM Plugin, import, and export, which are managed separately. A Project can be configured with a single SCM plugin to either import or export. After setting up the plugin, the Project and Job level "status" can be read. Changes to Jobs within a project affect the status of import or export.
For example, if the project is set to import, there will be indicators where jobs are out of sync with the source and could be imported.
The Git plugin provides "actions" which are available based on the Project or Job status. For example, a plugin can provide a "commit" action for a Job, which allows a user to save the changes for the job.
Prerequisites
To follow this tutorial you need to have Docker installed on your computer. Go here to install Docker Desktop depending on your Operating System.
Example Docker Environment
This Docker-compose file contains both Rundeck and GitBucket servers to test the Git plugin functionality.
version: "3"
services:
 rundeck:
   container_name: rundeck_oss
   image: rundeck/rundeck:4.5.0
   ports:
     - 4440:4440
   environment:
     RUNDECK_GRAILS_URL: http://localhost:4440
 gitbucket:
   container_name: git_bucket
   image: gitbucket/gitbucket
   ports:
     - 8080:8080
To run use:
docker-compose up
Exporting Jobs
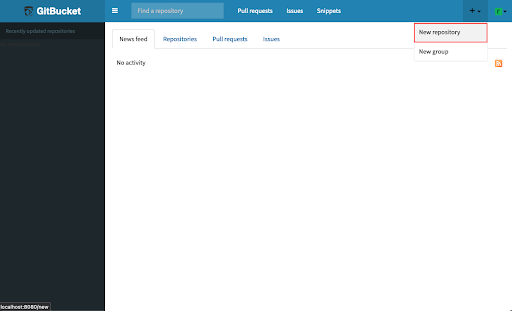
- Enter GitBucket server
http://localhost:8080`, user: `root`, password: `root` - Once logged in, create a new repository, by clicking on the "+" top icon and then on "New Repository".
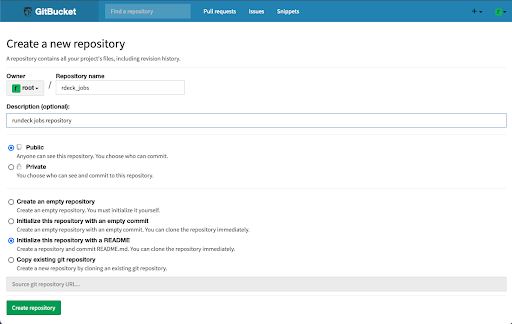
- Put a name in the "Repository name" textbox and select "Initialize this repository with a README".
The new repository should now contain the "master" branch by default. - Click on the "Create repository" button. That's all you need to complete in GitBucket.
- Log in to Rundeck
http://localhost:4440, user: admin, password: admin - Add a new password in the key storage.
Key Type: Password
Enter text: The password for the Git repository
Storage path: Can be left blank
Name: gitbucket_passwd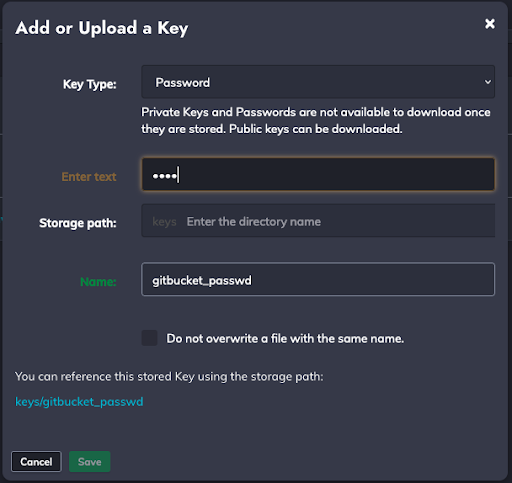
Tips
If you're using GitHub, it doesn't allow passwords to connect to the repositories via HTTPS. Instead of a password, GitHub accepts personal tokens. To create a token, follow these steps:
- Go to your User Icon (up to right) and select "Settings".
- Scroll down and click "Developer settings" at the end of the left menu.
- Now click on "Personal access tokens".
- Click the "Generate new token" button and then create a new token.
- The token value could be used as a password in the SCM configuration.
Exporting Jobs, continued
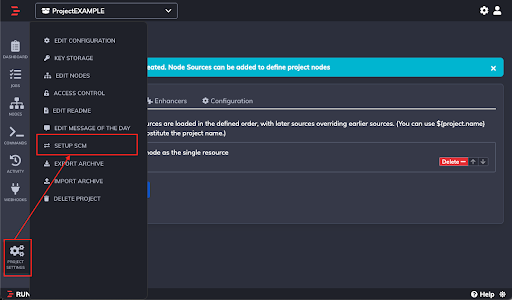
- Now, configure SCM in a Rundeck project. Go to the left navigation and click on "Project Settings" and select the "SETUP SCM" option from the menu.
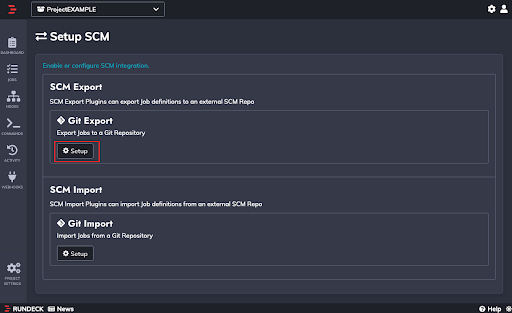
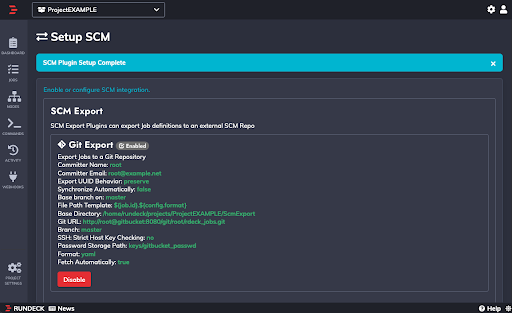
- Click on "Setup" in the “Git Export” section.
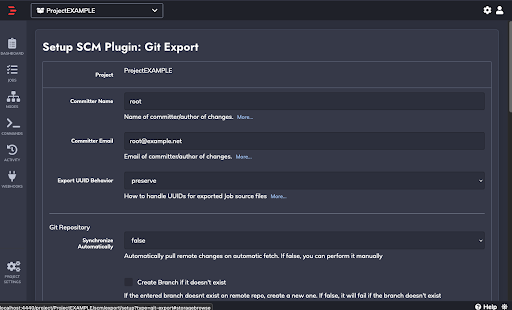
- In the "Project" section, add the Git repository username and a valid committer/author email.
- Scroll and check the "Git Repository" section. The Git URL must be filled in using the following format to connect via the HTTPS method:
http(s)://user@git_hostname:port/git/user/repo.git. In this example we used:http://root@gitbucket:8080/git/root/rdeck_jobs.git. Additionally, make sure to fill the "Branch" with the first branch created in step 2, "master".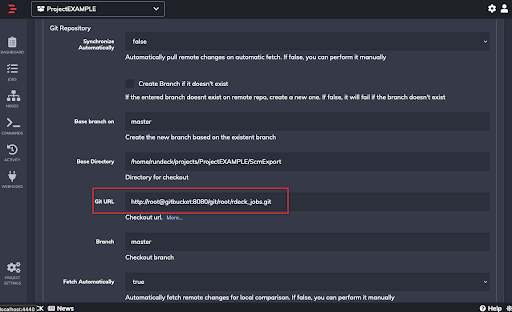
- Job Source Files (XML or YAML)
Format yaml
Authentication Enter key storage password path created in the third step.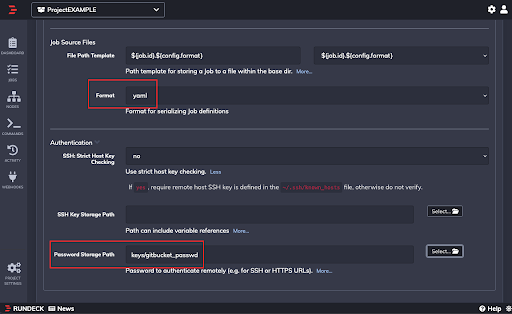
- Save the config.
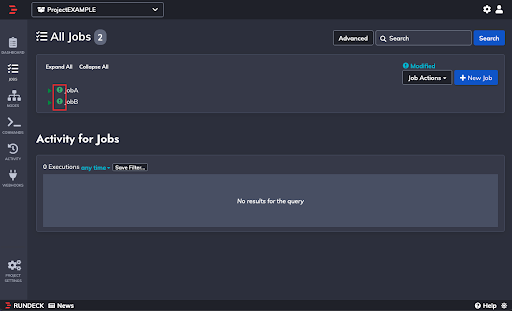
- Create a couple of jobs. You should see a green exclamation icon next to each, which signals the job is available in Rundeck and ready to export to the GitBucket repository configured above.
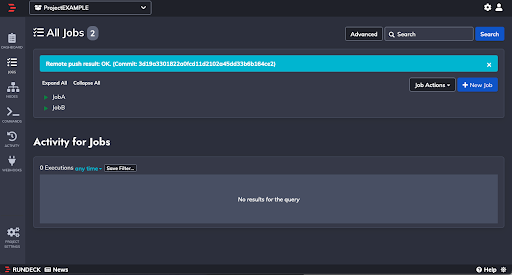
- To export both jobs to the GitBucket repo, click on "Job Actions" and select "Commit Changes to Git".
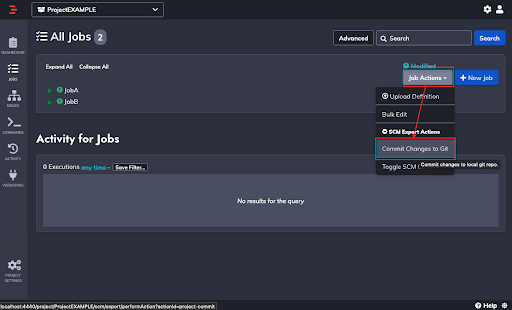
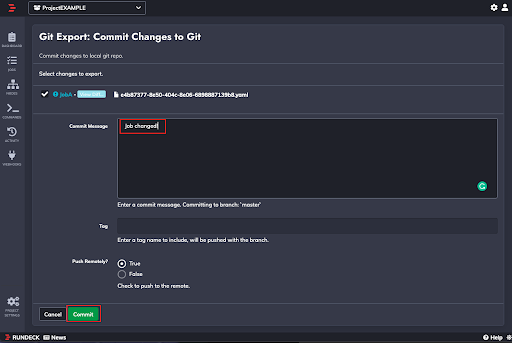
- In the "Commit Message" put a friendly commit message, which is mandatory. Click on the "Commit" button.

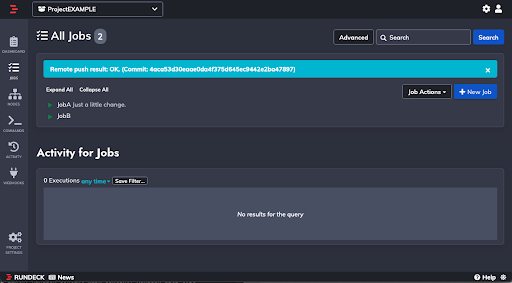
- "Remote push result: OK" should appear at the top
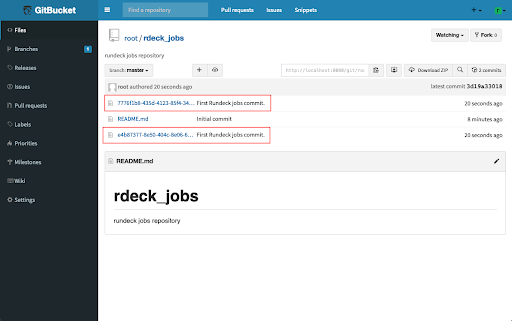
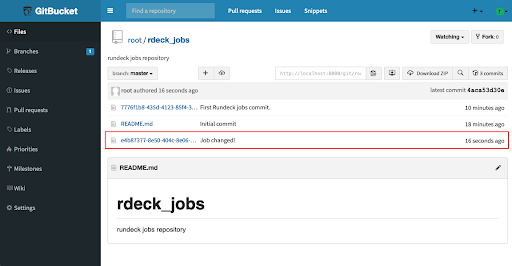
- To verify, go to GitBucket and look at the repository. You should see both jobs.
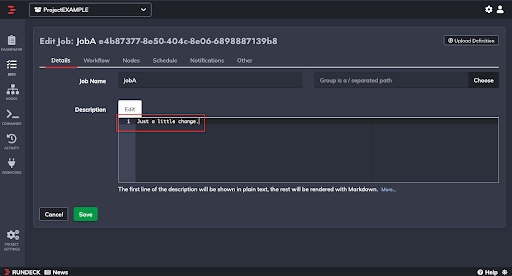
- Test further by editing a job in Rundeck and adding a description. The job structure will change and the SCM plugin will detect this change to export it.
- After saving, the blue "Modified" message appears.
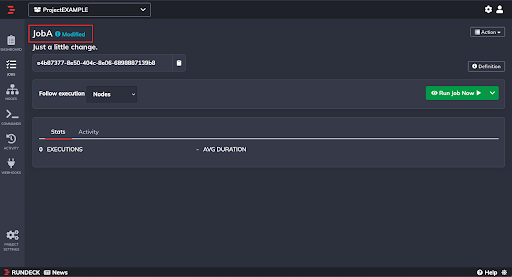
- A blue exclamation icon will appear in the job list as well.

- An additional way to see the job change is by clicking on the job "Actions" button and then on "Diff Changes”.
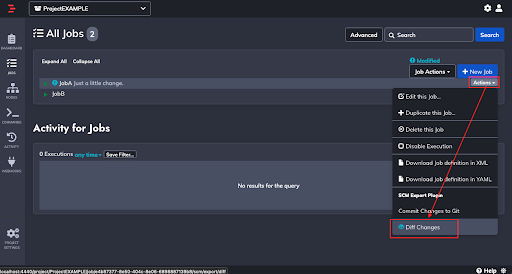
- To commit changes to GitBucket, click on the "Commit Changes to Git" blue button.

- Add a comment on the last change and click on the green "Commit" button.
- Now go back to the GitBucket repository. The changes should be uploaded with the new comment attached.
Tips
Note: The SCM plugin should be used either for Import or Export on a single project, not both. To test importing, you should use or create a different project than you used for the export section above.
Importing Jobs
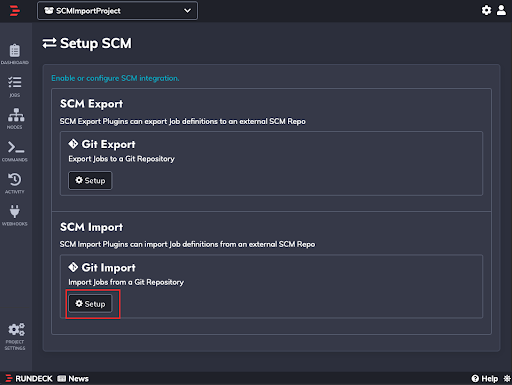
- In your import project, select "Projects Settings" from the left navigation and click on "SETUP SCM".

- Scroll to the "Import" section and click on "Setup".
- Git Repository section
Git URL
Must be filled in the following format to connect via HTTPS method:http(s)://user@git_hostname:port/git/user/repo.git. We used:http://root@gitbucket:8080/git/root/rdeck_jobs.git.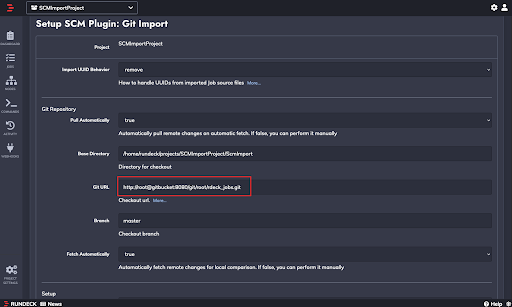
- Setup section
Regular Expression .*\yaml - Job Source/Files section
Format Select "yaml" - Authentication section
Password Storage Path Add the key storage path for the GitBucket account user password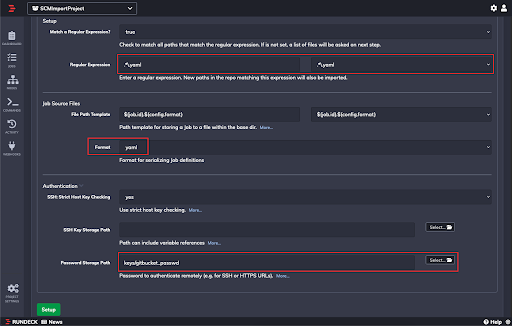
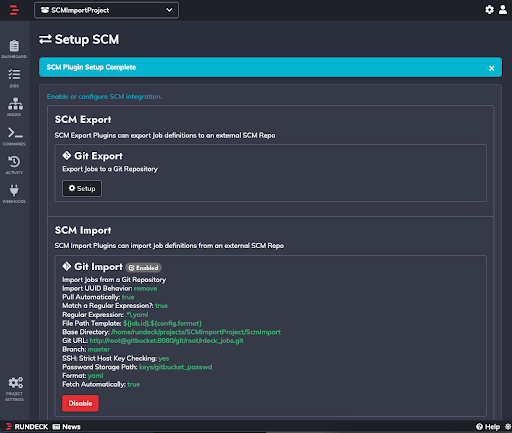
- Click on the "Setup" button. Now the configuration is saved.
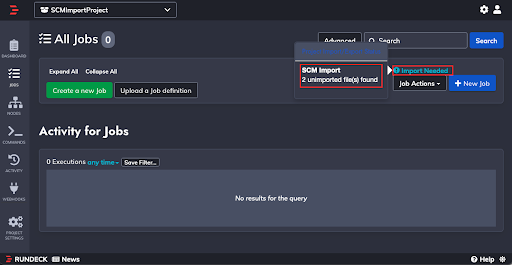
- Click on Jobs in the left navigation. If the repository contains jobs, you will see a blue banner. Scroll over the banner and you will see the number of jobs available to import to the Rundeck instance.
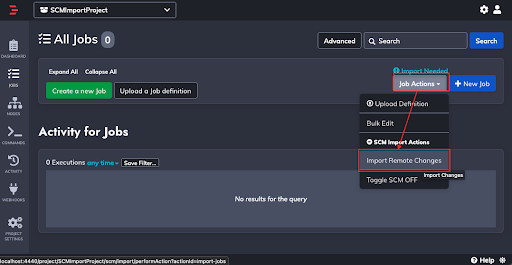
- Rundeck shows the available jobs to import. Click on the "Import" button.

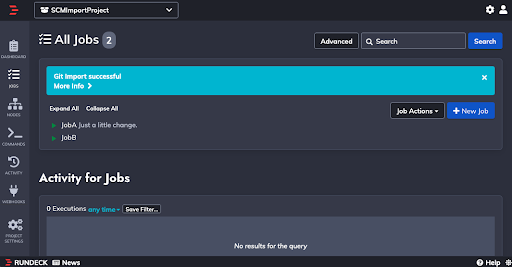
- The jobs should be imported from the Rundeck instance to the GitBucket repository.
Resources
About the Git Plugin (Rundeck Documentation)