
Get Started with Access Control
Get Started with Access Control
What is an ACL?
ACLs (Access Control Lists) are YAML-based rules that limit/give access to Rundeck elements to any user/role. An ACL Policy is a set of rules that allows/denies access to specific resources such as jobs, projects, keys, passwords, etc. No one can access or do anything in the system unless it is allowed by one or more ACL Policies.
Rules need to be defined in YAML format and Rundeck stores the ACLs in two places:
- In the file system as an
.aclpolcyfiles (at/etc/rundeck/path on an RPM/DEB based installation,/home/rundeck/etc/on Docker environment or $RDECK_BASE/etc/ on a war-based installation) - or in the internal database, which is referred to as "Stored" ACL
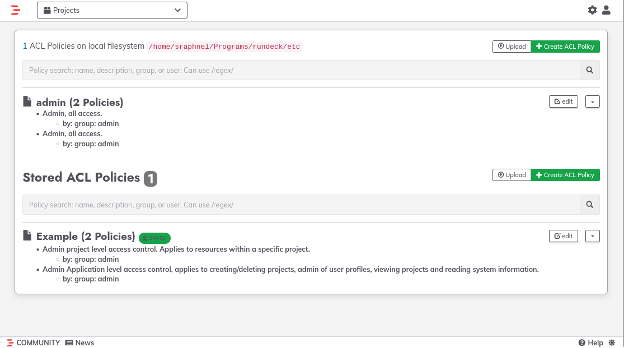
To see the current ACL rules click on the Gear Icon and then click on the "Access Control", in this section all ACLs are listed.
Getting Started
Rule Types
Rundeck uses two types of ACL rules: System ACLs and Project ACLs.
- System ACLs cover all elements "outside of a project": System ACL management, project creation, access to system info, access to user summary, etc.
- Projects ACLs cover all elements "inside a Project": access to jobs, nodes, ad-hoc commands, etc.
Storage Locations
As mentioned previously, ACL policies can be stored as files on the file system or in the database. The difference between filesystem and database-stored ACLs is that the first one needs a waiting period to get the changes after creation (around a minute).
ACL Locations (in the UI)
When creating a new ACL in the UI, there is actually a choice as to where you create an ACL policy and that choice does affect what that policy controls. The most obvious place to create an ACL policy is under the administrator gear icon at the top right. If you have access to that and create a policy there, that policy can include both types of ACL rules as described above (System and Project). However, it is also possible to create rules inside a project (under the Project Settings gear at the bottom left). Policies created in this second location are only Project ACLs. The ability to access or edit these is controlled by ACL policies as well. System admins have access to all options but you might wish to let project admins manage the ACL settings inside their own projects.
ACL basic components
Rundeck ACLs share the basic structure components, these components are:
The context clause
The context section declares the scope of the ensuing policy description. Rundeck ACLs allow two kinds of context: project and application. These are equivalent to the rule types mentioned previously.
The first one declares the name of the project(s) for which the policy applies. Its value is a String and can be a regular expression, for which the project name must match to apply.
The second one applies to the Rundeck system, so the only value admitted is "rundeck", in the following way:
context:
application: 'rundeck'
The for clause
The for section declares a set of resource types, each containing a sequence of matching rules which allow or deny certain actions.
Resource types declare the type of a specific resource for the match, and the generic "resource" is used to declare rules for all resources of a certain type. These resources could be job, node, adhoc, project, and resource.
Rules (inside for clause)
Each rule has one or more of these Action entries:
`allow` - the actions allowed

`deny` - the actions denied
It also has one or more of these "Matching" entries:
`match` - regular expression matches

`equals` - equality matches

`contains` - superset membership matches

`subset` - subset membership matches
Each Matching entry is composed of property: value, which declares what property of the resource to test, and what value or values to apply the matching rule to.
Example (match clause):
In the following example, only the group my_role can access the nodes where the name starts with the “node” string.
description: [read, run] on nodes where the name starts with "node"
context:
  project: MyProject
for:
  node:
  - match:
      nodename: node.*
    allow: [read,run]
by:
  group: my_role
The by/notBy clauses
The by section of a policy is specifying who this rule does or does not apply to.
In by section the ACL needs to know the username or group exact match, group:GROUP - matches a group name exactly and user:USER - matches a username exactly.
by:
  	username: 'bob'
The notBy is a variation of the by clause that only works on deny, it follows the same pattern using username and group and urn (to specify a username or group exact match, like urn: 'group:some.group') entries but in this case, the policy applies to any subject not matched. Example:
notBy:
  	username: 'bob'
Creating a new ACL
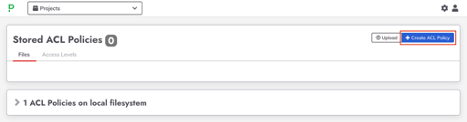
To create a new ACL, click on the Gear Icon > Access Control and click on the “+ Create ACL Policy” button (under stored ACL Policies).
Note for those considering the Enterprise product, PagerDuty Runbook Automation uses a user-friendly wizard to create rules using the GUI directly instead of typing all rules on the YAML text editor.
System Context ACL Example
In most cases, the first thing you need to do in a policy is to provide access to 1 or more projects. Below the first snippet provides read access to “ProjectY” for any users who belong to “my_role.” In effect, this doesn’t do very much by itself but is necessary to give someone project access, regardless of what they will be doing inside the project.
description: System-level read access to a specific project
context:
  application: rundeck
for:
  project:
  - equals:
  	name: ProjectY
	allow: read
by:
  group: my_role
PagerDuty Runbook Automation ACL Wizard Example
The following example shows how to create a user and give Access to the MyProject project and their jobs and nodes exclusively.
Creating a role and user.
- As an
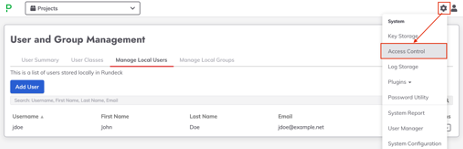
adminuser, click on the Gear Icon and select “User Manager”.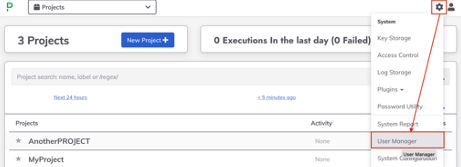
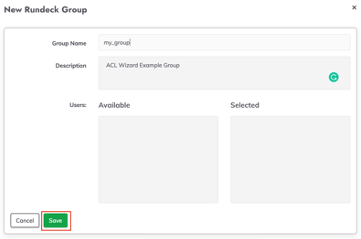
- Then click on the Manage Local Groups tab, add a new group called
my_groupand save.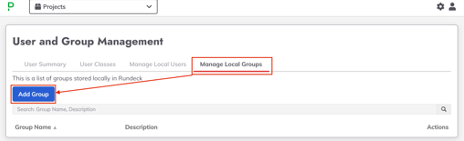
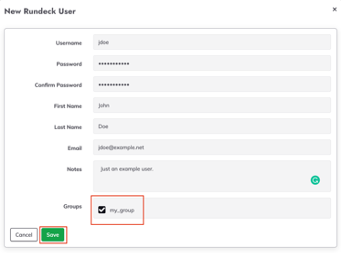
- Now click on the Manage Local User tab and create a new user called
jdoe(and click on themy_groupcheckbox to addjdoeuser tomy_grouprole.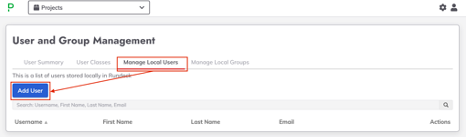
Creating the ACL via Wizard:
- Click on the Gear Icon and select “Access Control”
- Give it a name (“MyACL” in the example) and click on the “New Rule” button.
- The first rule is to give read access to a specific project (called “MyProject”). On the context section select “System”, on the “By” section select “Group” and put the
jdoerole (my_group). In the “For” section select “Project” then in the “Params” list select “equals” and put the project name in the next textbox. In the Action just click on “View (read) and click on the “Add Rule” button. Then save the rule.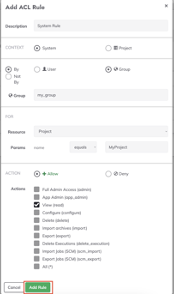
- Add a new rule, in this case a new Project context rule (focused on “MyProject” project and
my_groupGroup). Select Job in the “For” section and click on the following actions: “Read”, “View” and “Run”, then save this rule.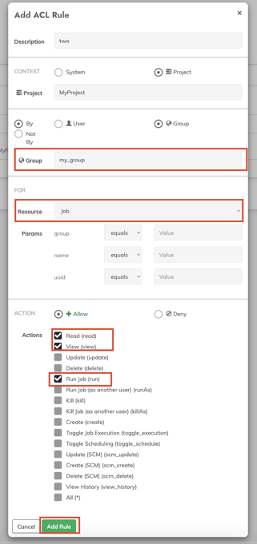
- The third rule allows
my_groupto execute jobs over the Project nodes. Create another Project rule (also focused on the “MyProject” project and my_group Group). In the “For” section select “Node”, in “nodename” (“Params” section) set “matches” in the next list and put the desired node filter (.* to all project nodes). Then select “Read” and “Run” checkboxes in the “Actions” sections and save.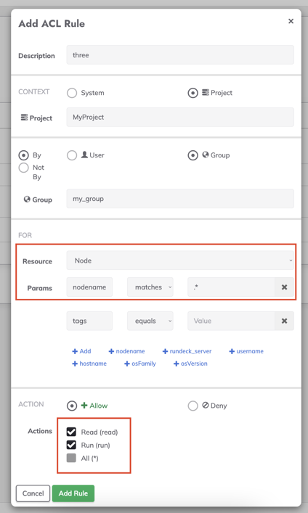
- Now the ACL is created, if you log in as a jdoe user you can see that the user only can see the MyProject project and their jobs.

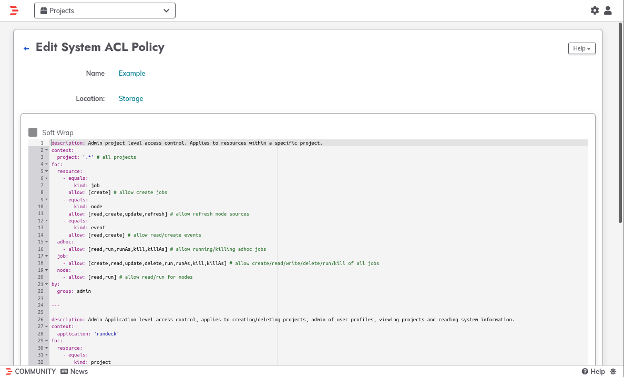
Project Context Example ACL
This is a common scenario. In this case, the role my_role has access to all MyProject jobs.
description: Project-level Access to Create and Delete Jobs
context:
  project: MyProject
for:
  resource:
  - equals:
  	kind: job
	allow: '*'
by:
  group: my_role
---
description: Allow [read, view, update, run, create] for job
context:
  project: MyProject
for:
  job:
  - allow: [read,view,update,run,create]
by:
  group: my_role
Access to Multiple Projects
In the following scenario, the group my_role has access only to PROJECT_A and PROJECT_B.
description: projects context ACL.
context:
  project: 'PROJECT_A|PROJECT_B'
for:
  job:
	- allow: [read,run]
  node:
	- allow: [read,run]
by:
  group: my_role

---

description: app context ACL.
context:
  application: 'rundeck'
for:
  project:
	- match:
    	name: 'PROJECT_A|PROJECT_B'
  	allow: [read]
  storage:
	- allow: [read]

by:
  group: my_role
Access to a Specific Job Group
In this scenario, only user1 and user2 can read and run the jobs marked on my_group group on MyProject project. For that, the equals subsection needs to point to the group element.
description: project context ACL.
context:
  project: MyProject
for:
  resource:
	- allow: [run,read]
  job:
	- equals:
    	group: my_group
  	allow: [run,read]
  node:
	- allow: [read,run]
by:
  username: [user1,user2]


---

description: app context ACL.
context:
  application: 'rundeck'
for:
  project:
	- match:
    	name: MyProject
  	allow: [read]
  storage:
 	- allow: [read]
by:
  username: [user1,user2]
At the end of any definition (system and project) the by: statement refers to who is the user(s) that can access the jobs, but it's possible to use roles instead of defining the user one by one.
by:
  group: myrole
Resources
- Find more examples in the ACL Recipes section and in
/etc/rundeck/etcpath (RPM/DEB based installation), the.aclpolicy_templatefiles contain examples of common ACLs scenarios. - The official documentation explains any ACL element with a definition example.
- This Rundeck Resources entry by Nathan Fluegel.
- And the recording from this Office Hours on Best Practices for Setting up Rundeck ACLs.