
Deploy Rundeck on AWS with Terraform
Deploy Rundeck on AWS with Terraform
What is Terraform?
Terraform is an infrastructure as code (IaC) tool that lets you define reusable and shareable resources with code. Terraform can manage components like computing and networking resources.
It is possible to quickly deploy and/or destroy a complete Rundeck environment using Terraform, as opposed to spending time doing the same thing manually using the AWS web interface / AWS CLI tool. Terraform allows you to deploy, release, and scale a fully functional Rundeck instance in a cloud infrastructure from a code definition (defined in .tf files).
With the IaC focus, a complete Rundeck production environment may be preserved for instantaneous redeployment in exact accordance with specifications. Additionally, a Terraform deployment lets you manage the resources in each layer jointly and takes care of dependencies between tiers automatically.
In this guide, we will show you how to deploy Rundeck (or commercial Runbook Automation) on AWS cloud infrastructure using a Terraform deployment project.
Prerequisites
To complete the tasks in this guide you’ll first need to install the following:
- Terraform 1.0 or later (available here).
- AWS CLI tool (available here), required by the Terraform AWS provider.
- Configure the AWS CLI using a valid AWS user. Use the
aws configurecommand to configureawsusing your AWS credentials (AWS Access and Secret keys).
Deployment of Rundeck as a Terraform project
Create an SSH keypair to interact with AWS in order to use the code. Create an example private key named example and a public key named example.pub, and run the following command in terminal (substituting the path to your project directory):
ssh-keygen -t rsa -b 4096 -C "your_email@example.com" -f /path/of/terraform/project/directory/example
Files
This project contains a few files with specific goals, these files are:
terraform.tf: Terraform provider definition.variables.tf: Project variables are stored here.vpc.tf: AWS VPC definition.subnet.tf: AWS Subnet definition.secgroup.tf: AWS Security group definitions.instances.tf: AWS EC2 definition.output.tf:Everything the project should print to the screen.
terraform.tf file
This file defines the Terraform provider information and the minimum required version needed by the terraform init command. Terraform providers are a logical abstraction of upstream APIs.
provider – defines main AWS cloud parameters like region (taken from the variables.tf file).
terraform – defines required terraform client minimum version, provider source, and minimum provider version.
# default Terraform provider: AWS
provider "aws" {
 profile = "default"
 region  = var.region
 default_tags {
   tags = {
     env = "example",
   }
 }
}

# Terraform requisites
terraform {
 required_version = ">=1.0"
 required_providers {
   aws = {
     source  = "hashicorp/aws"
     version = "~> 5.0"
   }
 }
}
variables.tf file
This file contains the Terraform project "global variables" including the CIDR block (for AWS VPC), the default region, and the default availability zone. This info is used across all .tf files.
# CIDR block
variable "vpc_cidr_block" {
 description = "vpc variable"
 type        = string
 default     = "10.20.0.0/16"
}

# default AWS region
variable "region" {
 default = "eu-north-1"
}

# default availability zone
variable "zone_a" {
 default = "eu-north-1a"
}
vpc.tf file
This file contains all VPC related definitions, including the Internet Gateway and default Route Table.
aws_vpc – provides AWS VPC resource elements like cidr_block (The VPC IPv4 CIDR block) and enable_dns_hostname (A boolean flag to enable/disable DNS hostnames in the AWS VPC).aws_internet_gateway – defines the AWS Gateway needed to access the internet.aws_route_table – defines a set of rules, called routes, that determine where network traffic from subnet or gateway is directed.
# AWS VPC
resource "aws_vpc" "example" {
 cidr_block           = var.vpc_cidr_block
 enable_dns_hostnames = true
 tags = {
   "Name" = "Rundeck Terraform Deployment Example VPC"
 }
}

# internet gateway
resource "aws_internet_gateway" "igw-example" {
 vpc_id = aws_vpc.example.id
 tags = {
   "Name" = "Rundeck Terraform Deployment Example Internet Gateway"
 }
}

# route table
resource "aws_route_table" "route_table-pub-example" {
 vpc_id = aws_vpc.example.id
 route {
   cidr_block = "0.0.0.0/0"
   gateway_id = aws_internet_gateway.igw-example.id
 }
 tags = {
   "Name" = "Rundeck Terraform Deployment Example Route Table"
 }
}
subnet.tf file
Contains the VPC Subnet information.
aws_subnet – defines the internal network for the EC2 Instance, this includes the availability zones.aws_route_table_association – provides a resource to create an association between an AWS Route Table and a Subnet or an AWS Route Table and an AWS Internet Gateway.
# subnet information
resource "aws_subnet" "subnet-example" {
 vpc_id            = aws_vpc.example.id
 availability_zone = var.zone_a
 cidr_block        = "10.20.0.0/24"
 tags = {
   "Name" = "Rundeck Terraform Deployment Example Subnet"
 }
}

# association to route table
resource "aws_route_table_association" "route_table_assoc-example" {
 subnet_id      = aws_subnet.subnet-example.id
 route_table_id = aws_route_table.route_table-pub-example.id
}
secgroup.tf file
This file defines all Security Group info, enabling ports 22 TCP (for SSH connections) and 4440 (specifically for Rundeck).
aws_security_group – creates the VPC Security Group, followed by the specific rules.
aws_security_group_rule – defines a series of rules to give or deny access to specific services or TCP ports, in this case, the SSH protocol and default Rundeck ports are allowed (22 and 4440).
# AWS Security Group
resource "aws_security_group" "secgroup-example" {
 depends_on  = [aws_vpc.example]
 name        = "secgroup-example"
 description = "Security Group for Rundeck Terraform Deployment Example"
 vpc_id      = aws_vpc.example.id
 tags = {
   Name = "Rundeck Terraform Deployment Example Security Group"
 }
}

# Rundeck (port 4440 by default)
resource "aws_security_group_rule" "rundeck" {
 type              = "ingress"
 description       = "rundeck"
 from_port         = 4440
 to_port           = 4440
 protocol          = "tcp"
 cidr_blocks       = ["0.0.0.0/0"]
 security_group_id = aws_security_group.secgroup-example.id
}

# SSH service (port 22)
resource "aws_security_group_rule" "ssh" {
 type              = "ingress"
 description       = "ssh"
 from_port         = 22
 to_port           = 22
 protocol          = "tcp"
 cidr_blocks       = ["0.0.0.0/0"]
 security_group_id = aws_security_group.secgroup-example.id
}

# outcoming rule to "all", only for testing, the aim is to restrict the access to some "allowed" clients.
resource "aws_security_group_rule" "all" {
 type              = "egress"
 description       = "all"
 from_port         = 0
 to_port           = 0
 protocol          = "-1"
 cidr_blocks       = ["0.0.0.0/0"]
 security_group_id = aws_security_group.secgroup-example.id
}
instances.tf file
This file defines the EC2 Rundeck instance. Below are some interesting parameters.
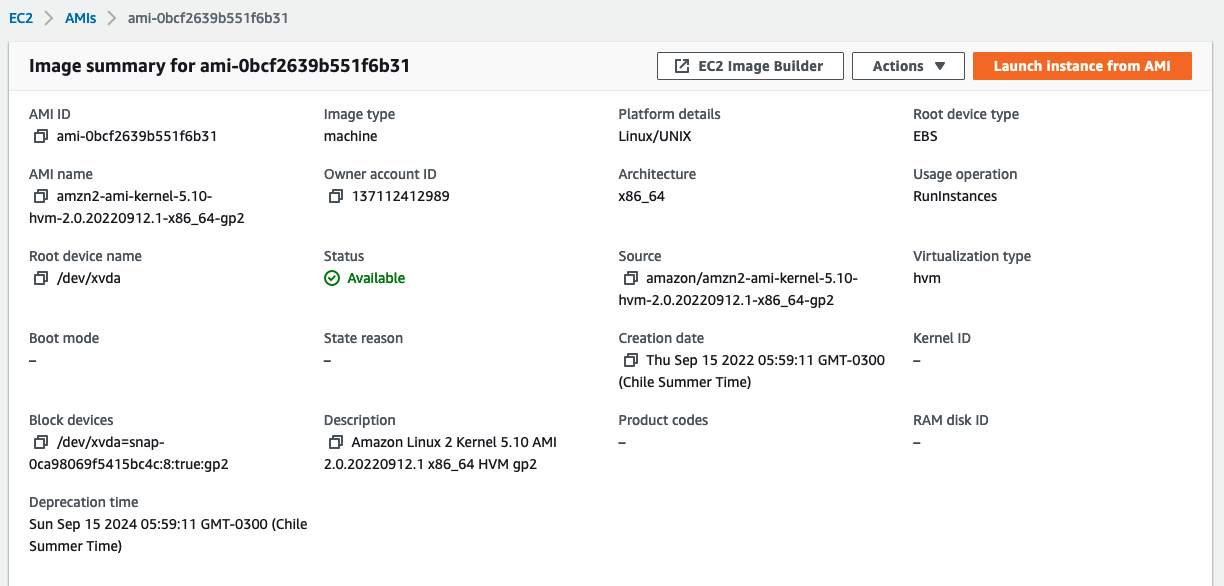
The ami parameter is the EC2 base image. This example will be deployed to the AWS eu-north-1 region, so the ami-0bcf2639b551f6b31 AMI must be available in that specific region.
The same applies to the instance_type parameter, the image must be available in the desired region.
The user_data section (explained here) is a script that updates the whole OS, installs, configures, and launches Rundeck.
In the public_key section, input the public key content that was generated in the first section of this guide as this is needed to access the EC2 instance via SSH.
# key pair info to access the instance
resource "aws_key_pair" "example" {
 key_name   = "example"
 public_key = "your_example.pub_conent_here"
}

# the EC2 instance details
resource "aws_instance" "example" {
 ami                         = "ami-0bcf2639b551f6b31"
 subnet_id                   = aws_subnet.subnet-example.id
 instance_type               = "t3.large"
 key_name                    = "example"
 vpc_security_group_ids      = ["${aws_security_group.secgroup-example.id}"]
 private_ip                  = "10.20.0.100"

 # install and configure rundeck, then enables and launch the service
 # user: admin, password: eSWsAAUBRdhS
 user_data                   = <<-EOF
               #!/bin/bash
               sudo su
               yum -y update
               amazon-linux-extras install java-openjdk11
               curl https://raw.githubusercontent.com/rundeck/packaging/main/scripts/rpm-setup.sh 2> /dev/null | bash -s rundeck
               yum -y install rundeck
               rdeck_ip=$(curl http://checkip.amazonaws.com)
               sleep 2
               sed -i "s/localhost/$rdeck_ip/g" /etc/rundeck/rundeck-config.properties
               sed -i "s/localhost/$rdeck_ip/g" /etc/rundeck/framework.properties
               echo "admin:eSWsAAUBRdhS,user,admin,architect,deploy,build" > /etc/rundeck/realm.properties
               systemctl enable rundeckd.service
               systemctl start rundeckd.service
               EOF
 associate_public_ip_address = true

 # 10gb disk instance
 root_block_device {
   volume_size = 10
 }

 # EC2 instance tags
 tags = {
   Name        = "Rundeck EC2 Deployment"
   Description = "Rundeck Terraform Deployment EC2 instance"
 }
}
output.tf file
This file defines the output after launching all AWS components. In this case, the instance has a public IP. Access the Rundeck instance through http://<instance_ip>:4440.
In this case, the public_ip block shows the EC2 instance public IP after deployment.
# after the deployment Terraform must print the external EC2 instance public IP
output "public_ip" {
 value       = aws_instance.example.public_ip
 description = "Rundeck Instance Public IP"
}
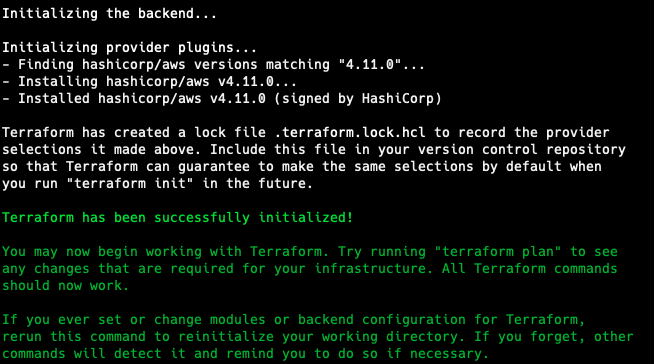
Initializing the Terraform Provider
The first step to running the Terraform code is to download the AWS provider by using the terraform init command. Note that this only happens once.
Testing the environment before deploying
Test all resources using the terraform validate command. This command checks all files to make sure there are no syntax problems.

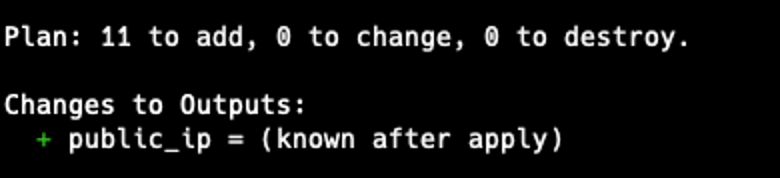
View all changes using the terraform plan command.
Deploying Rundeck
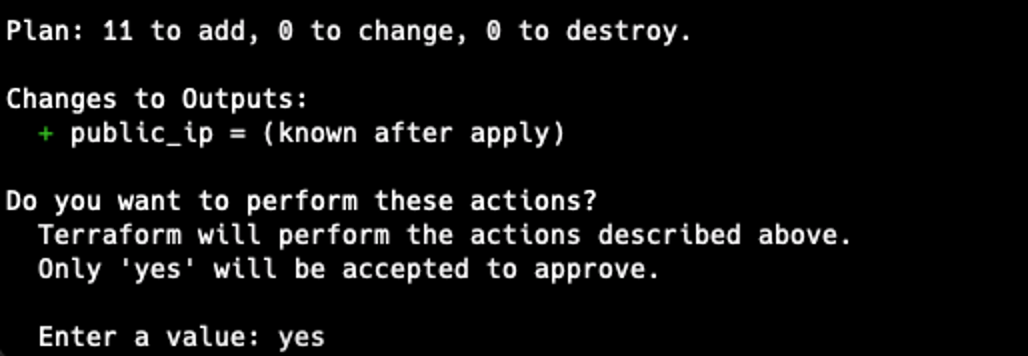
To deploy Rundeck, use terraform apply, check all changes, and type yes if all is ok to proceed.
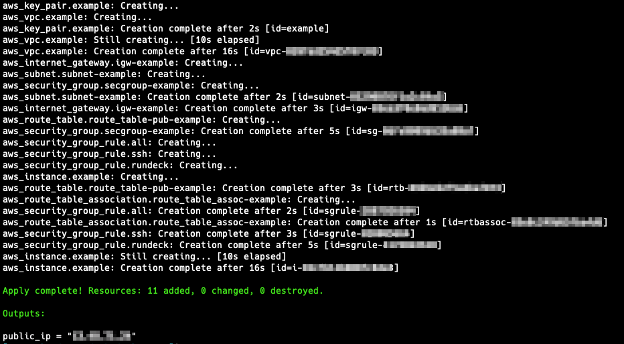
Now the Rundeck instance is running at the EC2 instance.
Deconstructing the entire deployment
With the terraform destroy command, all the resources will be destroyed.
Resources
- Terraform Documentation (Terraform Official Documentation).
- Rundeck installation on CentOS / RedHat-based Operating Systems (Rundeck Documentation).
- Rundeck Terraform Provider How-to (Rundeck Learning Section).