
Amazon EC2 Node Source
Amazon EC2 Node Source
Amazon's EC2 (Elastic Cloud Compute) is a cloud service that provides on-demand and scalable virtual-machines for dynamic infrastructure. It is one of the most popular cloud services used for developing, testing and hosting applications for businesses.
In order to automate tasks on EC2's - such as executing commands or rebooting - the instances must be populated into Rundeck's Node Inventory.
The EC2 Node Source, which retrieves the EC2 instances from one or more regions, is bundled into Runbook Automation and is also accessible to Community users here. This allows for targeted automation on EC2 instances - based off of instance-properties, tags, regions or Account ID's.
Configuring
Authentication
Follow the instructions outlined in the AWS Plugins Overview for Runbook Automation to authenticate with AWS.
Tips
If using AWS user credentials and a newer plugin version that allows it, store the secret key in Rundeck Key Storage and choose it via the Secret Key Storage Path field instead of the Secret Key field in your Node Source.
Required EC2 permissions:
ec2:DescribeAvailabilityZonesec2:DescribeImagesec2:DescribeInstancesec2:DescribeRegions
Basic Configuration
Note
If using Rundeck Community, first download the plugin JAR from the Github repository. Copy the plugin file rundeck-ec2-nodes-plugin-X.Y.jar into your $RDECK_BASE/libext directory. The plugin contains all of the required dependencies.
- Navigate to Project Settings -> Edit Nodes and select the Sources tab.
- Click on Add a new Node Source and select AWS EC2 Resources.
- Provide credentials either via AWS user or AWS role. Do not specify both.
- To specify the region (or multiple regions) to integrate with, fill in the Endpoint field with the associated regional endpoint. All endpoints are of the syntax
https://ec2.aws-region.amazonaws.com. For example, the us-west-1 endpoint ishttps://ec2.us-west-1.amazonaws.com. See below for defining multiple regions. - Toggle Only Running Instances to determine whether both Running and Stopped instances should be retrieved, or just Running instances.
- Click Save on the Node Source and then click Save again on the Sources configuration page.
Tips
If self-hosting Rundeck in AWS and an AWS IAM role is assigned to the instance your server is running on, then you do not need to fill in the Access Key or Secret Key fields.
Advanced Configuration Options
- Assume Role ARN: Specify an IAM Role that Rundeck should use when authenticating with AWS.
- Synchronous Loading: Do not use internal async loading behavior. Rundeck 2.6.3+ uses an asynchronous nodes cache by default. You should enable this if you are using the Rundeck nodes cache.
- Async Refresh Interval: Unless using Synchronous Loading, minimum time in seconds between API requests to AWS (default is 30).
- Filter Params: Filter which EC2 instances are populated in the Node Inventory using the following syntax:
filter=value;filter2=value2. You can specify multiple filters by separating them with;, and you can specify multiple values by separating them with,.
For example:tag:MyTag=My_Tag_Value;instance-type=m1.small,m1.large
The available filter names are listed in AWS API - DescribeInstances. - HTTP Proxy Host: If hosting Rundeck behind a proxy-host, define the proxy hostname here.
- HTTP Proxy Port: If hosting Rundeck behind a proxy-host, define the proxy host port here.
- HTTP Proxy User: If hosting Rundeck behind a proxy-host with authentication, define the proxy host username here.
- HTTP Proxy Password: If hosting Rundeck behind a proxy-host with authentication, define the proxy host password here.
- Mapping Params: Node attributes are configured by mapping EC2 instances properties via a mapping configuration. The mapping declares the node attributes that will be set, and what their values will be set to using a "selector" on properties of the EC2 Instance object. Here is the default mapping:
description.default=EC2 node instance
editUrl.default=https://console.aws.amazon.com/ec2/home#Instances:search=${node.instanceId}
hostname.selector=publicDnsName,privateIpAddress
sshport.default=22
sshport.selector=tags/ssh_config_Port
instanceId.selector=instanceId
nodename.selector=tags/Name,instanceId
osArch.selector=architecture
osFamily.default=unix
osFamily.selector=platform
osName.default=Linux
osName.selector=platform
privateDnsName.selector=privateDnsName
privateIpAddress.selector=privateIpAddress
state.selector=state.name
tag.pending.selector=state.name=pending
tag.running.selector=state.name=running
tag.shutting-down.selector=state.name=shutting-down
tag.stopped.selector=state.name=stopped
tag.stopping.selector=state.name=stopping
tag.terminated.selector=state.name=terminated
tags.default=ec2
tags.selector=tags/Rundeck-Tags
username.default=ec2-user
username.selector=tags/Rundeck-User
Tips
You can configure the mapping source to start with the above default mapping with the Use Default Mapping property. Then, selectively change it either by setting the mappingParams or pointing to a new properties file with mappingFile.
For example, you can put this in the mappingParams field in the GUI to change the default tags for your nodes:tags.default=mytag, mytag2;tag.stopping.selector=;ami_id.selector=imageId
This would remove the "stopping" tag selector, and add a new "ami_id" selector.
- Mapping File: Filepath to a mapping property-mapping file.
- Use Default Mapping: Start with default mapping definition. (Defaults will automatically be used if no others are defined).
- Max API Results: Limit the number of instances retrieved per API call.
Connecting to EC2's for Commands and Scripts
In order to execute commands or scripts on EC2's, a Node Executor must be specified - either for the full Node Source or for a subset of EC2's within the Node Source. A few of the most common Node Executors are SSH, WinRM and Powershell, and Ansible.
With EC2's, there is also the option to use AWS's Systems Manager (SSM).
In order to specify a Node Executor for all EC2's, add the associated Node Executor properties to the Mapping Params field. For example, to use SSH:ssh-key-storage-path.default=keys/us-west-1-privKey;username.default=ubuntu
Or, to use SSM:ssm-accessKeyId.default=MY_AWS_ACCESS_KEY;ssm-secretKey.default=keys/aws_access_key
To declare Node Executors on a subset of EC2's within a given Node Source, use the Attribute Match Enhancer. For example, to specify the WinRM Node Executor for just Windows EC2's, use osName==windows in the Attribute Match box and node-executor:WinRMPython in the Attributes to Add box: 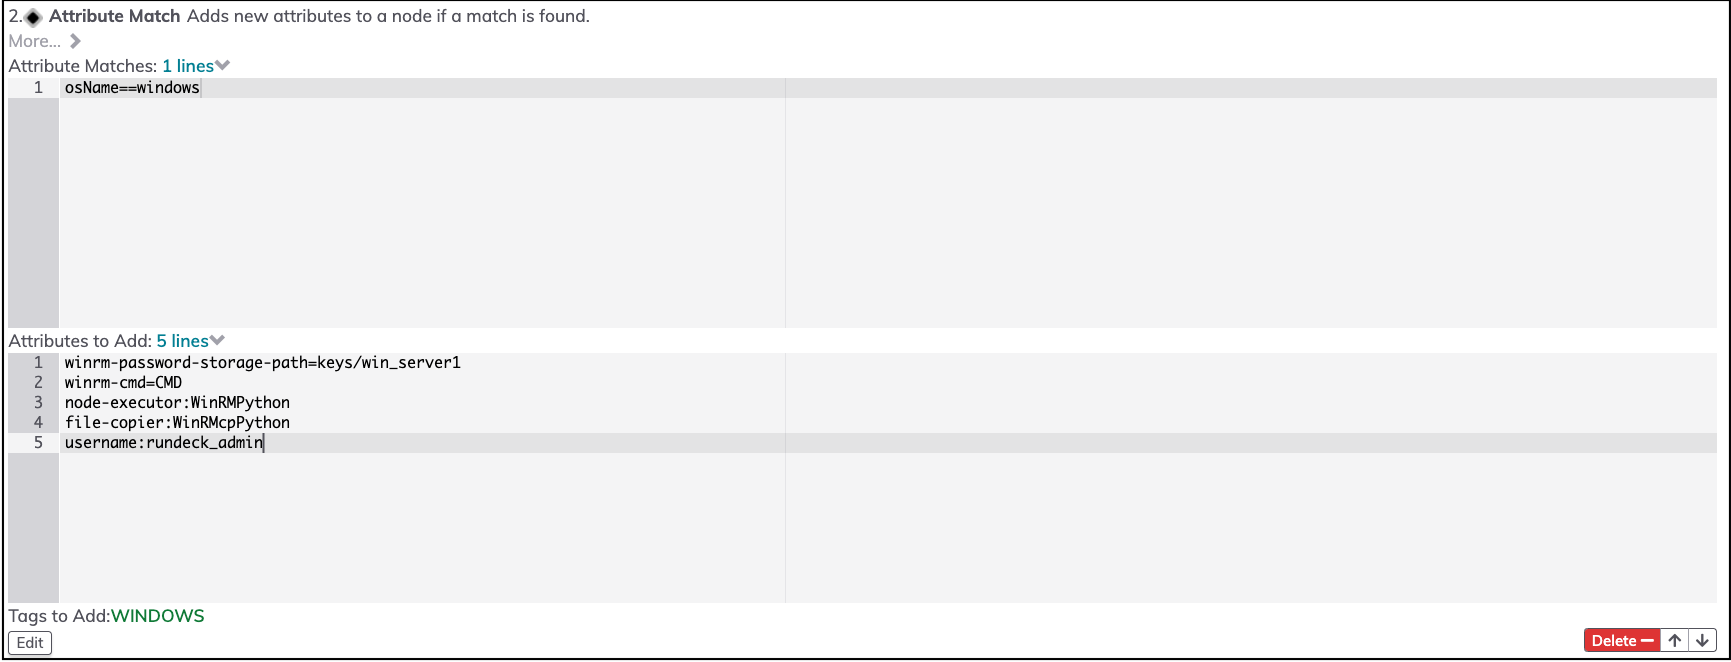
Note
If a Node Executor is not specified for the Node Source, then the Project's Default Node Executor will be used.
Integrating with Multiple Regions
In the Endpoint field, enter a comma-separated list of endpoints to integrate with multiple regions. For example:https://ec2.us-west-1.amazonaws.com, https://ec2.us-east-1.amazonaws.com, https://ec2.eu-west-1.amazonaws.com would integrate with the us-west-1, us-east-1, and eu-west-1 regions.
You can also input ALL_REGIONS and this will retrieve instances from all the regions that the provided credentials have access to. For the full list of endpoints, see Amazon EC2 Regions and Endpoints.
Integrating with Multiple AWS Accounts in a Single Project
It is possible to retrieve nodes from multiple AWS accounts in a single Rundeck project. After configuring the AWS EC2 Resources node source with credentials for a given AWS Account, simply click on Add a new Node Source and select the AWS EC2 Resources option again - this time configuring it with credentials for your other AWS Account. There is no limit to the number of AWS Accounts that you can integrate with in a given Rundeck project (or across multiple projects).
Advanced Mapping Configuration
The mapping consists of defining either a selector or a default for the desired Node fields. The "nodename" field is required, and will automatically be set to the instance ID if no other value is defined.
For purposes of the mapping definition, a field selector is either:
- An EC2 fieldname, or dot-separated field names
- "tags/" followed by a Tag name, e.g. "tags/My Tag"
- "tags/*" for use by the
attributes.selectormapping
Selectors use the Apache BeanUtils to extract a property value from the AWS API Instance class. This means you can use dot-separated fieldnames to traverse the object graph. E.g. "state.name" to specify the "name" field of the State property of the Instance.
format:
# define a selector for "property":
<attribute>.selector=<field selector>
# define a default value for "property":
<attribute>.default=<default value>
# Special attributes selector to map all Tags to attributes
attributes.selector=tags/*
# The value for the tags selector will be treated as a comma-separated list of strings
tags.selector=<field selector>
# the default tags list
tags.default=a,b,c
# Define a single tag <name> which will be set if and only if the selector result is not empty
tag.<name>.selector=<field selector>
# Define a single tag <name> which will be set if the selector result equals the <value>
tag.<name>.selector=<field selector>=<value>
Note that a ".selector" value can have multiple selectors defined, separated by commas, and they will be evaluated in order with the first value available being used.
For example, nodename.selector=tags/Name,instanceId, which will look for a tag named "Name", otherwise use the instanceId. You can also use the <field selector>=<value> feature to set a tag only if the field selector has a certain value.
Tags selector
When defining field selector for the tags node property, the string value selected (if any) will be treated as a comma-separated list of strings to use as node tags. You could, for example, set a custom EC2 Tag on an instance to contain this list of tags, in this example from the simplemapping.properties file:
tags.selector=tags/Rundeck-Tags
So creating the "Rundeck-Tags" Tag on the EC2 Instance with a value of "alpha, beta" will result in the node having those two node tags.
The tags.selector also supports a "merge" ability, so you can merge multiple Instance Tags into the RunDeck tags by separating multiple selectors with a "|" character:
tags.selector=tags/Environment|tags/Role
Appending values
A field selector can conjoin multiple values using +, and can append literal text like the _ character for example.
# conjoin two fields with no separation between the values
# this will result in "field1field2"
<attribute>.selector=<field selector>+<field2 selector>

# conjoin multiple fields with a literal string delimiter
# this will result in "field1-*-field2"
<attribute>.selector=<field selector>+"-*-"+<field2 selector>
Use a quoted value to insert a delimiter, with either single or double quotes.
Here is an example to use the "Name" instance tag, and InstanceId, to generate a unique node name for rundeck:
nodename.selector=tags/Name+'-'+instanceId
Default Rundeck Node Attributes
Rundeck node definitions specify mainly the pertinent data for connecting to and organizing the Nodes. EC2 Instances have metadata that can be mapped onto the fields used for Rundeck Nodes.
Rundeck nodes have the following metadata fields:
nodename- unique identifierhostname- IP address/hostname to connect to the nodesshport- The ssh port, if resolved to another port than 22 hostname will be set to<hostname>:<sshport>username- SSH username to connect to the nodedescription- textual descriptionosName- OS nameosFamily- OS family: unix, windows, cygwin.osArch- OS architectureosVersion- OS versiontags- set of labels for organizationeditUrl- URL to edit the definition of this node objectremoteUrl- URL to edit the definition of this node object using Rundeck-specific integration
In addition, Nodes can have arbitrary attribute values.
EC2 Instance Fields
EC2 Instances have a set of metadata that can be mapped to any of the Rundeck node fields, or to Settings or tags for the node.
EC2 fields:
- amiLaunchIndex
- architecture
- clientToken
- imageId
- imageName
- instanceId
- instanceLifecycle
- instanceType
- kernelId
- keyName
- launchTime
- license
- platform
- privateDnsName
- privateIpAddress
- publicDnsName
- publicIpAddress
- ramdiskId
- rootDeviceName
- rootDeviceType
- spotInstanceRequestId
- state
- stateReason
- stateTransitionReason
- subnetId
- virtualizationType
- vpcId
- tags
EC2 Instances can also have "Tags" which are key/value pairs attached to the Instance.
A common Tag is "Name" which could be a unique identifier for the Instance, making it a useful mapping to the Node's name field.
Note that EC2 Tags differ from Rundeck Node tags: Rundeck tags are simple string labels and are not key/value pairs.
Additional Information & Contributing
More configuration and the opportunity to contribute to this open-source project is available at the Github repository.