WinRM Node Execution
WinRM Node Execution
These plugins will only execute through Runbook Automation installed on Windows or an Enterprise Runner installed on Windows.
There are two plugins:
- WinRM File Copier: Copies files to the remote node for execution by the Node Executor. This plugin would be used to execute any Script steps in your workflows, or to copy your own files stored on the Runbook Automation host.
- WinRM Node Executor Python: Executes the command and script steps.
The plugins can be enabled in the Project Configuration page by selecting the WinRM Node Executor Python and WinRM File Copier as the default Node Executor and File Copiers.
Authentication Types
Authentication can happen in two ways, via trusted domain account or by username and password.
Hosts in Trusted Domain
When all hosts are in a trusted domain, remote execution requires just the username to access the remote hosts. Authentication will be made to the remote nodes as the domain user account that is executing the Rundeck server process.
Username and Password
If all hosts are not in a trusted domain, both username and password are required to access the remote hosts.
Plugin Configuration
Trusted Domain authentication will be used by default, unless a username and password are configured to be used.
You can configure the plugins to use a password via the Key Storage facility when accessing remote hosts.
- password storage - using a password that is stored in the Key Storage facility.
You can configure the username and password or password storage path at a project-wide level, on a per-node basis or upon job execution.
To pass the credentials upon job execution, it is required for the job to have the following job options:
- username: to override the username defined in Project or Node settings.
- winrmpassword: to overrise the password defined in the Project or Node settings. This should be using 'Secure 'Input Type.
Password Storage
Passwords can be stored securely in the Runbook Automation Keystore facility. These passwords can be stored in a tree like structure to help you organize them any way you wish. The passwords can be referenced using an attribute named "password-storage-path". When Rundeck needs the password, it looks up the file as referenced by the storage path, reads, decrypts, and passes the value to the plugins.
Node Configuration
Each host is configurable via "nodes" in the project resource model. Nodes are defined in terms of attributes.
Attributes
- hostname: The hostname of the remote node accessible to the Rundeck server host.
- username: The login account name to the remote host.
- password-storage-path: The path to the file containing the password in the keystore. This path will start with "keys/".
- connectionUri: Alternate connection parameters as a URI. e.g. "https://hostname:port"
- output-charset: The character encoding used for outputs of the node. Necessary in very specific cases where the output of commands is not printed correctly using the default charset. Default: 'utf-8'
Example resource model definitions
The following example show a node defined using the XML format.
Note the password-storage-path attribute referencing the key path.
 <node name="winhost123"
       hostname="xxx.xxx.xxx.xxx"
       username="myaccount"
       password-storage-path="keys/winhost123.passwd"
       output-charset: 'utf-8'.../>
Project Configuration
The Password storage path can be configured at the project level. In the Project Configuration page, set the Password Storage Path to a key path. The path can contain references to information from the node or user who is executing the command, for example:
keys/nodes/${node.name}.password
or
keys/users/${job.username}.password
WinRM Setting to use WinRM Node Executor Plugin
In order to connect Rundeck with remote Windows nodes, it is necessary to set WinRM in both, the server and the remote nodes.
On the rundeck server
winrm quickconfig
winrm set winrm/config/client @{TrustedHosts="*"}
On the remote nodes
winrm quickconfig
winrm set winrm/config/service/Auth @{Basic="true"}
winrm set winrm/config/service @{AllowUnencrypted="true"}
winrm set winrm/config/winrs @{MaxMemoryPerShellMB="1024"}
Other setting
To enable the execution of remote command:
Set-ExecutionPolicy RemoteSigned
To enable permission to a user to execute remote command:
Set-PSSessionConfiguration -ShowSecurityDescriptorUI -Name Microsoft.PowerShell
Increase the concurrent shell issue:
set-item wsman:\localhost\shell\maxshellsperuser 50
Enable CredSSP Authentication On Windows Domain
On the Rundeck server
Enable CredSSP
Open a powershell windows and run:
Enable-WSManCredSSP -Role "Client" -DelegateComputer "*.something.com"
Where something.com is the DNS domain of the target computer
or
Enable-WSManCredSSP -Role "Client" -DelegateComputer "*"
To enable unencrypted access for the purpose of establishing a connection, run this command on both the Rundeck server and the remote nodes:
winrm/config/service @{AllowUnencrypted="true"}
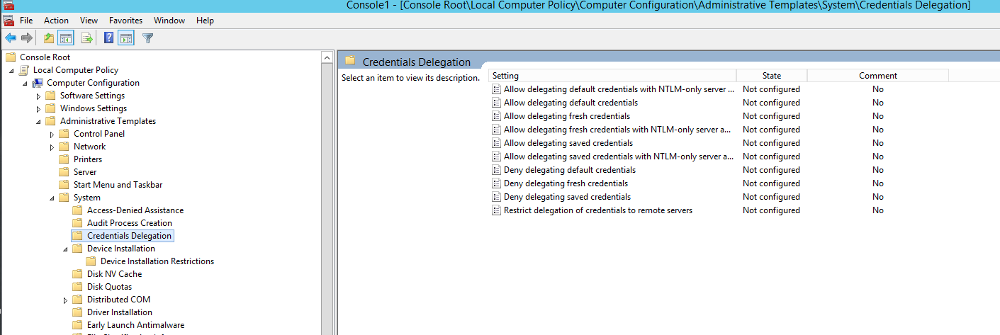
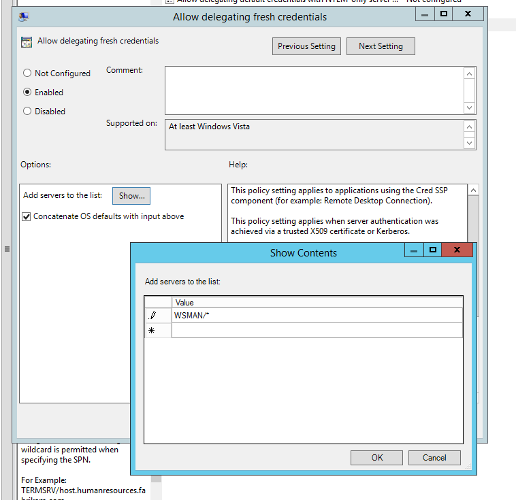
Allow Delegating Fresh Credentials
- Click Start, type mmc and then click OK.
- Click File and then click Add/Remove Snap-in.
- Click Group Policy Object and then click Add.
- Select Local Computer and then click Finish.
- Go to Computer Policy\Administrative Templates\System\Credentials Delegation\Allow Delegating Fresh Credentials → Set to enabled

- Add WSMAN/* to list of computers and check the box for Concatenate OS defaults with input above.

Enable CredSSP authentication on Winrm Client
Open a CMD Prompt as an Administrator user and execute:
winrm set winrm/config/client/auth @{CredSSP="true"}
You need to have winrm service configured and running.
On the remote node
Enable CredSSP
Open a powershell windows and run:
Enable-WSManCredSSP -Role "Server"
Make sure that you enable the CredSSP on WinRM Service settings
To get the WinRm Service config:
winrm get winrm/config/service
To enable the CredSSP:
winrm set winrm/config/service/auth @{CredSSP="true"}
To enable unencrypted access for the purpose of establishing a connection, run this command on the Rundeck server and the remote nodes:
winrm/config/service @{AllowUnencrypted="true"}
Troubleshooting
Using non-administrator user
If you are using a non-administrator user (or a not- domain-administrator user) to execute command to remote nodes, you need to set up the access on the remote machine ( to the user or some of its groups, eg: Domain User group).
To add permissions to non-administrator user to execute remote commands:
Set-PSSessionConfiguration Microsoft.Powershell -ShowSecurityDescriptorUI
Access is denied error
If you get "Access is denied" error when you try to access to a shared folder on the remote node, it is possible that you must use the CredSSP Authentication.
Then, you can define the authentication type like:
<node name="XXXXX"
      description="Windows Server 2012"
      tags="Win2012"
      hostname="XXXXX"
      osArch="amd64"
      osFamily="windows"
      osName="Windows Server 2012"
      osVersion="6.3"
      username="rundeckuser@Domain.Local" password-storage-path="keys/xxxxx"
      ps-authentication-type="CredSSP" />
If you get this error, you have to change the network category:
WinRM service is already running on this machine.

WSManFault
   Message
       ProviderFault
           WSManFault
               Message = WinRM firewall exception will not work since one of the network connection types on this machine is set to Public. Change the network connection type to either Domain or Private and try again.
Error number:  -2144108183 0x80338169

WinRM firewall exception will not work since one of the network connection types on this machine is set to Public. Change the network connection type to either Domain or Private and try again.
Workaround using PowerShell as Administrator User:
# (to get the InterfaceIndex)
Get-NetConnectionProfile

Set-NetConnectionProfile -InterfaceIndex [INTERFAZ_INDEX] -NetworkCategory Private
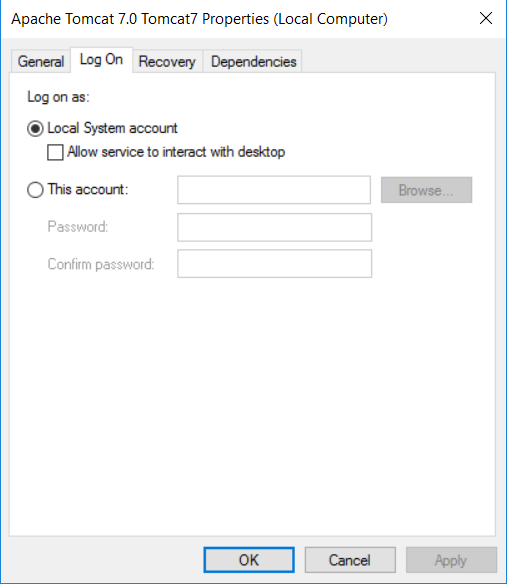
It could be necessary to change the user’s log-on in tomcat service when the remote connection does not work:

For more information about installing and configuring Windows Remote Nodes, see Windows Remote Nodes.
Use utf-8 scripts
If you need to use UTF-8 scripts from an unix instance to a windows node, powershell is unable to identify correctly the encoding of UTF-8 files without bom. You can force the file to be UTF-8 with bom adding the file-copier-add-utf8-bom property to the node:
<node
  name="windowsServer"
  description="Windows server node"
  tags="windows"
  osArch="x86_64"
  osFamily="windows"
  osName="Windows 10"
  osVersion="10"
  hostname="192.168.56.101:5985"
  file-copier-add-utf8-bom="true"
  />
