
SSH Node Execution
SSH Node Execution
Rundeck employs SSH as its default protocol for remote command execution and SCP for script file transfers to remote nodes. For local (server) nodes, commands and scripts are executed directly on the system.
Core Requirements
The SSH plugin requires specific node configuration parameters for establishing secure connections:
The essential node properties include:
hostname: the hostname of the remote node. It can be in the format "hostname:port" to indicate that a non-default port should be used. The default port is 22.username: the username to connect to the remote node.
Authentication must be configured using either SSH public/private key pairs or SSH Password authentication for both SSH and SCP operations.
There are multiple options for SSH plugin suites. The current recommended option is the SSH-J package which supports the latest encryption algorithms, and is set as the default for new projects.
Basic Configuration
Standard node configuration involves:
- Defining the hostname attribute (format: "hostname:port", with port 22 as default)
- Specifying the username attribute for remote access
- Implementing public/private key authentication between the Rundeck server and target nodes
This configuration enables both remote command execution and script deployment capabilities.
Security Considerations
For enhanced security, it is recommended to implement firewall rules that restrict SSH access (port 22) to authorized endpoints only. Additional configuration options are detailed in the subsequent sections.
Additional Configuration
See below for more configuration scenarios and options.
Sudo Password Authentication
The SSH plugin also includes support for a secondary Sudo Password Authentication. This simulates a user writing a password to the terminal into a password prompt when invoking a "sudo" command that requires password authentication.
Using Key Storage for SSH
Passwords, Passphrases and Private Keys can all be stored in the Key Storage Facility and used with the built-in SSH plugins for Node Execution and File Copying.
For specific usage, see below.
The storage facility can be configured to store the keys on disk, or in the database, and can use plugins to provide encryption of the data.
When uploaded, private keys and passwords are identified by a path which locates them in the storage facility. The path looks similar to a unix filesystem path.
All SSH Keys and Passwords are stored under the keys/ top-level path.
Note: In general if a "key storage path" and another configuration option are both specified, the "key storage path" will be used.
It is possible to embed context property references within the key storage path such as ${job.project}. See Job Variables Reference.
SFTP File Copier
To use SFTP as the method for dispatching files and executing scripts against remote nodes, use the following steps:
- Navigate to Project Settings -> Edit Configuration.
- Click on Default File Copier.
- From dropdown menu, select SSHJ-SCP:
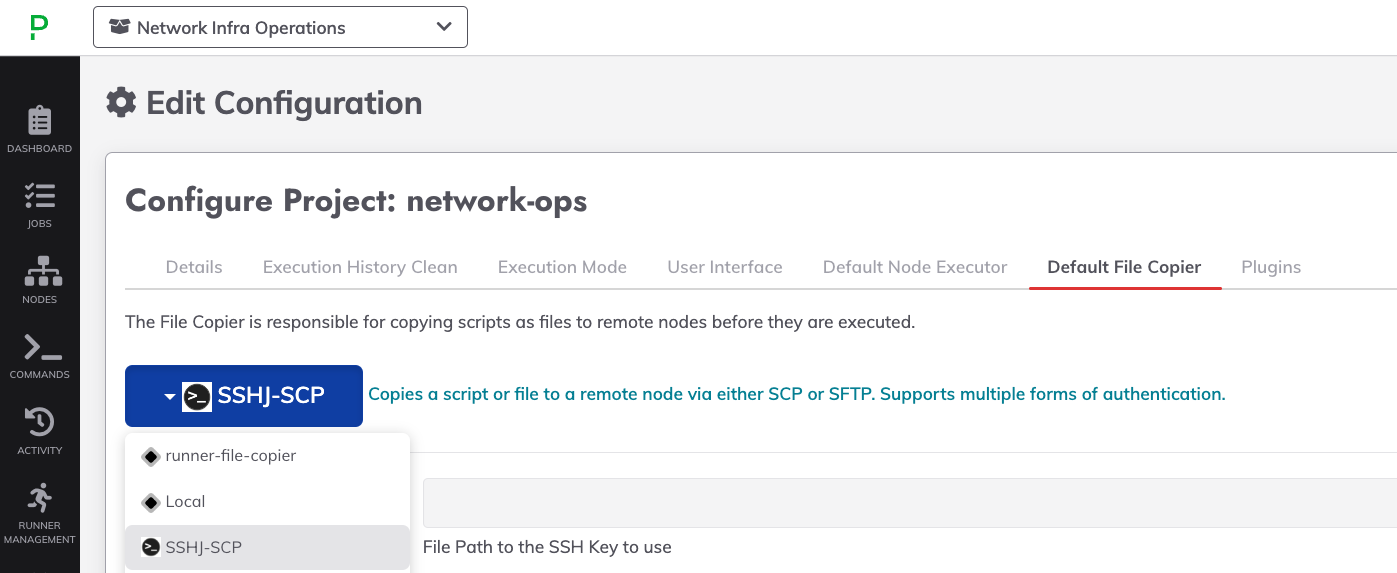
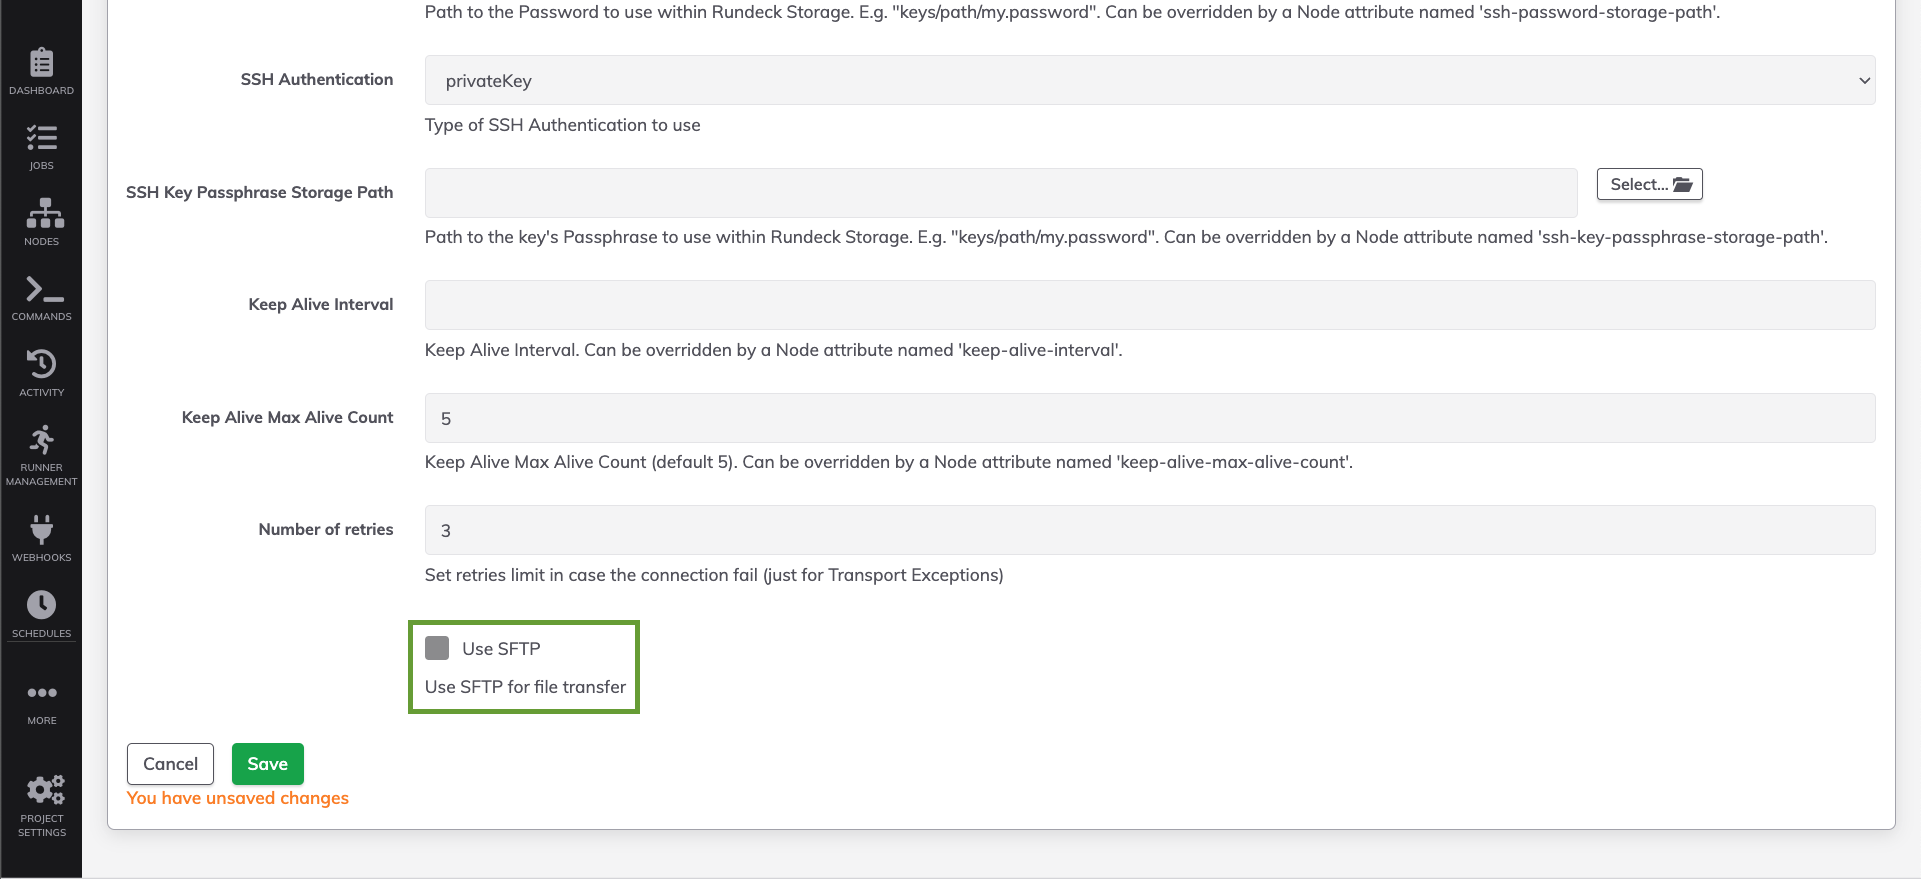
- Scroll to the bottom of the configuration page and select the checkbox for Use SFTP:
SCP File Copier
In addition to the general SSH configuration mentioned for in this section, some additional configuration can be done for SCP.
When a Script is executed on a remote node, it is copied over via SCP first, and then executed. In addition to the SSH connection properties, some attributes can be configured. See File Copier destination directory.
Authentication types
SSH authentication can be done in two ways, via password or public/private key.
By default, public/private key is used, but this can be changed on a node, project, or framework scope.
The mechanism used is determined by the ssh-authentication property. This property can have two different values:
passwordprivateKey(default)
When connecting to a particular Node, this sequence is used to determine the correct authentication mechanism:
- Node level:
ssh-authenticationattribute on the Node. Applies only to the target node. - Project level:
project.ssh-authenticationproperty inproject.properties. Applies to any project node by default. - Rundeck level:
framework.ssh-authenticationproperty inframework.properties. Applies to all projects by default.
If none of those values are set, then the default public/private key authentication is used.
Specifying SSH Username
The username used to connect via SSH is taken from the username Node attribute:
username="user1"
This value can also include a property reference to dynamically change it, for example to the name of the current Rundeck user, or the username submitted as a Job Option value:
${job.username}- uses the username of the user executing the Rundeck execution.${option.someUsername}- uses the value of a job option named "someUsername".
If the username node attribute is not set, then the static value provided via project or framework configuration is used. The username for a node is determined by looking for a value in this order:
- Node level:
usernamenode attribute. Can contain property references to dynamically set it from Option or Execution values. - Project level:
project.ssh.userproperty inproject.propertiesfile for the project. - Rundeck level:
framework.ssh.userproperty inframework.propertiesfile for the Rundeck installation.
Specifying SSH Config options
Default config options:
PreferredAuthentications: publickey,password,keyboard-interactiveMaxAuthTries: 1
SSH config options can be specified by setting the following properties:
- Node level:
ssh-config-KEYattribute on the Node. Applies only to the target node. - Project level:
project.ssh-config-KEYproperty inproject.properties. Applies to any project node by default. - Rundeck level:
framework.ssh-config-KEYproperty inframework.properties. Applies to all projects by default.
Specifying SSH Timeout options
SSH timeout options can be specified. The timeout values are in milliseconds.
A value of 0 means the timeout will be indefinite.
The precedence level is Node > Project > Rundeck.
Node level: attribute on the Node. Applies only to the target node.
ssh-connection-timeoutconnection timeoutssh-command-timeoutcommand timeout
Project level: Applies to any project node by default. Set property in Project Config (
project.properties).project.ssh-connection-timeoutconnection timeoutproject.ssh-command-timeoutcommand timeout
Rundeck level: Applies to all projects by default. Set property in
framework.properties.framework.ssh-connection-timeoutconnection timeoutframework.ssh-command-timeoutcommand timeout
Deprecated: The framework property framework.ssh.timeout will also be used for Connection timeout if set.
SSH Private Keys
Choose either:
If the Private Key is encrypted with a passphrase, see: SSH Private Key Passphrase.
SSH Private Keys On Disk
The default authentication mechanism is public/private key using a private key file stored locally on disk.
The built-in SSH connector allows the private key file to be specified in several different ways. It can be configured at these levels:
- Node
- Project
- Rundeck instance / Server
When connecting to the remote node, Rundeck will look for a property/attribute specifying the location of the private key file, in this order, with the first match having precedence:
- Node level:
ssh-keypathattribute on the Node. Applies only to the target node. - Project level:
project.ssh-keypathproperty inproject.properties. Applies to any project node by default. - Rundeck level:
framework.ssh-keypathproperty inframework.properties. Applies to all projects by default.
If the private key is encrypted with a passphrase use a "Secure Remote Authentication Option" to prompt the user to enter the passphrase when executing on the Node. See below.
It is possible to embed context property references within the keypath such as ${job.project}. See Job Variables Reference.
SSH Private Key Storage
Note: See Using Key Storage for SSH.
When connecting to the remote node, Rundeck will look for a property/attribute specifying the location of the private key storage path, in this order, with the first match having precedence:
- Node level:
ssh-key-storage-pathattribute on the Node. Applies only to the target node. - Project level:
project.ssh-key-storage-pathproperty inproject.properties. Applies to any project node by default. - Rundeck level:
framework.ssh-key-storage-pathproperty inframework.properties. Applies to all projects by default.
If the private key is encrypted with a passphrase, see SSH Private Key Passphrase below.
SSH Private Key Passphrase
To enable SSH Private Key authentication, first make sure the ssh-authentication value is set #authentication-types. Second, configure the path to the private key file (#ssh-private-keys).
Choose a method to provide a passphrase:
SSH Private Key Passphrase with a Job Option
Job Options can be used to supply a passphrase for privateKey authentication. When the user executes the Job, they are prompted for the key's passphrase. The Secure Remote Authentication Option value for the passphrase is not stored in the database, and is used only for that execution.
Passphrases are input either via the GUI or arguments to the job if executed via CLI or API.
First, configure a Job, and include an Option definition where secureInput is set to true. The name of this option can be anything, but the default value of sshKeyPassphrase assumed by the node configuration is easiest.
If the value is not sshKeyPassphrase, then make sure to set the following attribute on each Node for password authentication:
ssh-key-passphrase-option= "option.NAME" where NAME is the name of the Job's Secure Remote Authentication Option.
An example Node and Job option configuration are below:
 <node name="egon"
    description="egon"
    osFamily="unix"
    username="rundeck"
    hostname="egon"
    ssh-keypath="/path/to/privatekey_rsa"
    ssh-authentication="privateKey"
    ssh-key-passphrase-option="option.sshKeyPassphrase" />
Job:
<joblist>
    <job>
        <!-- ... -->
        <context>
          <project>project</project>
          <options>
            <option required='true' name='sshKeyPassphrase' secure='true'
              description="Passphrase for SSH Private Key"/>
          </options>
        </context>
        <!-- ... -->
    </job>
</joblist>
SSH Private Key Passphrase Storage
Note: See Using Key Storage for SSH.
When connecting to the remote node with a private key, Rundeck will look for a property/attribute specifying the location of the private key passphrase storage path, in this order, with the first match having precedence:
- Node level:
ssh-key-passphrase-storage-pathattribute on the Node. Applies only to the target node. - Project level:
project.ssh-key-passphrase-storage-pathproperty inproject.properties. Applies to any project node by default. - Rundeck level:
framework.ssh-key-passphrase-storage-pathproperty inframework.properties. Applies to all projects by default.
An example Node using private key passphrase storage:
 <node name="egon"
    description="egon"
    osFamily="unix"
    username="rundeck"
    hostname="egon"
    ssh-authentication="privateKey"
    ssh-key-storage-path="keys/nodes/${node.name}.key"
    ssh-key-passphrase-storage-path="keys/nodes/${node.name}.key.password" />
SSH Password Authentication
Password authentication works in one of two ways:
In both cases, to enable SSH Password authentication, first make sure the ssh-authentication value is set as described in Authentication types.
Both methods can be used for multiple nodes within a Job. I.e. some nodes could be authenticated via stored password, and others via Job option user input.
SSH Password with a Job Option
Passwords for the nodes are input either via the GUI or arguments to the job if executed via CLI or API.
- The Job must define a Secure Remote Authentication Option to prompt the user for the password before execution.
- All Nodes using this method must have an equivalent Secure Remote Authentication Option defined, or may use the same option name (or the default) if they share authentication passwords.
First configure a Job and include one or more Option definitions where Secure Remote Authentication type is selected. (In XML/YAML, secure is set to true, and valueExposed is set to false.) The name of this option can be anything, but the default value of sshPassword assumed by the node configuration is easiest. In order to use multiple different passwords for different nodes, the job must be define multiple options in this way.
If the option name is not sshPassword, then make sure to set the following attribute on each Node for password authentication:
ssh-password-option= "option.NAME" where NAME is the name of the Job's Secure Remote Authentication Option.
An example Node and Job option configuration are below:
 <node name="egon"
    description="egon"
    osFamily="unix"
    username="rundeck"
    hostname="egon"
    ssh-authentication="password"
    ssh-password-option="option.sshPassword1" />
Job:
<joblist>
    <job>
        <!-- ... -->
        <context>
          <project>project</project>
          <options>
            <option required='true' name='sshPassword1' secure='true' valueExposed="false"/>
          </options>
        </context>
        <!-- ... -->
    </job>
</joblist>
SSH Password Storage
Note: See Using Key Storage for SSH.
When connecting to the remote node, Rundeck will look for a property/attribute specifying the location of the password storage path, in this order, with the first match having precedence:
- Node level:
ssh-password-storage-pathattribute on the Node. Applies only to the target node. - Project level:
project.ssh-password-storage-pathproperty inproject.properties. Applies to any project node by default. - Rundeck level:
framework.ssh-password-storage-pathproperty inframework.properties. Applies to all projects by default.
Note: If both ssh-password-storage-path and ssh-password-option resolve to a value, then the ssh-password-storage-path will be used.
An example Node using password storage:
 <node name="egon"
    description="egon"
    osFamily="unix"
    username="rundeck"
    hostname="egon"
    ssh-authentication="password"
    ssh-password-storage-path="keys/projects/${job.project}/nodes/${node.name}/rundeck.password" />
Secondary Sudo Password Authentication
The SSH provider includes support for Sudo password authentication as a secondary authentication mechanism. This capability proves valuable in environments where security requirements mandate SSH connections through specific user accounts rather than generic "rundeck" accounts, while still enabling password-protected sudo-level command execution.
This works in the following way:
- After connecting to the remote node via SSH, a command requiring "sudo" authentication is issued, such as "sudo -u otheruser /sbin/some-command"
- The remote node will prompt for a sudo password, expecting user input
- The SSH Provider will write the password to the remote node
- The sudo command will execute as if a user had entered the command
The Sudo password(s) can be provided in two ways:
To enable Sudo Password Authentication, set the sudo-command-enabled property/attribute to true. When using SSHJ, ensure that the property/attribute always-set-pty is set as true.
The Sudo Password Authentication configuration can be managed through properties set at the Node, Project, or Rundeck scope levels. The configuration is controlled by setting the attribute name on a Node, defining project.NAME in project.properties, or specifying framework.NAME in framework.properties.
sudo-command-enabled- set to "true" to enable Sudo Password Authentication.sudo-command-pattern- a regular expression to detect when a command execution should expect to require Sudo authentication. Default pattern is^sudo$.sudo-password-option- an option reference ("option.NAME") to define which secure remote authentication option value to use as password. The default isoption.sudoPassword.sudo-password-storage-path- Path in the Key Storage facility for the password.sudo-prompt-pattern- a regular expression to detect the password prompt for the Sudo authentication. The default pattern is^.*password.*sudo-failure-pattern- a regular expression to detect the password failure response. The default pattern is^.*try again.*.sudo-prompt-max-lines- maximum lines to read when expecting the password prompt. (default:12).sudo-prompt-max-timeout- maximum milliseconds to wait for input when expecting the password prompt. (default5000)sudo-response-max-lines- maximum lines to read when looking for failure response. (default:2).sudo-response-max-timeout- maximum milliseconds to wait for response when detecting the failure response. (default5000)sudo-fail-on-prompt-max-lines- true/false. If true, fail execution if max lines are reached looking for password prompt. (default:false)sudo-success-on-prompt-threshold- true/false. If true, succeed (without writing password), if the input max lines are reached without detecting password prompt. (default:true).sudo-fail-on-prompt-timeout- true/false. If true, fail execution if timeout reached looking for password prompt. (default:true)sudo-fail-on-response-timeout- true/false. If true, fail on timeout looking for failure message. (default:false)
Note: The default values have been set for the unix "sudo" command, but can be overridden if needed to customize the interaction.
Bracketed Paste Mode
Sudo Password Authentication may experience compatibility issues when Bracketed Paste Mode is enabled on the target node. This condition can be identified by the presence of "[?2004h" and "[?2004l" character sequences in the shell output during PTY-enabled sudo command execution.
To check the status of this shell variable value run the command - bind -V | grep enable-bracketed-paste. To disable it, append the set enable-bracketed-paste off on /etc/inputrc
Sudo Password as a Job Option
Job Option Passwords for the nodes are input either via the GUI or arguments to the job if executed via CLI or API.
Configure a Job, and include an Option definition where secureInput is set to true. The name of this option can be anything, but the default value of sudoPassword recognized by the plugin can be used.
If the value is not sudoPassword, then make sure to set the following attribute on each Node for password authentication:
sudo-password-option= "option.NAME" where NAME is the name of the Job's Secure Remote Authentication Option.
An example Node and Job option configuration are below:
 <node name="egon"
    description="egon"
    osFamily="unix"
    username="rundeck"
    hostname="egon"
    sudo-command-enabled="true"
    sudo-password-option="option.sudoPassword2" />
Job:
<joblist>
    <job>
         <sequence keepgoing='false' strategy='node-first'>
          <command>
            <exec>sudo apachectl restart</exec>
          </command>
        </sequence>

        <context>
          <project>project</project>
          <options>
            <option required='true' name='sudoPassword2' secure='true'
                    description="Sudo authentication password"/>
          </options>
        </context>
        ...
    </job>
</joblist>
Sudo Password Storage
Note: See Using Key Storage for SSH.
Define a sudo-password-storage-path node attribute specifying the path in the Key Storage Facility for the password.
See example Node configuration below:
 <node name="egon"
    description="egon"
    osFamily="unix"
    username="rundeck"
    hostname="egon"
    sudo-command-enabled="true"
    sudo-password-storage-path="keys/nodes/${node.name}/sudo.password" />
Multiple Sudo Password Authentication
Additional sudo password support can be enabled at the node level to accommodate multi-level sudo command chains. For scenarios requiring nested sudo commands (e.g., "sudo -u user1 sudo -u user2 command"), password input functionality for multiple sudo levels can be implemented through a secondary set of node/project/framework properties.
The configuration properties are the same as those for the first-level of sudo password authentication described in Configuring Secondary Sudo Password Authentication, but with a prefix of "sudo2-" instead of "sudo-", such as:
sudo2-command-enabled="true"
sudo2-command-pattern="^sudo .+? sudo .*$"
This would turn on a mechanism to expect and respond to another sudo password prompt when the command matches the given pattern.
If a value for "sudo2-password-option" is not set, then a default value of option.sudo2Password will be used.
A note about the "sudo2-command-pattern":
The sudo authentication mechanism uses two regular expressions to test whether it should be invoked.
The initial sudo authentication process matches the "sudo-command-pattern" value against the command's first component. The pattern's default value is ^sudo$, which correctly matches commands structured like "sudo -u user1 some command". While the regular expression can be modified (for example, to accommodate "su"), the pattern matching is strictly limited to the command's first component.
If "sudo2-command-enabled" is "true", then the "sudo2-command-pattern" is also checked and if it matches then another sudo authentication is enabled. However this regular expression is tested against the entire command string to make it possible to determine whether it should be enabled. The default value is ^sudo .+? sudo .*$. It may be necessary to customize this value.
SSH Agent support
This will start /usr/bin/ssh-agent on each command step execution (if enabled), inject the private key the job would normally use in the agent, make the agent available on the newly created jsch connection and enable agent forwarding on the connection. Once the job is done the ssh-agent is killed. Optionally ssh-agent can be started with -t <ttl> which will guarantee the private key will be flushed at that time if by some chance it's not killed.
When this feature is enabled, host access control cannot be managed through Rundeck alone. Proper SSH key management must be implemented and maintained across all hosts to ensure security.
New variables are:
framework.properties:
framework.local-ssh-agent=<true|false>
framework.local-ttl-ssh-agent=<time in sec>
project.properties:
project.local-ssh-agent=<true|false>
project.local-ttl-ssh-agent=<time in sec>
Node attributes:
local-ssh-agent=<true|false>
local-ttl-ssh-agent=<time in sec>
SSH System Configuration
- The SSH configuration requires that the Rundeck server machine can ssh commands to the client machines.
- SSH is assumed to be installed and configured appropriately to allow this access.
- SSH can be configured for either password based authentication or public/private key based authentication.
- For public/private key authentication:
- There are many resources available on how to configure ssh to use public key authentication instead of passwords such as this article from ArchLinux.
- If the private key file has a passphrase, each Job definition that will execute on the node must be configured correctly.
- For password authentication:
- each Node definition must be configured to allow password authentication
- each Job definition that will use it must be configured correctly
SSH key generation
- The Rundeck installation can be configured to use RSA or DSA type keys.
- Run key generation command(s) on a secure machine separate from the Rundeck Server.
- After importing keys to nodes/Rundeck Key Storage remove the generated files from the secure machine.
- When re-generating keys be sure to over-write the existing key.
Here's an example of SSH RSA key generation on a Linux system:
$ ssh-keygen -t rsa -b 4096
Generating public/private rsa key pair.
Enter file in which to save the key (/home/demo/.ssh/id_rsa):
Enter passphrase (empty for no passphrase):
Enter same passphrase again:
Your identification has been saved in /home/demo/.ssh/id_rsa.
Your public key has been saved in /home/demo/.ssh/id_rsa.pub.
The key fingerprint is:
a7:31:01:ca:f0:62:42:9d:ab:c8:b7:9c:d1:80:76:c6 demo@ubuntu
The key's randomart image is:
+--[ RSA 4096]----+
| .o . .          |
|.  * . .         |
|. = =   .        |
| = E     .       |
|+ + o   S .      |
|.o o .   =       |
|  o +   .        |
|   +             |
|                 |
+-----------------+
When using OpenSSH-Client 8.0p1-6build1 or higher (which is installed on Ubuntu 19.10 and up) it is necessary to change the key generation:
$ ssh-keygen -t rsa -b 4096 -m PEM
Generating public/private rsa key pair.
Enter file in which to save the key (/home/demo/.ssh/id_rsa):
Enter passphrase (empty for no passphrase):
Enter same passphrase again:
Your identification has been saved in /home/demo/.ssh/id_rsa.
Your public key has been saved in /home/demo/.ssh/id_rsa.pub.
The key fingerprint is:
SHA256:GzO9Km/BPIl6IQ/NVPyeSQmr+6+sBOPYzIeTTZTMORk demo@ubuntu
The key's randomart image is:
+---[RSA 4096]----+
|      E.         |
|     o =+        |
|      O. + .     |
|     .....+      |
|    o+.=S+.o     |
|   *oB* *=+.     |
|  . O=+o.o.      |
|    .+=...       |
|     ..**o.      |
+----[SHA256]-----+
Configuring remote machine for SSH
To be able to directly ssh to remote machines, an SSH public key of the client should be shared to the remote machine.
Follow the steps given below to enable ssh to remote machines.
A new SSH key should be generated following the previously outlined steps. For security purposes, existing keys should not be utilized unless their origin can be verified with certainty.
The ssh public key should be copied to the authorized_keys file of the remote machine. The public key will be available in ~/.ssh/id_rsa.pub file.
Be sure to remove any keys that are no longer needed.
The authorized_keys file should be created in the .ssh directory of the remote machine.
The file permission of the authorized key should be read/write for the user and nothing for group and others. To do this check the permission and change it as shown below.
$ cd ~/.ssh
$ ls -la
-rw-r--r--   1 raj  staff     0 Nov 22 18:14 authorized_keys

$ chmod 600 authorized_keys
$ ls -la
-rw-------   1 raj  staff     0 Nov 22 18:14 authorized_keys
The permission for the .ssh directory of the remote machine should be read/write/execute for the user and nothing for the group and others. To do this, check the permission and change it as shown below.
$ ls -la
drwxr-xr-x   2 raj  staff    68 Nov 22 18:19 .ssh
$ chmod 700 .ssh
$ ls -la
drwx------   2 raj  staff    68 Nov 22 18:19 .ssh
For Windows-based Rundeck installations, Cygwin is recommended as it provides SSH functionality and essential Unix-like command line utilities that facilitate system operations.
Passing environment variables through remote command
To pass environment variables through remote command dispatches, it is required to properly configure the SSH server on the remote end. See the AcceptEnv directive in the "sshd_config(5)" manual page for instructions.
Use a wild card pattern to permit RD_ prefixed variables to provide open access to Rundeck generated environment variables.
Example in sshd_config:
# pass Rundeck variables
AcceptEnv RD_*