
Job Workflows
Job Workflows
The Job's most basic feature is its ability to execute one or more steps. This sequence of steps is called a workflow.
The steps of the Job workflow are displayed when viewing a Job's detail from a Job listing or within the Job editor form.
Workflow definition
Workflows can be defined within the Rundeck graphical console or as an XML or YAML document that is loaded to the server.
The graphical console provides an authoring environment where steps can be added, edited, removed or reordered.
Users preferring to define Jobs in a text format should refer to the two format definitions:
It is also possible to author Jobs inside the graphical console and then export the definition as a file using the rd CLI tool (rd), or via the API.
See Command Line Tools and API Acccess.
Workflow control settings
Workflow execution is controlled by two important settings: Handling a step failure and Strategy.
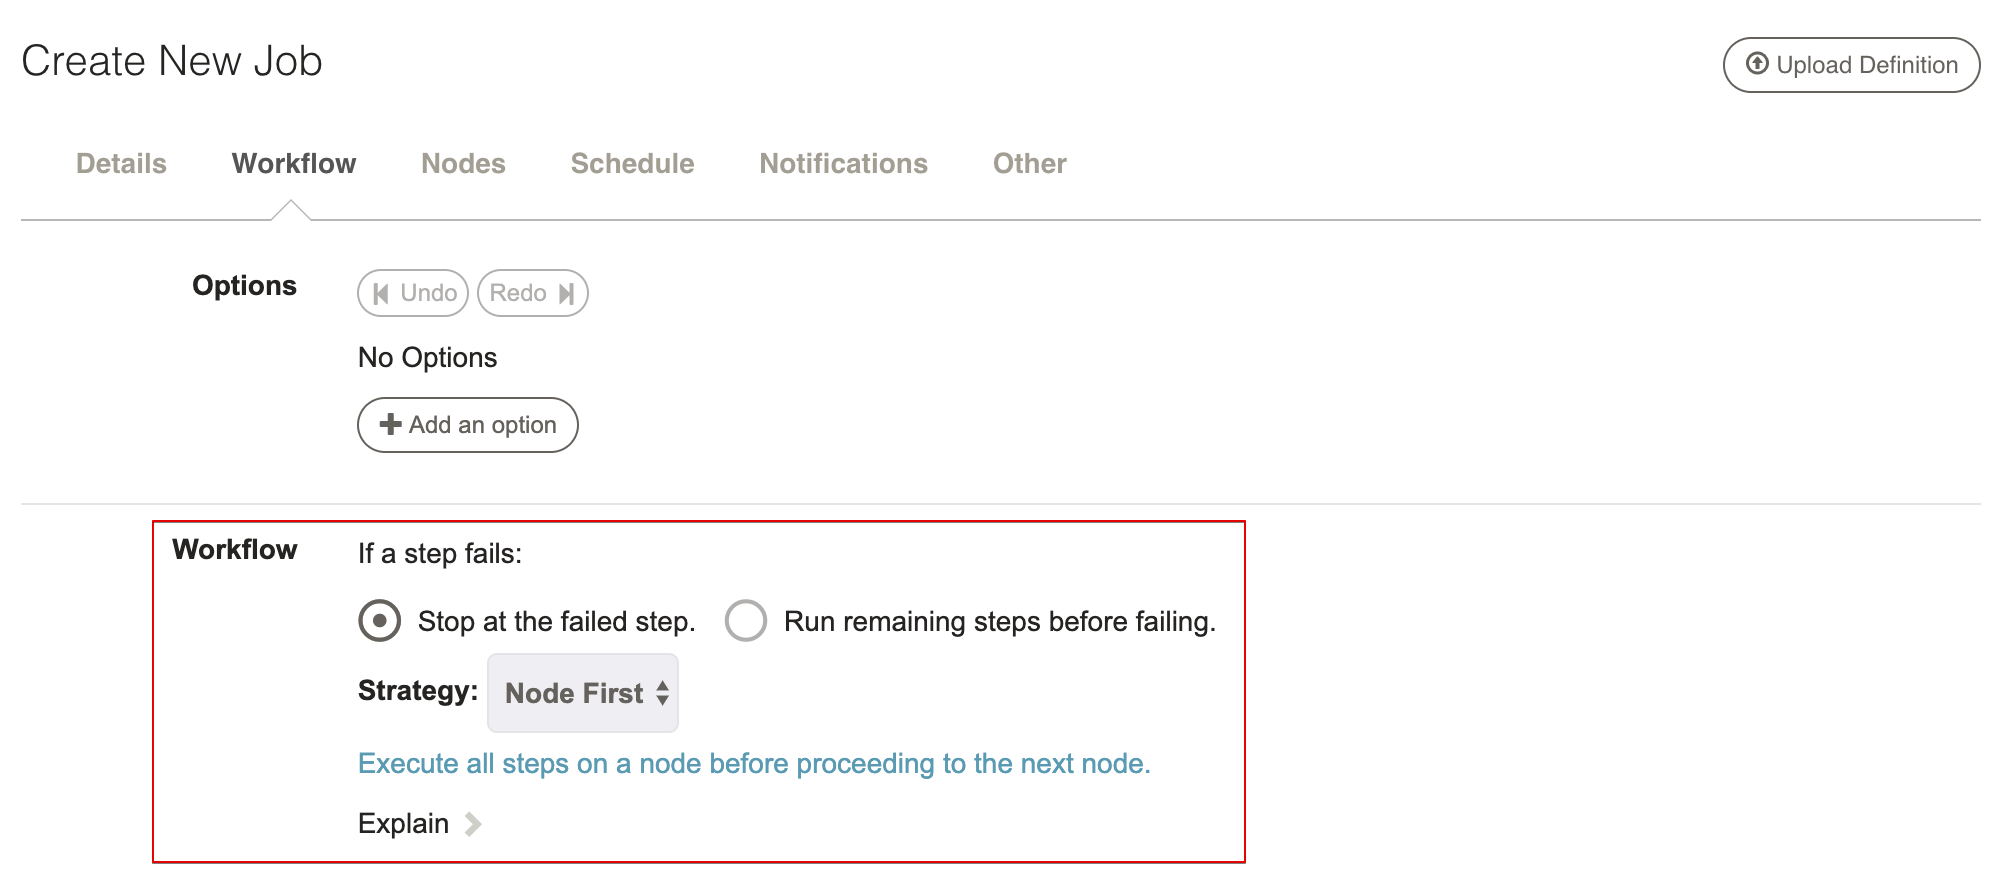
If a step fails: This manages what to do if a step incurs an error:
- Stop at the failed step: Fail immediately (default).
- Run remaining steps before failing: Continue to next steps and fail the job at the end.
The default is to fail immediately but depending on the procedure at hand it is possible to choose to have the execution continue.
Strategy: Controls the order of execution of steps and command dispatch to nodes: Node-oriented and Step-oriented.
- Node First: Executes the full workflow on each node before the next node. (default)
- Sequential: Executes each step on all nodes before the next step.
- Parallel: Run all steps in parallel.
For more complex workflow strategy rules, see Ruleset Workflow Strategy Plugin
Steps
The following sections describe how to build a job as a set of steps of different types.
When creating a new Job definition, the Workflow form will be set with defaults and have no steps defined. The workflow editor will have a form open asking to choose a step type to add.
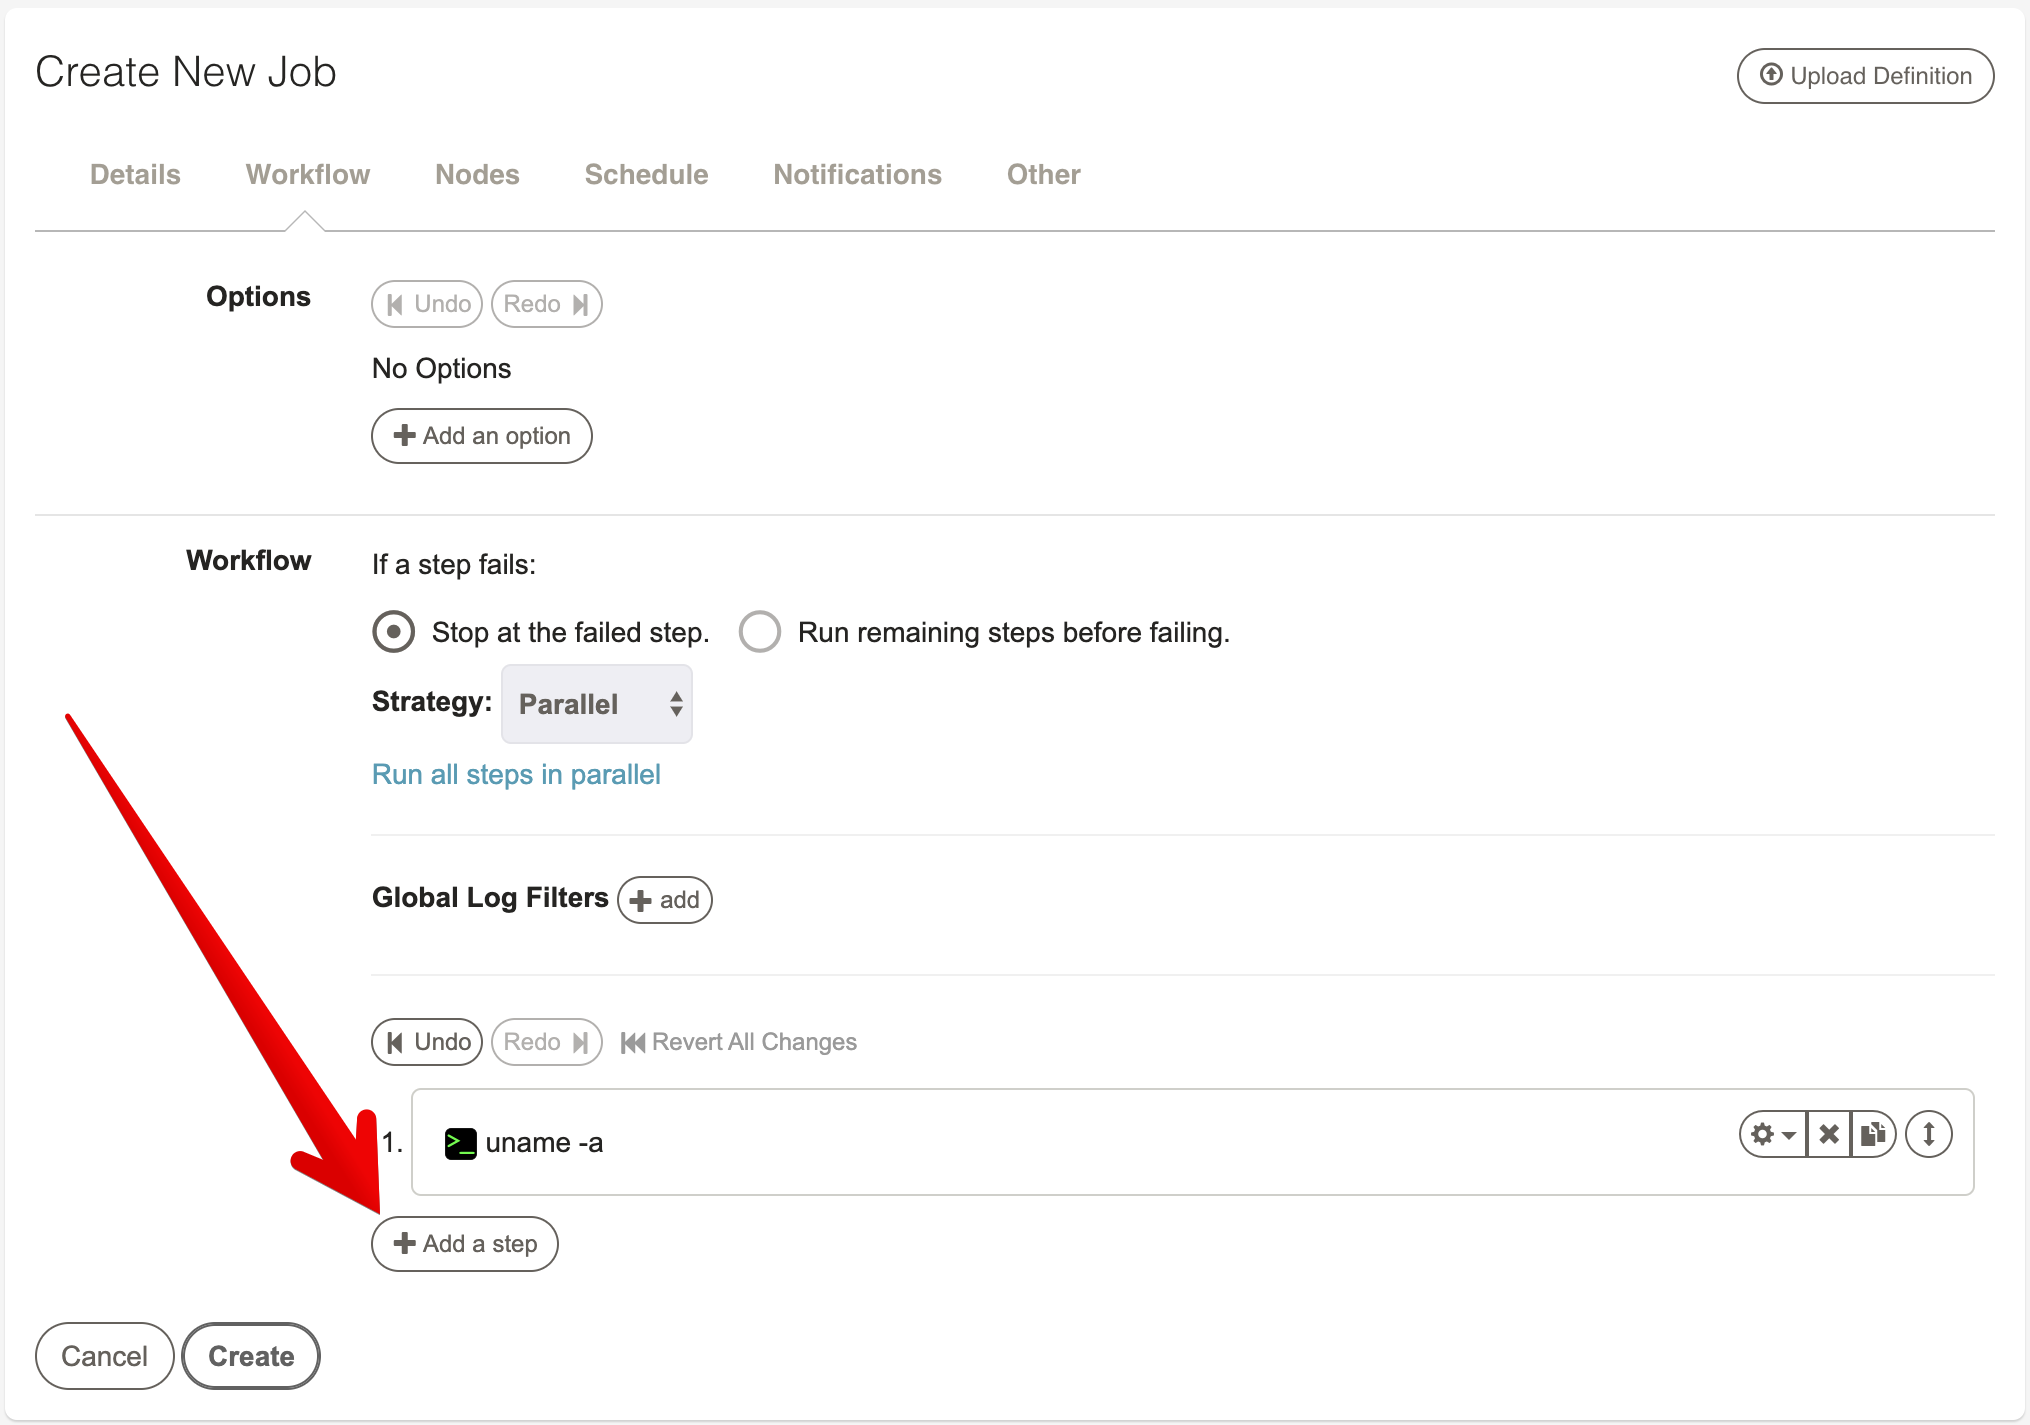
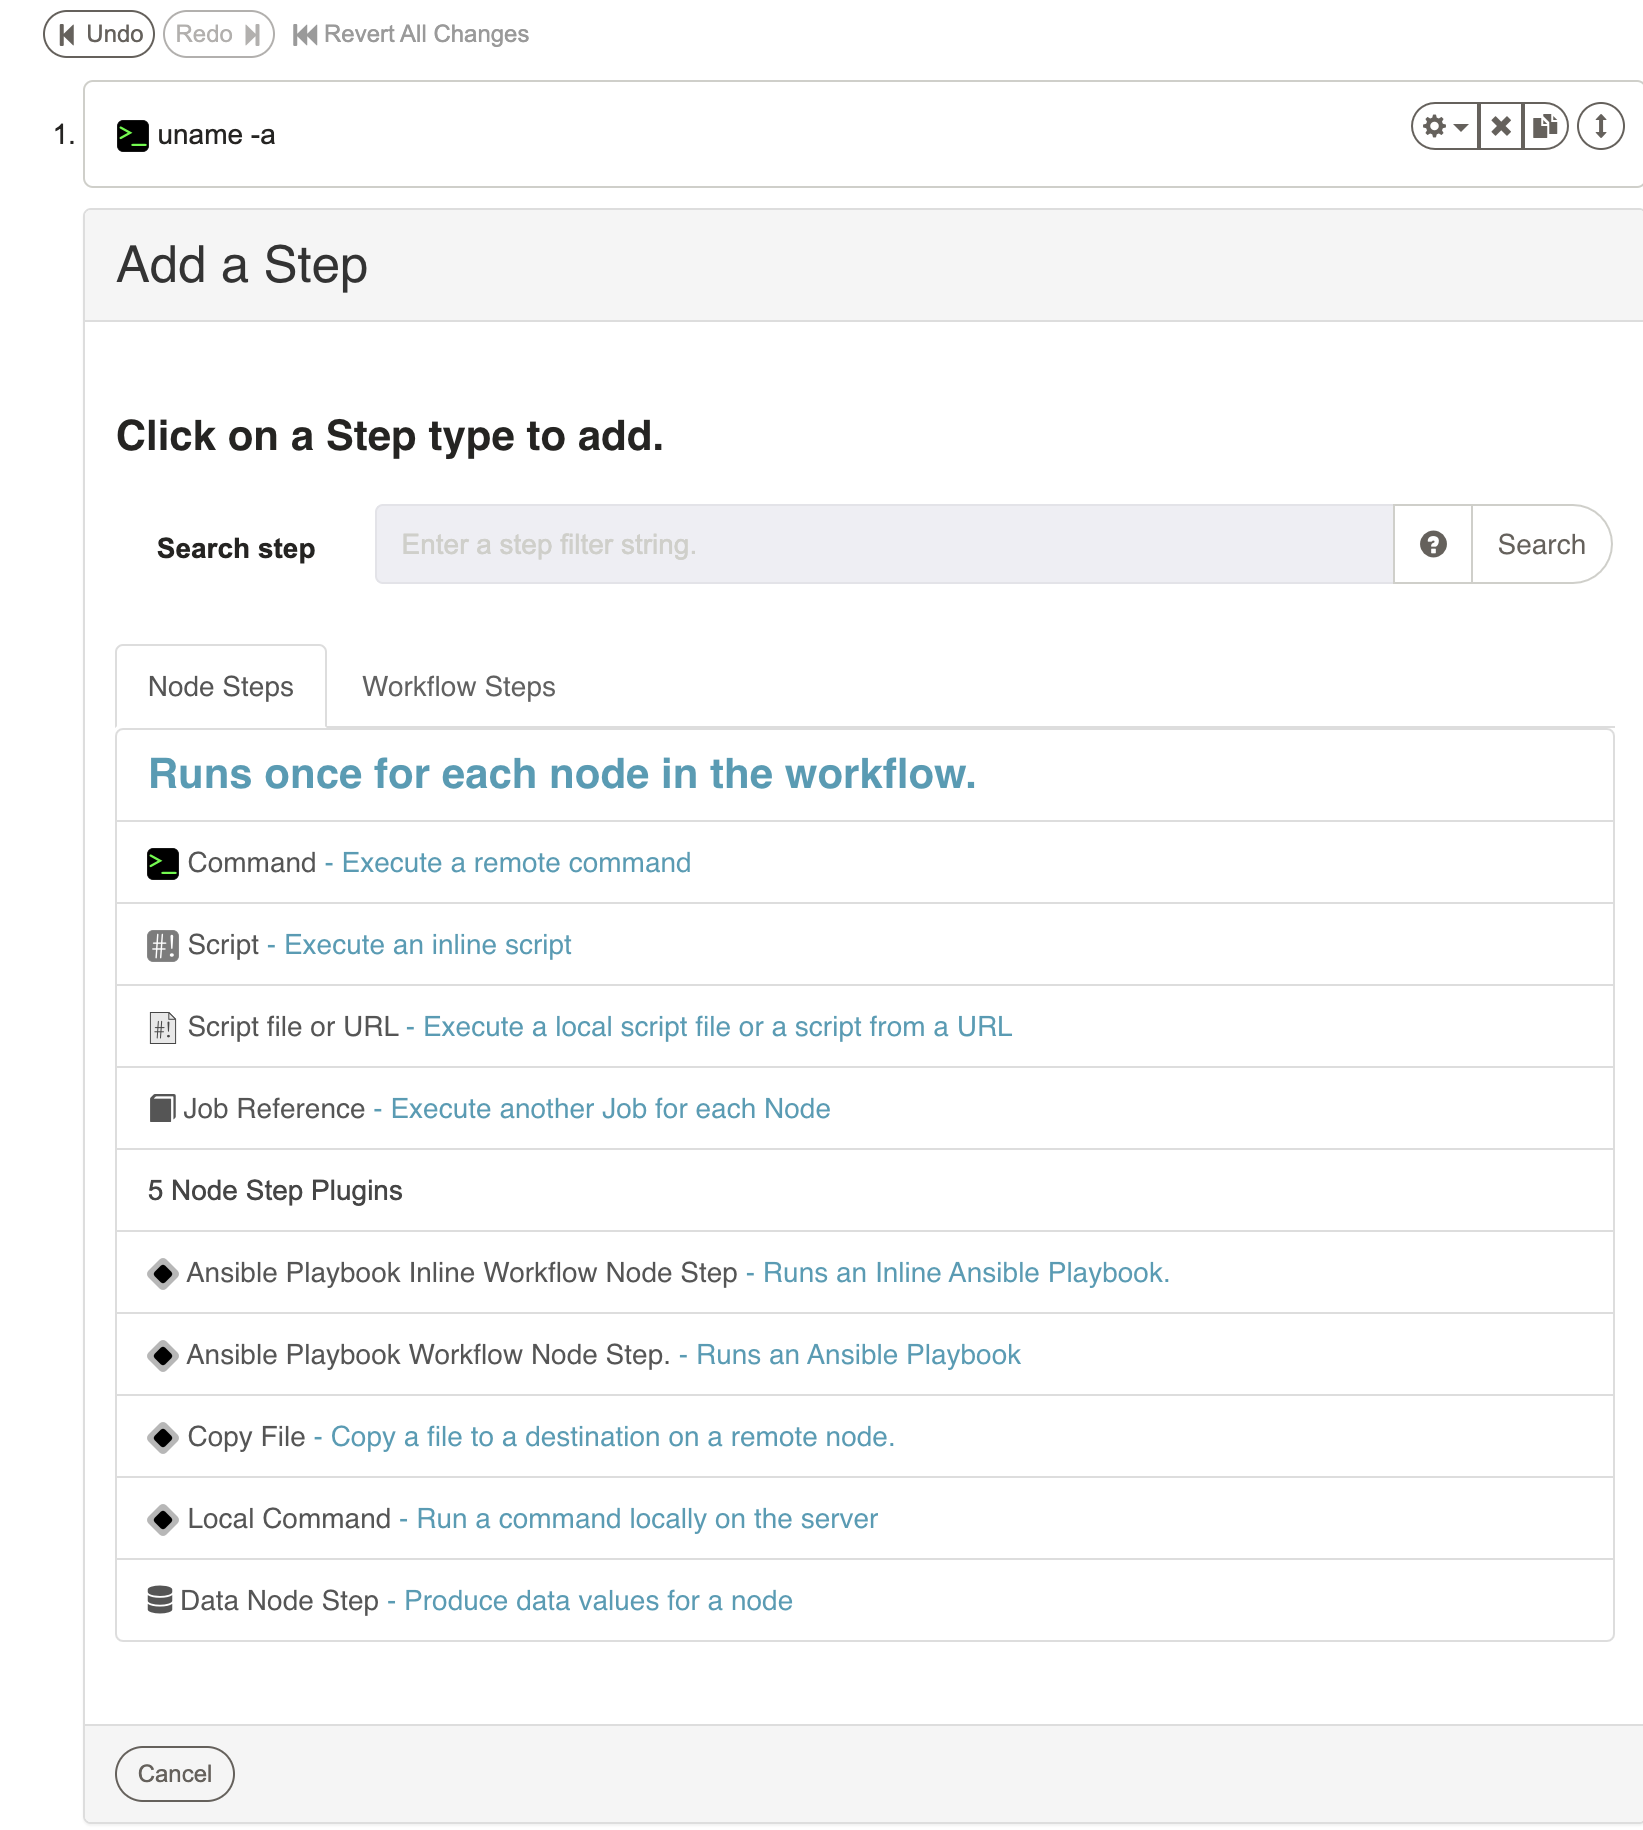
To add new steps simply press the "Add a step" link inside the workflow editor form. This will prompt with a dialog asking which kind of step to add. Each kind of step has its own form. When the form is completed, press "Save" to add it to the sequence. Pressing "Cancel" will close the form and leave the sequence unchanged.
New steps are always added to the end of the sequence.
See Reordering steps for directions on moving steps into a new order.
Each step can have a "Description" to give it a more logical name or description to be displayed in the Rundeck GUI.
The next several sections describe the specification of each kind of workflow step.
Types of Steps
Steps in a workflow can be either Node Steps or Workflow Steps.
- Node Steps execute once on each node that matches the Job's node filter, running in a Node Context with access to node-specific variables
- Workflow Steps execute exactly once per Job invocation on the Rundeck server, running in a Global Context
Understanding the distinction between these step types is critical for building effective workflows, especially when working with variables and data capture.
For a comprehensive explanation of Node Steps vs Workflow Steps, including characteristics, variable scoping, and execution order, see Job Step Plugins - Understanding Step Types.
Available Steps:
- Node Steps - Commands, scripts, file operations
- Workflow Steps - Orchestration, integrations, global operations
Reordering steps
The order of the Workflow steps can be modified by hovering over any step and then clicking and dragging the double arrow icon to the desired position.
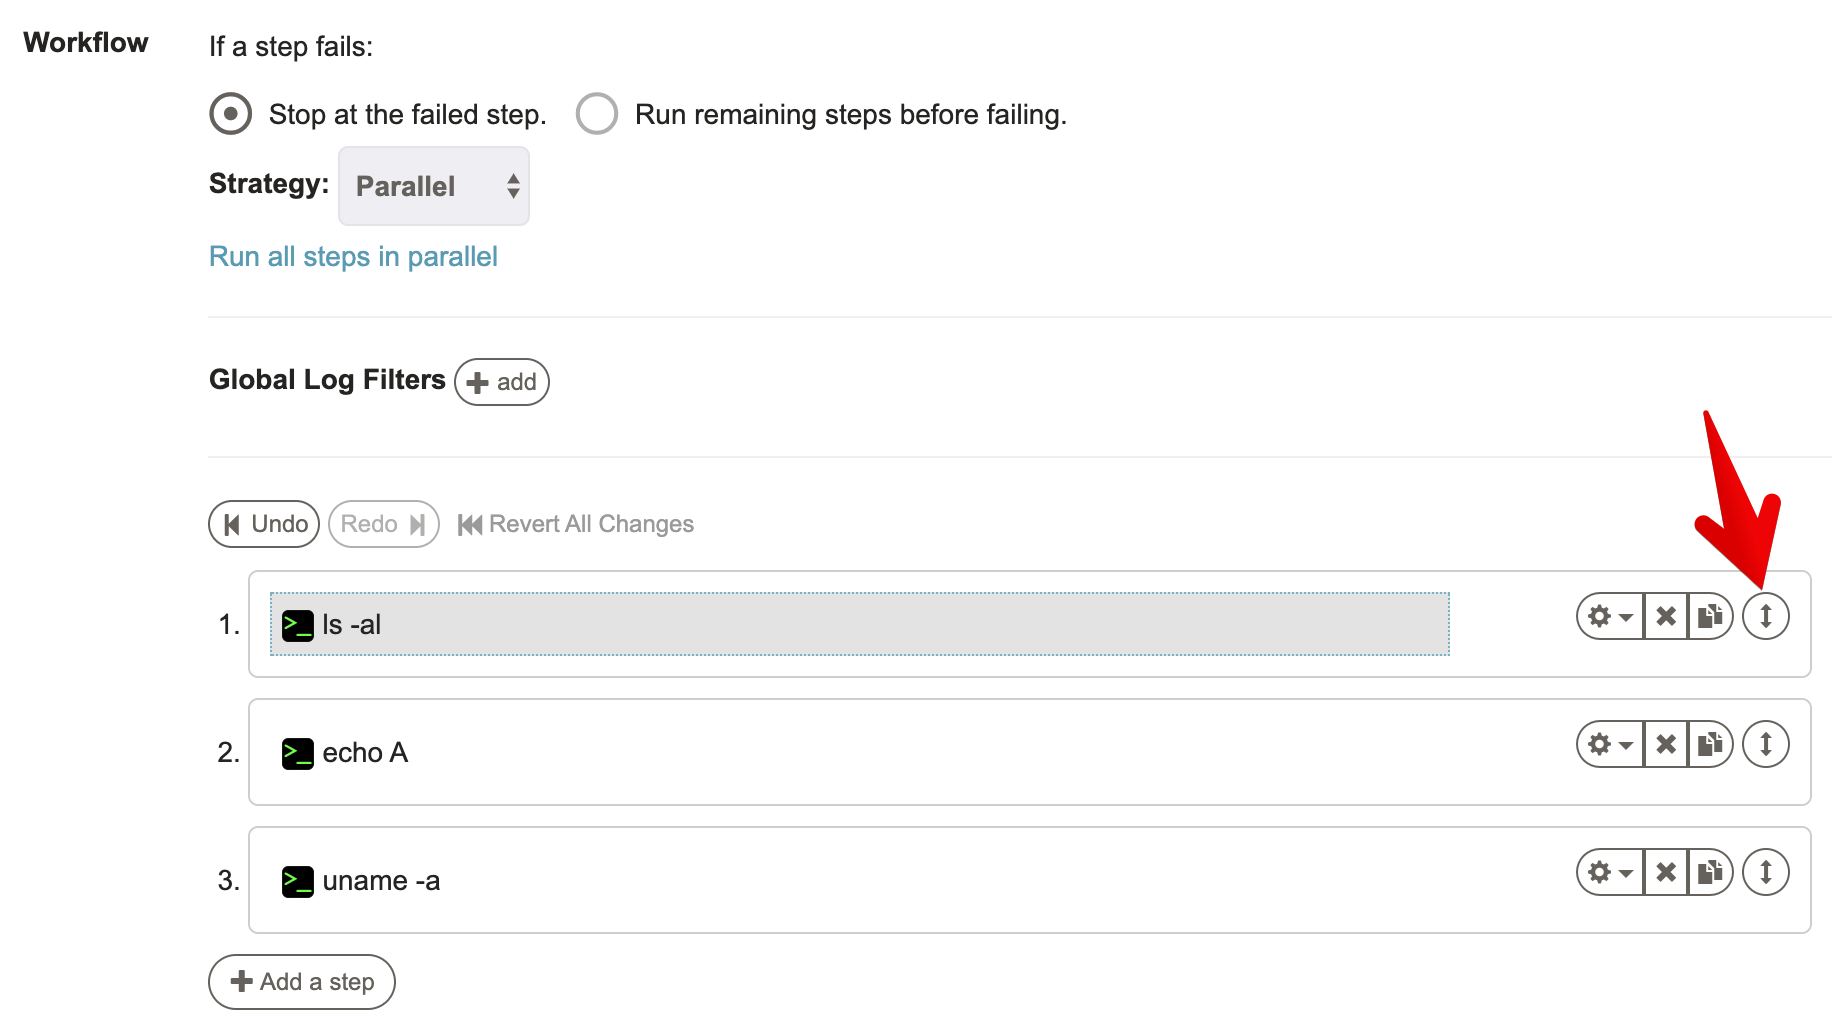
A blue horizontal bar helps highlight the position where the Job will land.

After releasing the select Job, it will land in the desired position and the step order will be updated.
To Undo the step reordering, press the "Undo" link above the steps.
The "Redo" button can be pressed to reapply the last undone change.
Press the "Revert All Changes" button to go back to the original step order.
Error Handlers
Each step in a Workflow can have an associated "Error Handler" action. This handler is a secondary step of any of the available types that will execute if the Workflow step fails. Error Handler steps can be used to recover the workflow from failure, or simply to execute a secondary action.
This provides a few different ways to deal with a step's failure:
- Print additional information about a failure
- Roll back a change
- Recover the workflow from failure, and continue normally
When a Workflow step has a failure, the behavior depends on whether it has an Error Handler or not, and the value of the "runRemainingOnFail" and "keepGoingOnSuccess" settings for the workflow and Error Handler respectively.
Essentially, the result status of the Error Handler becomes the result status of its Step. In other words: "If the Error Handler succeeds, then the step is not considered to have failed".
Workflow Behavior
- When a step fails without an Error Handler
- The Workflow is marked as "failed".
- If
runRemainingOnFail="false"- The entire Workflow stops.
- Otherwise, the remaining Workflow steps are executed in order.
- The Workflow ends with a "failed" result status.
If a job is defined with an Error Handler for a step, the behavior changes. This one can recover from the step failure by executing successfully or, as previously said, perform a secondary action.
A "keepGoingOnSuccess" checkbox will override the Workflow's "runRemainingOnFail" value if it is false:
- When a step fails with an Error Handler
- The Error Handler is executed.
- If the Error Handler is successful:
runRemainingOnFail="false"andkeepGoingOnSuccess="false"- The Step is marked as a success.
- Remaining steps don't run.
- Workflow execution status is marked as Failed.
runRemainingOnFail="true"orkeepGoingOnSuccess="true"- The Workflow failure status is not marked, and it will continue to the next step.
- If the Error Handler fails:
- The step is marked as Failed
- The workflow behaves according to the
runRemainingOnFailvariable.
Tips
When defining error handlers, it is a good practice to use a step that will always fail (e.g. scripts/commands return a non-zero exit-code) so that rundeck can show the step as FAILED, unless it is specifically to be used for Recovery.
Tips
Error-handlers can be attached to either Node Steps or Workflow Steps, and the type of step and the Strategy of the Workflow determines what type of Error-handler steps can be attached to a step. The only restriction is in the case that the Workflow is "Node-oriented", which means that the workflow is executed independently for each node. In this case, Node Steps can only have other Node steps as Error Handlers. In other cases, the Error Handler can be other Workflow steps.
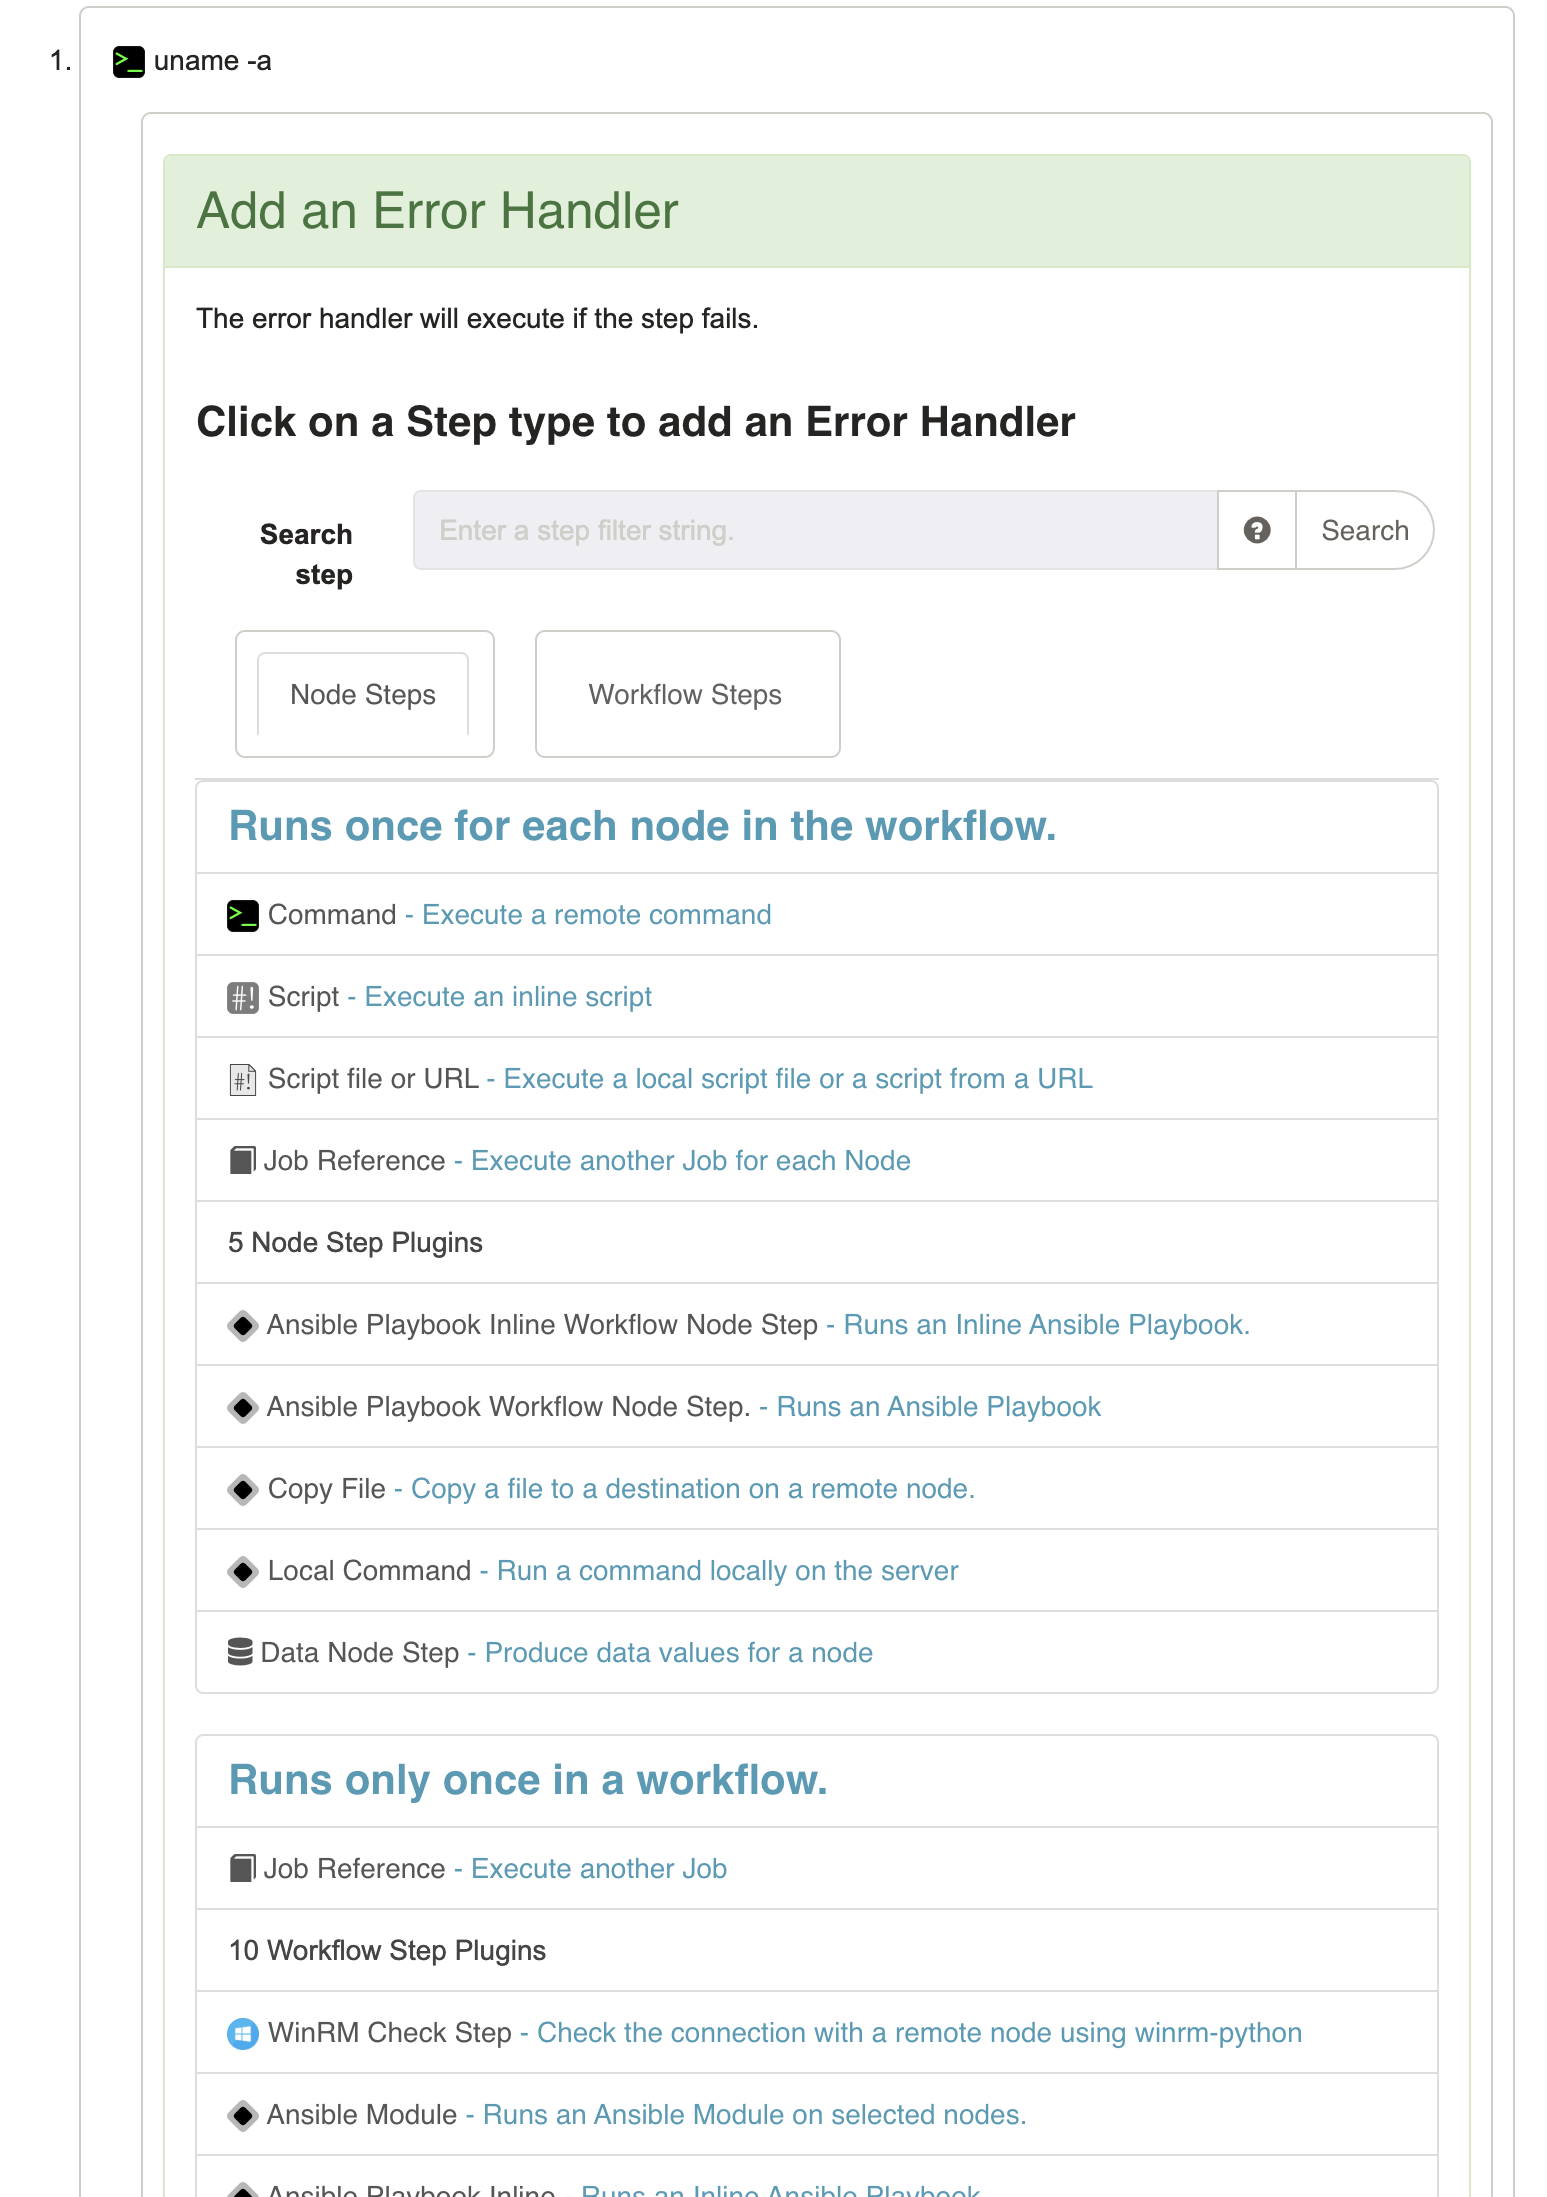
To add an error handler press the "settings" button on the step to handle.
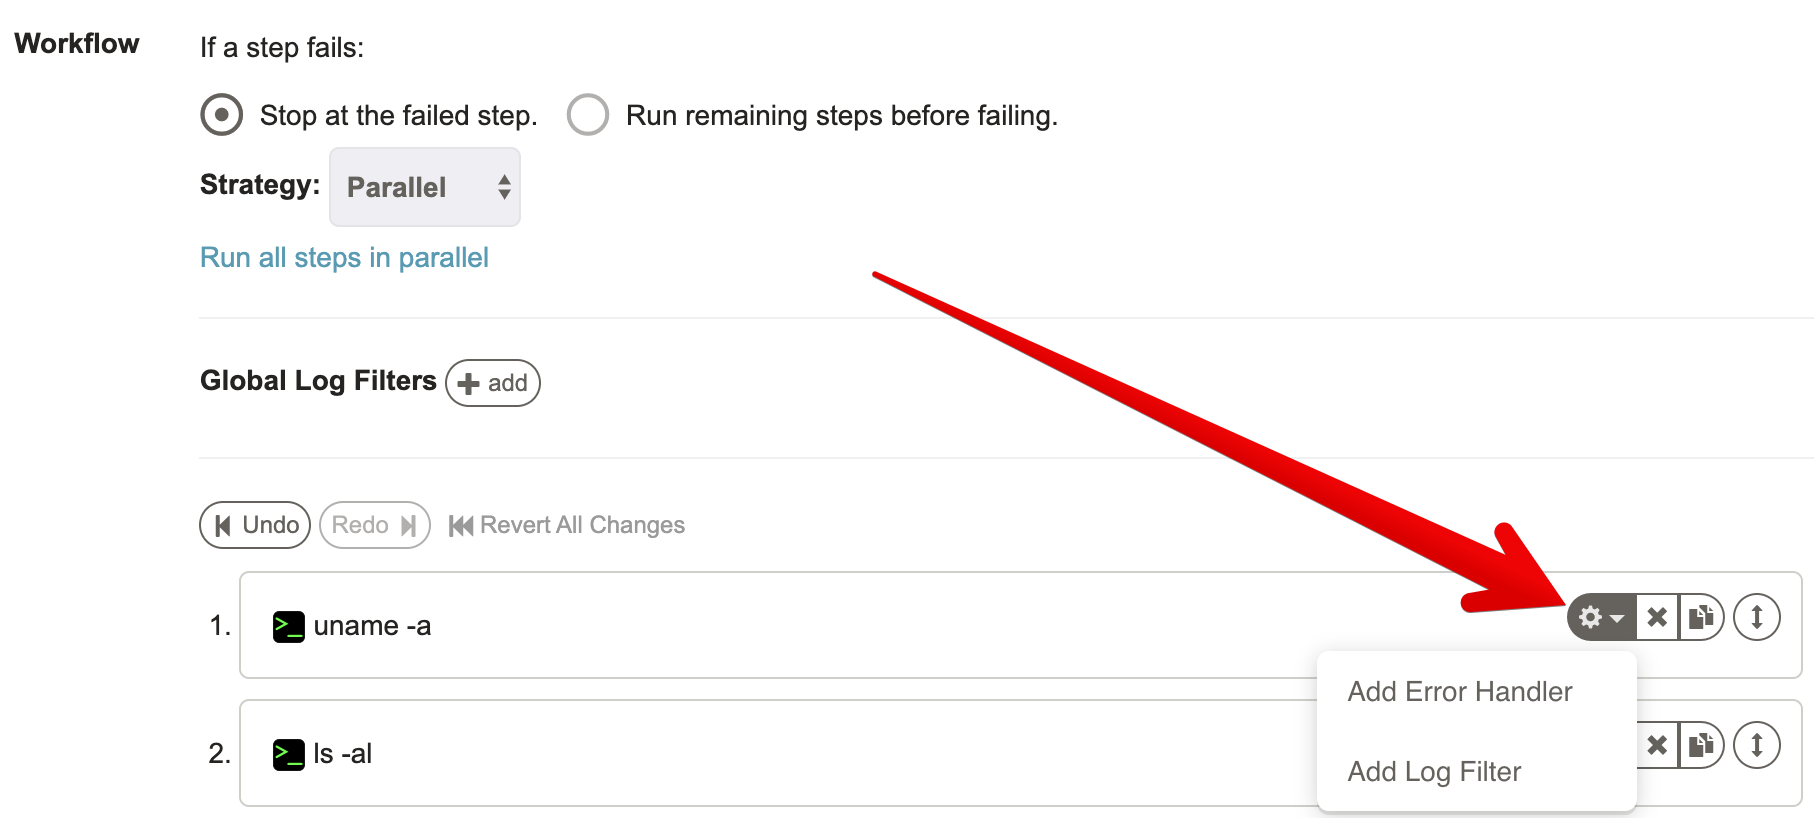
The form presented includes the normal set of steps that can be added to a workflow.
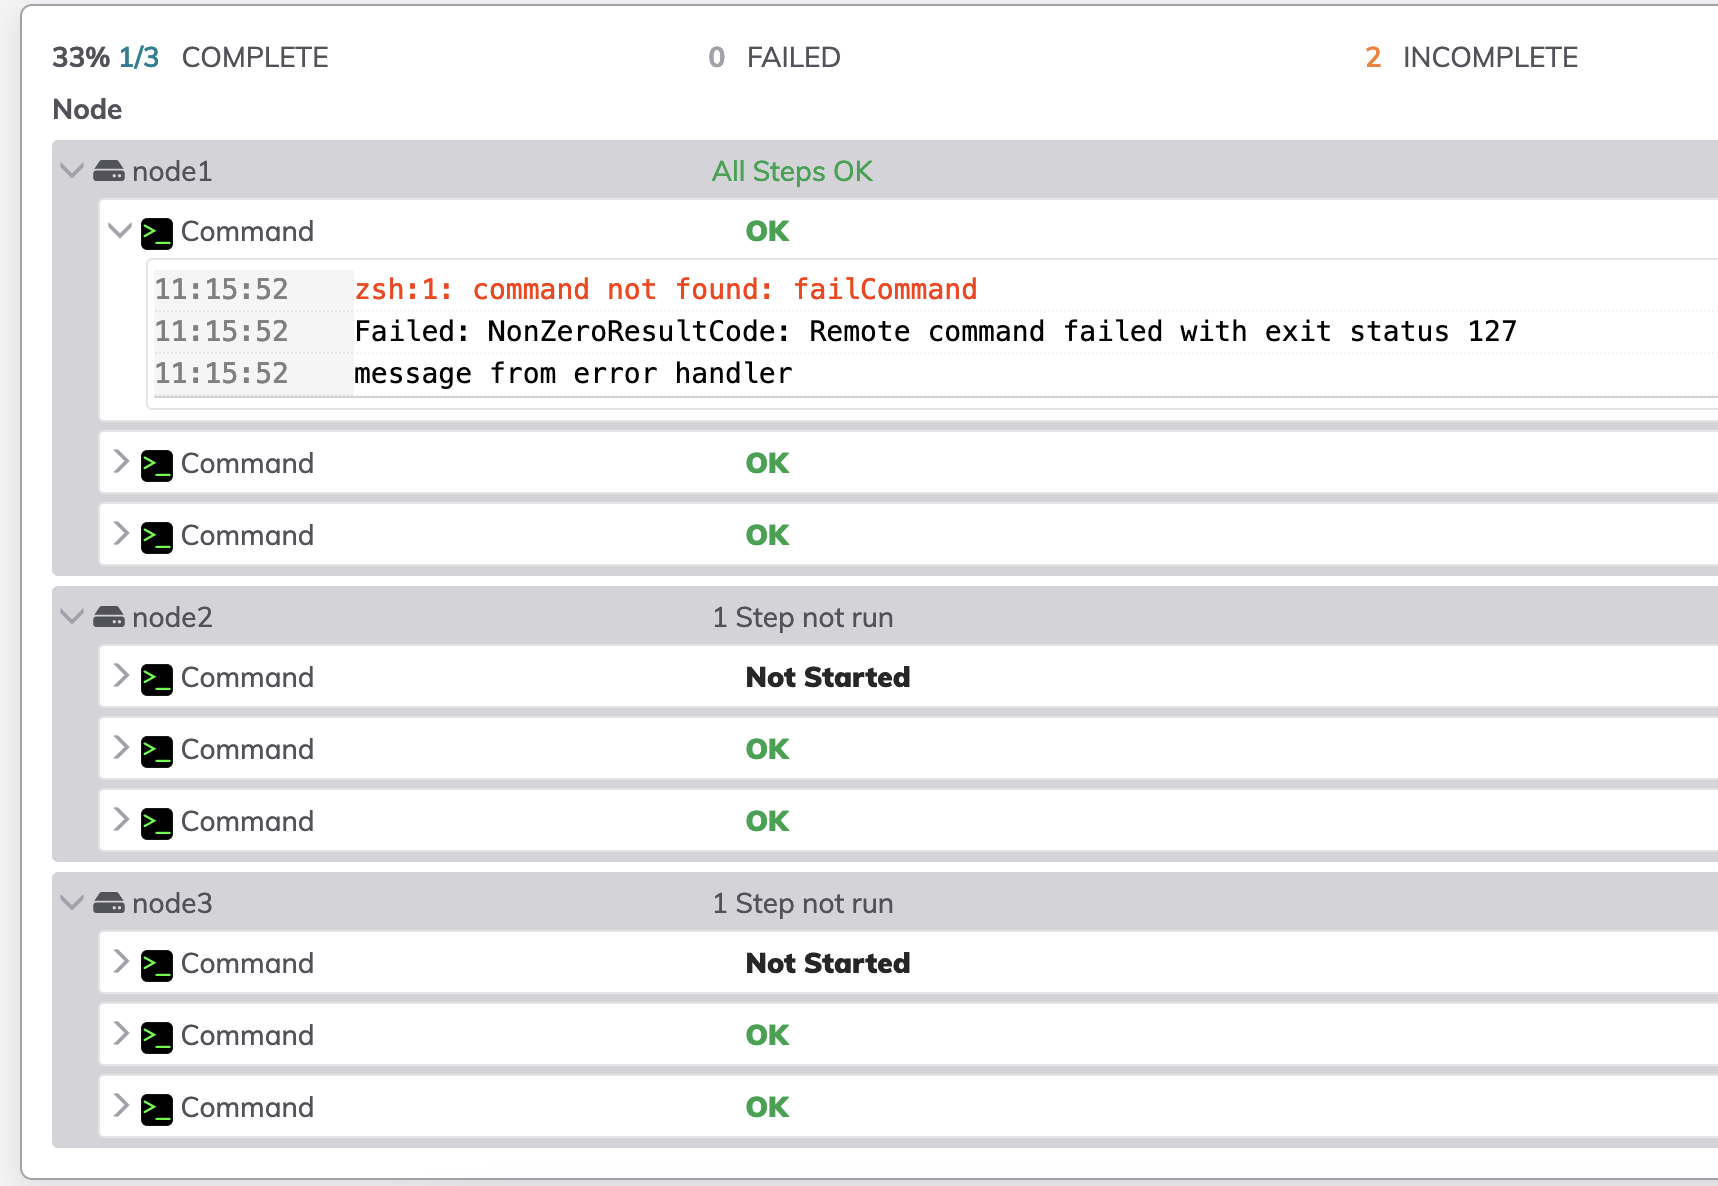
Error handler with sequential workflow strategy
When using Sequential workflow strategy, the error handler gets triggered once in the first node that fails to execute the step and it won't run the step on the remaining nodes unless "Continue running on any remaining nodes before failing the step" is selected in the Nodes tab.
Here is the log output when using error handler with sequential workflow strategy
Context information
When the Error-handler step is executed, its execution context will contain some information about the nature of the failure that occurred for the original step.
In the case where a Node Step has a Workflow Step as an Error Handler, then the failure data for multiple nodes is rolled up into a single failure reason to be used by the Workflow Step.
See the section on Context Variables for more information.
Save the changes
Once the Workflow steps have been defined and order, changes are permanently saved after pressing the "Create" button if new or the "Update" button if the Job is being modified.
Context Variables
When a Job step is executed, it has access to a set of "context variables" that provide information about the Job, nodes, options, and runtime data. These variables can be referenced in commands, scripts, and configuration fields throughout your workflow.
For comprehensive information about all available variables, their syntax, and usage patterns, see the Job Variables Reference.
Quick Examples
Job Information:
echo "Running ${job.name} in project ${job.project}"
Node Information:
echo "Executing on ${node.hostname}"
User Options:
echo "Environment: ${option.environment}"
Captured Data:
# Using data captured from a previous step via log filter
echo "Status: ${data.status}"
Cross-Node References:
# Get value from specific node
${data.hostname@webserver01}

# Get values from all nodes (comma-separated)
${data.status*}
Error Handler Context:
# Available in error handlers
echo "Failed with: ${result.reason}"
For the complete reference including all variable types, scopes, syntax variations, and advanced usage, see Job Variables Reference.
Command Line Tools and API access
Jobs can be exported or imported in XML or Yaml format using the API or the rd CLI tool.