Kubernetes Integration Overview
Kubernetes Integration Overview
Available in PagerDuty Runbook Automation Commercial products.

Runbook Automation integrates with Kubernetes through a variety of plugins. By integrating Runbook Automation with Kubernetes, users can automate and provide self-service interfaces for operations in their Kubernetes Clusters.
| Plugin Name | Plugin Type | Description |
|---|---|---|
| Amazon EKS Node Source | Node Source | Imports Amazon Web Services EKS Clusters as Nodes. |
| Azure AKS Node Source | Node Source | Imports Azure AKS Clusters as Nodes. |
| Google Cloud GKE Node Source | Node Source | Imports Google Cloud GKE Clusters as Nodes. |
| Kubernetes Cluster Create Object | Node Step | This plugin creates an object of a selected kind within a Kubernetes cluster. |
| Kubernetes Cluster Delete Object | Node Step | This plugin deletes an object of a selected kind within a Kubernetes cluster. |
| Kubernetes Cluster Describe Object | Node Step | This plugin describes an object of a selected kind within a Kubernetes cluster. |
| Kubernetes Cluster List Objects | Node Step | This plugin lists objects of a selected kind within a Kubernetes cluster. |
| Kubernetes Cluster Object Logs | Node Step | This plugin allows you to view the logs of an object within a Kubernetes cluster. |
| Kubernetes Cluster Run Command | Node Step | This plugin allows you to execute a command in a pod within a Kubernetes cluster. |
| Kubernetes Cluster Run Script | Node Step | This plugin executes a script using a predefined container image within a Kubernetes cluster. |
| Kubernetes Cluster Update Object | Node Step | This plugin updates a specified object of a selected kind within a Kubernetes cluster. |
Commercial Plugins
This document covers the plugins available in the commercial Runbook Automation products. For a list of Kubernetes plugins available for Rundeck Community (open-source), see documentation for the Open Source Kubernetes plugins.
Adding Clusters & Authenticating with Kubernetes API
There are multiple methods for adding Kubernetes clusters to Runbook Automation:
- Runners with Pod-based Service Account: Install a Runner in each cluster (or namespace), and target the Runner as the cluster or particular namespace. The Runner uses the Service Account of the pod that it is hosted in to authenticate with the Kubernetes API.
- Cloud Provider Integration: Use the cloud provider's API to dynamically retrieve all clusters and add them as nodes to the inventory. The cloud provider's API can also optionally be used to retrieve the necessary Kubernetes authentication to communicate with the clusters.
- Manual Authentication Configuration: Clusters are added to the inventory either manually or through method 1 or 2. The Kubernetes API Token or Kube Config file is manually added to Key Storage and configured as node-attributes.
Prerequisite Configuration
Note that all of these methods require the use of the Automatic mode for the Project's use of Runners. See this documentation to confirm that your project is configured correctly.
Runners with Pod-based Service Account
With this method, clusters are added to the inventory by installing a Runner in the cluster and adding the Runner as a node to the inventory. The Runner uses the Service Account of the pod that it is hosted in to authenticate with the Kubernetes API.
This method is recommended if you want to have a 1:1 relationship between Runners and Kubernetes clusters or between Runners and namespaces within clusters, or if you are unable to use the Cloud Provider Integration method outlined in the next section.
Follow these steps to set up a Runner in a Kubernetes cluster:
- Create a new Runner within your Project using the API. Replace
URLwith your Runbook Automation instance URL,PROJECTwith the project name, andAPI_TOKENwith your API Token:curl --location --request POST 'https://[URL]/api/42/project/[PROJECT]/runnerManagement/runners' \ --header 'Accept: application/json' \ --header 'X-Rundeck-Auth-Token: [API_TOKEN]' \ --header 'Content-Type: application/json' \ --data-raw '{ "name": "K8s Runner US-WEST-1 Cluster 1", "description": "Runner installed in US-WEST-1 Cluster 1", "tagNames": ["K8S-RUNNER", "us-west-1", "cluster-1"] }'The response will provide the following. Be sure to capture theTip
It is recommended to add at least one Tag through the
tagNamesfield to the Runner, as this simplifies adding the Node Enhancer in step 4.runnerIdand thetoken:{"description":"Runner installed in US-WEST-1 Cluster 1", "downloadTk":"fbc12393-3454-426d-9dd0-6e72ce53b9d5", "name":"K8s Runner","projectAssociations":{"network-infra":".*"}, "runnerId":"acc00df8-fbb8-497a-8f7f-07eaaa0c5b78","token":"6Y4bHjk4TCU1MUGBaso9Ak7sHOokwRkw"} - Create a deployment YAML for the Runner. Be sure to replace
[namespace],[runnerId]with the value from the previous step,[token], and[Runbook Automation Instance URL]:apiVersion: v1 kind: Pod metadata: namespace: [namespace] name: rundeck-runner labels: app: rundeck-runner spec: containers: - image: rundeckpro/runner imagePullPolicy: IfNotPresent name: rundeck-runner env: - name: RUNNER_RUNDECK_CLIENT_ID value: "[runnerId]" - name: RUNNER_RUNDECK_SERVER_TOKEN value: "[token]" - name: RUNNER_RUNDECK_SERVER_URL value: "https://[Runbook Automation Instance URL]" lifecycle: postStart: exec: command: - /bin/sh - -c - touch this_is_from_rundeck_runner restartPolicy: Always - Create the deployment:
kubectl apply -f deployment.yml. - Add a Node Attribute to the Runner's node in the inventory through an Attribute Match Node Enhancer.
- Set the Attribute Match to use one of the tags set in Step 1:
tags=~.*K8S-RUNNER.* - Set the Attributes to Add as:
kubernetes-use-pod-service-account=true
Tip
This step is only required one time if you use the same tag for all Runners that are deployed into Kubernetes clusters and use the Pod-based Service Account method.
- Set the Attribute Match to use one of the tags set in Step 1:
The Runner will now be able to authenticate with the Kubernetes API using the Service Account of the pod that it is hosted in.
Cloud Provider Integration
The Cloud Provider Integration method can be used to dynamically retrieve all clusters from the cloud provider's API and add them as nodes to the inventory. The cloud provider's API can also be used to retrieve the necessary Kubernetes authentication to communicate with the clusters.
Cloud Provider for Discovery and Pod Service Account for Authentication
It is possible to use the Cloud Provider Integration method for cluster discovery and the Pod-based Service Account method for authentication. This is useful when you want to dynamically discover clusters but have a 1:1 relationship between Runners and clusters or do not have the option to use the cloud provider for retrieving cluster credentials. To take this approach, be sure to select the Use Pod Service Account for Node Steps when configuring the Node Source plugins.
Cloud Provider for Cluster Discovery
Use the Node Source plugins for the cloud provider to add the clusters to the Node Inventory:
Note that a Runner does not need to be installed to configure these Node Source plugins.
Cloud Provider for Kubernetes Authentication
Runbook Automation can use its integration with the public cloud providers to retrieve credentials to authenticate with the Kubernetes clusters.
This method of authentication is useful when:
- Installing a Runner inside the clusters is not an option
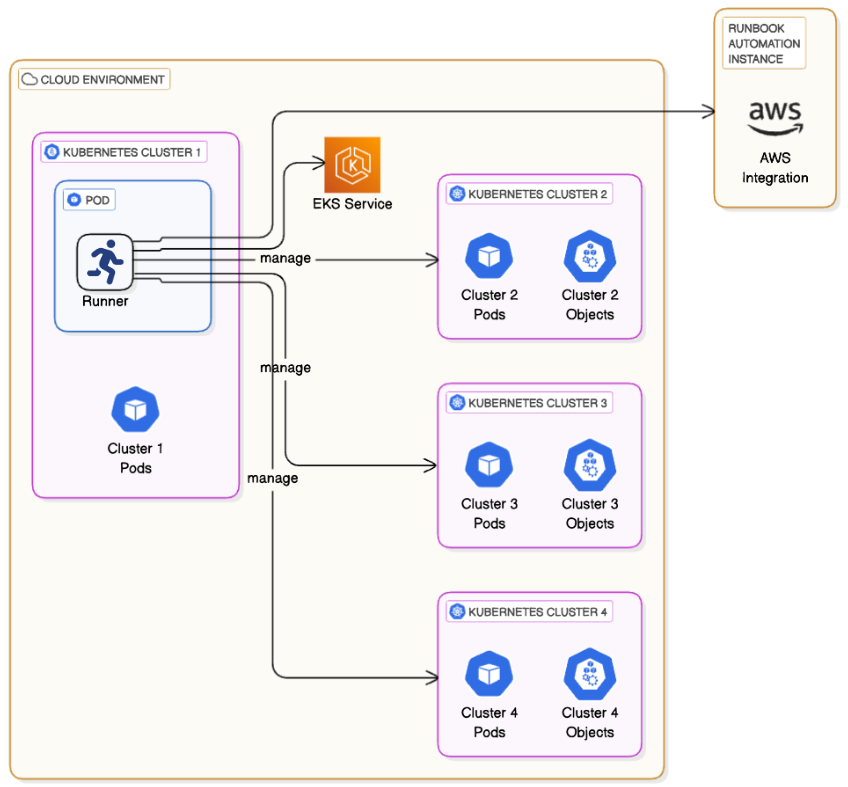
- There are numerous clusters and it is preferred to have a one-to-many relationship between the Runner and the clusters
With this approach, a single Runner is installed in either a VM or a container that has a path to communicate with the clusters. The Runner uses the cloud provider's API to retrieve the necessary Kubernetes authentication to communicate with the clusters:

AWS EKS Authentication
To authenticate with EKS clusters using the AWS APIs:
Install a Runner in an EC2 instance or a container that has access to the EKS clusters.
Assign permissions to the IAM role of this EC2 or container to allow the Runner to retrieve the necessary EKS cluster credentials:
eks:DescribeCluster
Add the EKS API as an authentication mode and add the IAM Role of the Runner's host (EC2 or container) to the target clusters:
Repeat for each target cluster
This process must be repeated for each target cluster so that the Runner can authenticate with each cluster.
AWS Console- Navigate to the EKS Console.
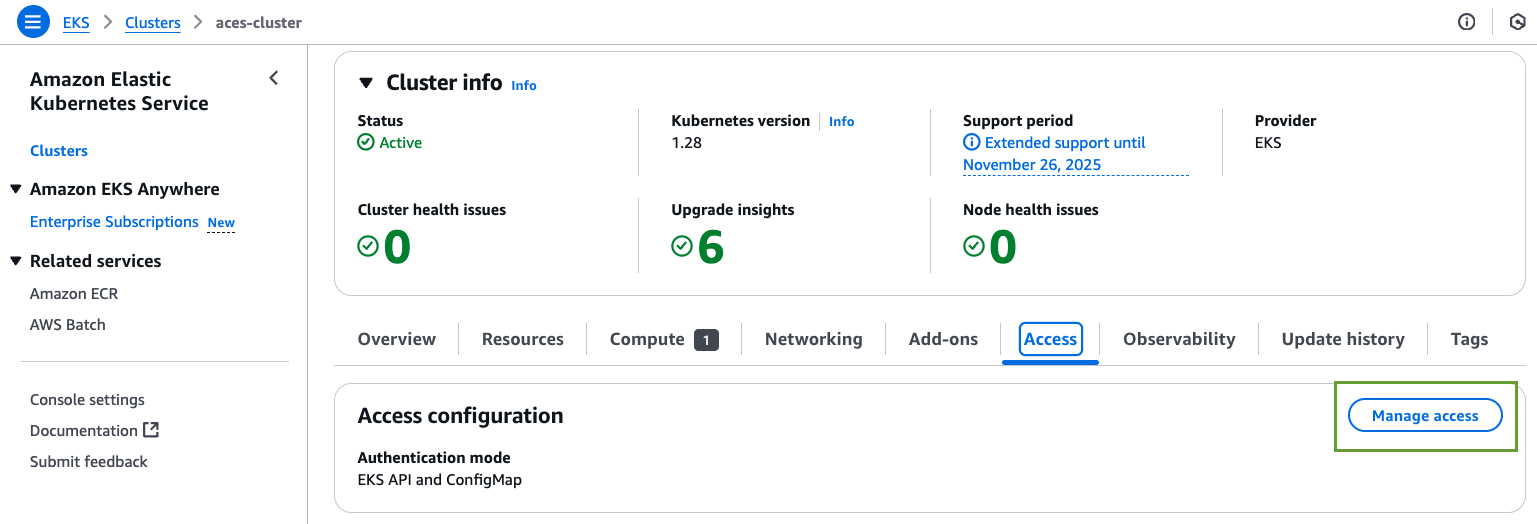
- Select the target cluster and click on the Access tab and click Manage Access.

- Select either EKS API or EKS API and ConfigMap.
- Click Save Changes.
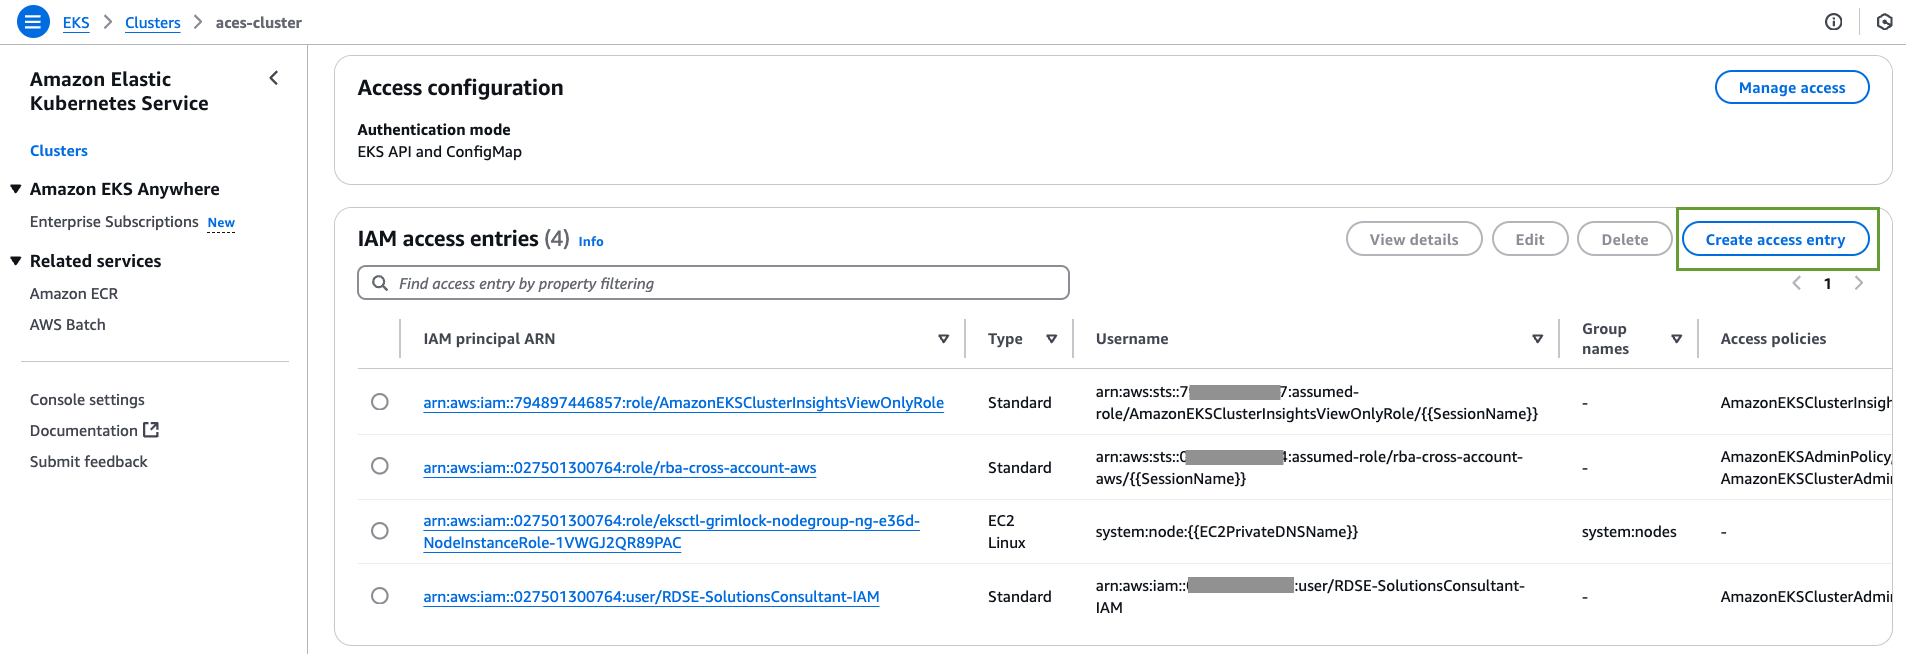
- Now in the IAM access entries section, click on Create access entry:

- In the IAM principal section, select the IAM Role of the Runner's host (EC2 or container).
- Select Standard for the Type.
- On the next screen, assign the desired Policy Name and Access Scope for this entry.
- On the next screen, click Create.
CLI- Install the AWS CLI as described here
- Run the following command to add the EKS API as an access mode:
aws eks update-cluster-config --name my-cluster --access-config authenticationMode=API_AND_CONFIG_MAP - Create an access entry for the IAM Role of the Runner's host (EC2 or container). Here is an example command, but additional examples can be found in the official AWS documentation:Replace
aws eks create-access-entry --cluster-name my-cluster --principal-arn arn:aws:iam::111122223333:role/EKS-my-cluster-self-managed-ng-1 --type STANDARDarn:aws:iam::111122223333:role/EKS-my-cluster-self-managed-ng-1with the IAM Role of the Runner's host.
Now when the Runner targets the EKS clusters using the Kubernetes node-step plugins, it will be able to authenticate with the clusters using credentials fetched from AWS.
Azure AKS Authentication
To authenticate with AKS clusters using the Azure APIs:
Install a Runner in a VM or container that has a network path to the target AKS clusters.
Follow the instructions in the Azure Plugins Overview to create a Service Principal and add the credentials for this Service Principal to Runbook Automation.
Pre-existing Service Principal
If Runbook Automation has already been integrated with Azure, then you may not need to create a new Service Principal. Instead, add these permissions to the existing Service Principal.
A assign permissions that allow this Service Principal to retrieve AKS cluster credentials:
Microsoft.ContainerService/managedClusters/listClusterUserCredential- Azure provides pre-built roles that have this permission, such as Azure Kubernetes Service Cluster User Role.
Role Assignment Scope
The role assignment of these permissions can be assigned at the Subscription, Resource Group or even on an individual cluster basis. Regardless of the chosen scope, navigate to the Access Control (IAM) section and add the role assignment.
Now when the Runner targets the AKS clusters using the Kubernetes node-step plugins, it will be able to authenticate with the clusters using credentials fetched from Azure.
Google Cloud GKE Authentication
To authenticate with GKE clusters using the Google Cloud APIs:
Install a Runner in a VM or container that has a network path to the target GKE clusters.
Follow the instructions in the Google Cloud Plugins Overview to create a Service Account and add the credentials for this Service Account to Runbook Automation.
Pre-existing Service Account
If Runbook Automation has already been integrated with Google Cloud, then you may not need to create a new Service Account. Instead, add these permissions to the existing Service Account.
Add a Role to the Service Account that has the permissions to retrieve the cluster credentials from the GKE service:
container.clusters.get- A predefined role, such as Kubernetes Engine Developer, can be used for this purpose.
Now when the Runner targets the GKE clusters using the Kubernetes node-step plugins, it will be able to authenticate with the clusters using credentials fetched from Google Cloud.
Manual Authentication Configuration
If you do not have the option to place the Runner inside the target cluster or use the Cloud Provider Integration method, you can manually configure the Kubernetes authentication.
- Create an API token for a service account following the steps outlined here.
- Retrieve the
tokenand theca.crtfrom the secret created in the previous step:kubectl get secret/[secret-name] -o yaml. - Add both the
tokenand theca.crtto Key Storage. - Next, retrieve the cluster's API endpoint. This can be found by running
kubectl cluster-info. - Add a node to the inventory and add the following as node attributes:
kubernetes-cloud-provider=self-hosted
kubernetes-cluster-endpoint=<<cluster endpoint>>
kubernetes-token-path=<<path to token in key storage>>
kubernetes-ca-cert-path=<<path to CA cert in key storage>>
This node can now be targeted by the Kubernetes node-step plugins.
