
Integrate with Hashicorp Vault
Integrate with Hashicorp Vault
Out-of-the-box, both PagerDuty Runbook Automation & Rundeck Community store all the keys and passwords in their own Key Storage using the database backend. Many customers prefer to use a central Key Storage server to access all keys and passwords from a single secure location. This avoids saving secrets in multiple locations and reduces the risk of key/password leaks.
This article will demonstrate how to integrate PA/Rundeck Community with the Hashicorp Vault plugin.
Hashicorp Vault
Vault is an identity-based secret and encryption management system. A secret is anything that you want to tightly control access to, such as API encryption keys, passwords, or certificates. Vault provides encryption services that are gated by authentication and authorization methods. Using Vault’s UI, CLI, or HTTP API, access to secrets and other sensitive data can be securely stored and managed, tightly controlled (restricted), and auditable.
Validate Vault server access.
Before integrating Vault with PA or Rundeck confirm the the Vault server is available and that you have access to configure it.
If you don’t already have Vault installed follow these steps:
- Download the Vault binary here.
- Uncompress the file and save the executable in a specific location in this example is saved on
/home/user/Programs/vault - Start the server with
./vault server -devcommand. - Check the output, you can see the Vault server URL and use the token to access it.
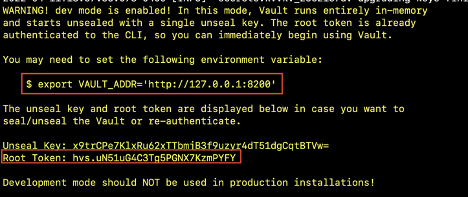
Checking the VAULT_ADDR URL in any browser you can see the Vault web interface. Use the Vault output’s Root Token to login.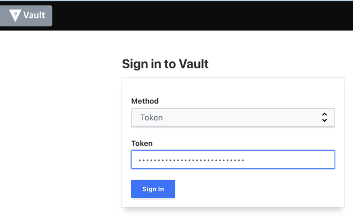
For more Vault Setup instructions see their documentation here.
Preparing Vault Integration
Hashicorp recommends using AppRoles for authenticating and governing access for integrations such as this. The following steps assume this is a fresh installation of Vault. Feel free to adapt to your current installation as needed. To perform these steps you will need a working Vault CLI setup with root rights to configure the Vault installation.
- Enable Approle authentication method.
vault auth enable approle - Save the following text to a file called
policy.hclon the machine where the Vault CLI is run from.path "secret/data/rundeck-keys/*" { capabilities = ["create", "read", "update"] } path "secret/metadata/rundeck-keys/*" { capabilities = ["read", "delete", "list"] } path "secret/delete/rundeck-keys/*" { capabilities = ["update"] } path "secret/rundeck-keys/*" { capabilities = ["create", "update", "delete", "read", "list"] }This policy assumes all the keys will be stored in the default
secretkV store whether it is version 1 or 2. If you have an existing path for keys you wish to use only replace therundeck-keyspart with the path you desire. - Import this policy to Vault:
vault policy write rundeck-policy ./policy.hcl - Create a role for Rundeck
vault write auth/approle/role/rundeck \ secret_id_ttl=20m \ token_num_uses=0 \ token_ttl=20m \ token_max_ttl=30m \ secret_id_num_uses=40 policies=rundeck-policy - Gather the
role_idandsecret_idfor use when configuring in Rundeck: Role ID:vault read auth/approle/role/rundeck/role-idSecret ID:vault write -force auth/approle/role/rundeck/secret-id
Configuring Vault with PA / Rundeck
The Vault Storage plugin is bundled by default with PagerDuty Runbook Automation. To use the plugin, you need to add properties using the System Configuration feature.
PA includes a Configuration Management module to set configuration settings via the GUI and store them in the product database. Database storage shares configuration options with all your cluster members and centralizes configuration.
- Click on the gear icon (upper right) and select “System Configuration”.
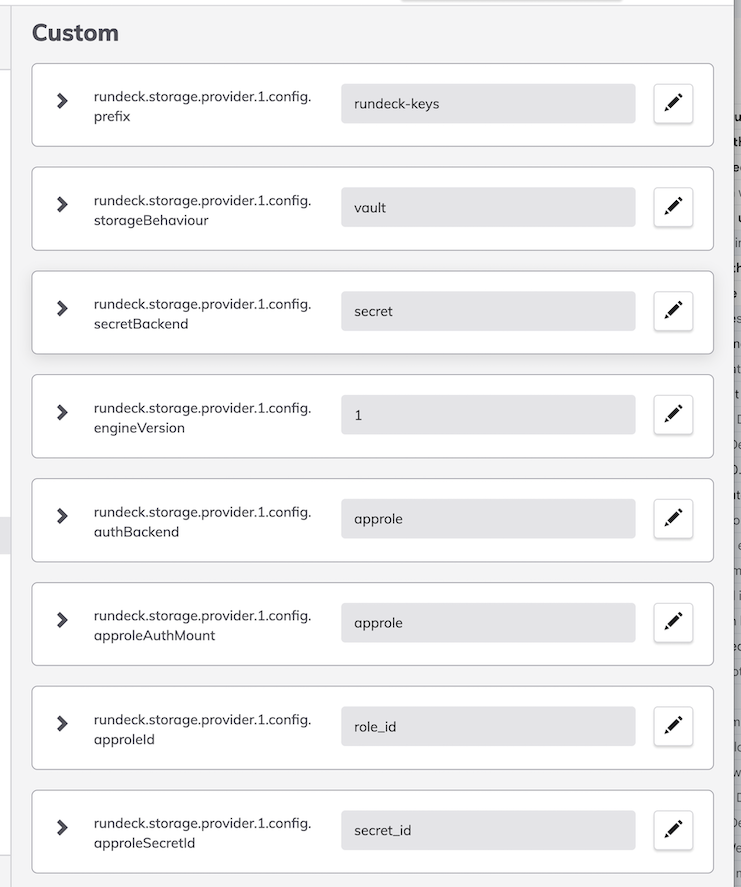
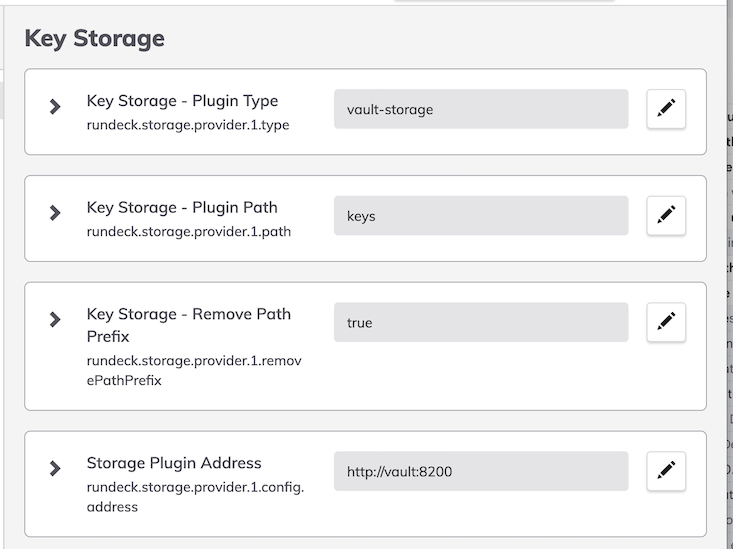
- Add these properties:
- Restart the PDPA / Rundeck service.
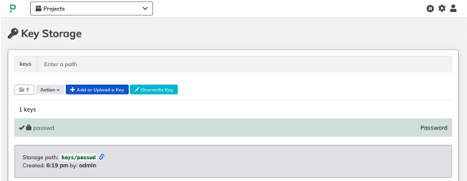
- To save a key or password, just click on the Gear Icon (Up to right) select “Key Storage” and save the password or key on any path.
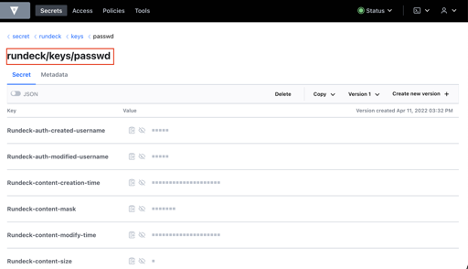
- From the Vault side, check the secret/rundeck path and see the stored key.
- Stop the Rundeck service.
- Download the Vault Storage Plugin jar file from here and save it to the
libextdirectory. - Open the
rundeck-config.propertiesfile, comment out or remove the following lines:rundeck.storage.provider.1.type=db rundeck.storage.provider.1.path=keys - Then add the following config with adjustments for your specific environment:
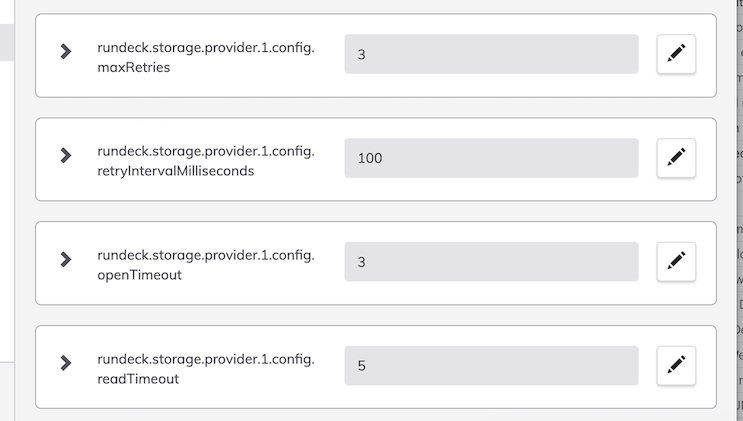
rundeck.storage.provider.1.type=vault-storage rundeck.storage.provider.1.path=keys rundeck.storage.provider.1.removePathPrefix=true rundeck.storage.provider.1.config.prefix=rundeck-keys rundeck.storage.provider.1.config.address=http://vault:8200 rundeck.storage.provider.1.config.storageBehaviour=vault rundeck.storage.provider.1.config.secretBackend=secret rundeck.storage.provider.1.config.engineVersion=1 rundeck.storage.provider.1.config.authBackend=approle rundeck.storage.provider.1.config.approleAuthMount=approle rundeck.storage.provider.1.config.approleId=role_id rundeck.storage.provider.1.config.approleSecretId=your-secret-id rundeck.storage.provider.1.config.maxRetries=3 rundeck.storage.provider.1.config.retryIntervalMilliseconds=100 rundeck.storage.provider.1.config.openTimeout=3 rundeck.storage.provider.1.config.readTimeout=5 - Start the Rundeck service.
- To save any key or password, just click on the Gear Icon (Up to right) select “Key Storage” and save any password or key.
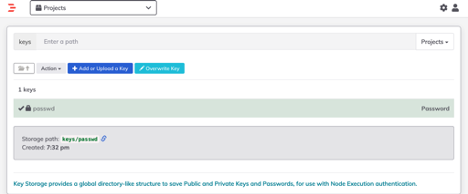
- From the Vault side, check the secret/rundeck path and see the Rundeck stored key.

Properties explained:
rundeck.storage.provider.[index].config.approleId: This value should be set to the Role ID gathered in the Vault setup steps.rundeck.storage.provider.[index].config.approleSecretId: This value should be set to the Secreet ID gathered in the Vault setup steps.rundeck.storage.provider.[index].config.prefix: Base path in Vault secret backend to the keys that should be available in Rundeck.rundeck.storage.provider.[index].config.address: Connection Address of the Vault server with port number.rundeck.storage.provider.[index].config.maxRetries: Maximum number of connection retries to Vault server.rundeck.storage.provider.[index].config.retryIntervalMilliseconds: Retry interval. Connection retry interval, defined in ms.rundeck.storage.provider.[index].config.openTimeout:Open timeout. Connection opening timeout, in seconds.rundeck.storage.provider.[index].config.readTimeout: Read timeout. Response read timeout, in seconds.rundeck.storage.provider.[index].config.secretBackend: Secret Backend. The secret backend to use in Vault.rundeck.storage.provider.[index].config.storageBehaviour: Storage Behaviour. Use the default Rundeck behavior for key storage (with Rundeck headers) or use just the key/value behavior from Vault. Options arerundeckandvault.rundeck.storage.provider.[index].config.engineVersion: Vault Engine Version Key/Value Secret Engine Config.rundeck.storage.provider.[index].removePathPrefix: This is set to 'true' to prevent Rundeck from adding thekeyspath to Vault.