
Configure WinRM on Windows remote nodes
Configure WinRM on Windows remote nodes
 |  |
Rundeck is a popular automation tool and many organizations use it to manage their IT infrastructure. It can easily manage and automate tasks on various operating systems including Windows. In this tutorial, we'll walk through the process of configuring Windows nodes on Rundeck Open Source and how to dispatch commands and Powershell scripts on them.
By the end of this tutorial, you'll have a good understanding of how to set up and manage Windows nodes on Rundeck Open Source and how to leverage its powerful features to automate various tasks on your Windows infrastructure. These instructions would also work for PagerDuty Runbook Automation, the commercial counterpart to Rundeck.
The WinRM Protocol
WinRM (Windows Remote Management) is a protocol developed by Microsoft that enables administrators to remotely manage computers running Windows operating systems.
This protocol uses Windows PowerShell as its command-line interface, which allows administrators to run commands and scripts on remote computers using a familiar syntax. PowerShell also includes a number of built-in cmdlets (command-line utilities) that are designed specifically for remote management.
Why WinRM over Windows based systems?
Rundeck can work with many different protocols but in the case of Windows servers, WinRM is often used because it is natively available on Windows, so nothing needs to be downloaded to make it work. Additionally, WinRM may already be configured in the environment, making setup that much easier.
WinRM and Rundeck
Rundeck can dispatch commands and jobs to nodes through the WinRM protocol. Historically, this was done using the "Overthere WinRM" plugin. That has since been replaced by the "PyWinRM" plugin.
The Overthere WinRM plugin was originally developed by the Rundeck community and included as an official plugin in Rundeck versions up to 3.0. However, the plugin is no longer actively maintained or supported by the Rundeck development team. This means that while the Overthere WinRM plugin may still work with older versions of Rundeck, users should not expect to receive updates from the Rundeck team. Instead, users may need to rely on community resources or alternative plugins to achieve similar functionality.
Users who require WinRM functionality in Rundeck are encouraged to use the PyWinRM plugin, which has active development and community support.
The PyWinRM plugin is included out of the box with Rundeck and Runbook Automation and does not require extra steps to install it.
Current py-winrm-plugin builds require Python 3.8+ on the Rundeck server (and on Runner hosts that run WinRM work); Python 2 is not supported. See Windows nodes with PyWinRM and Upgrading to Rundeck 6.0.
Configuration Steps
The following section explains how to configure Windows to use WinRM and Rundeck to dispatch commands and scripts over WinRM against Windows nodes.
Configuring WinRm on Windows nodes
Here are the steps to enable the WinRM service on Windows using the basic authentication method:
- Open the Windows PowerShell console with administrative privileges.
- Configure WinRM to allow basic authentication:
winrm set winrm/config/service/Auth '@{Basic="true"}' - Configure WinRM to allow unencrypted SOAP messages:
winrm set winrm/config/service '@{AllowUnencrypted="true"}' - Configure WinRM to provide enough memory to the commands that you are going to run, e.g. 1024 MB:
winrm set winrm/config/winrs '@{MaxMemoryPerShellMB="1024"}' - Once the command completes, type the following command to verify that WinRM is running on the machine:
Test-WSMan - To test a WinRM connection from another WinRM machine:
Test-WSMan -ComputerName TargetMachineName
If these tests were successful, you can use WinRM to remotely manage the computer using PowerShell and configure the Rundeck instance to connect to the Windows node.
Note that the WinRM service requires that the Windows Firewall be configured to allow incoming connections on TCP port 5985 (HTTP) or 5986 (HTTPS). If the Windows Firewall is enabled, you may need to create a new inbound rule to allow WinRM traffic.
Enable PyWinRM on Rundeck server
In order to connect exclusively to Windows nodes using WinRM from a particular project, enable PYWinRM as the default node executor.
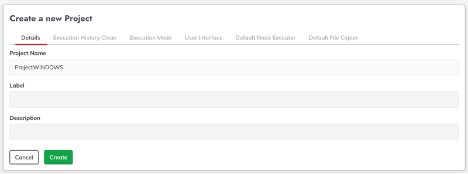
- Create a new project and give it a name.
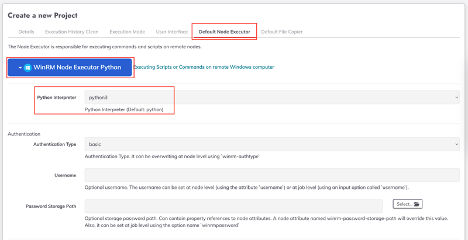
- Click on the "Default Node Executor" tab and select "WinRM Node Executor Python" from the Node Executor selector list (the default value is "SSH").
- Pick the correct version of Python from the "Python Interpreter" list. (Note: some Linux distributions use "Python" to indicate the Python 3 interpreter by default).
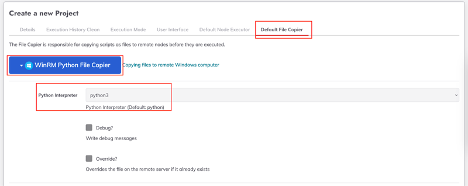
- Click on the "Default File Copier" tab and select "WinRM Python File Copier".
- Pick the appropriate Python version as an interpreter. This enables dispatching scripts against Windows systems.
- Scroll down and save the project.
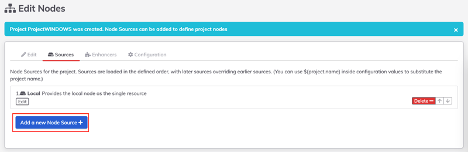
Adding a Node Source
Nodes are the servers or other devices that are managed by Rundeck. Since we don’t have any nodes in this project yet (other than the server itself), we need to set one up by adding a Node Source and entering details about the node. This is a static method of defining nodes but nodes could also come from an existing source, such as Ansible inventory or AWS EC2.
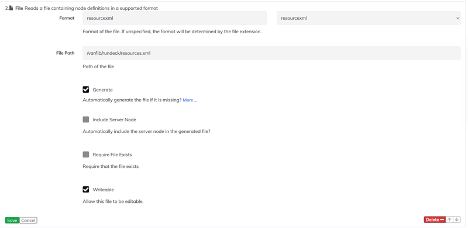
- Add a new node source by clicking on the "Add a new Node Source" button.
- Select "File" and choose "Resourcexml" from the left dropdown menu under the "Format" section.
- Create a full file path that is reachable by the rundeck user, such as
/var/lib/rundeck/resources.xml. - Select "Generate" and "Writeable" checkboxes and click on the "Save" button.
- Click on the "Save" button again.
Entering Node Details
- Go to the "Edit" tab and click on the "Modify" button.
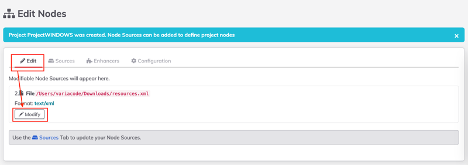
The XML editor should appear, showing a nodeless XML file as follows:<?xml version="1.0" encoding="UTF-8"?> <project/> - Replace that default XML content with the following:
<?xml version="1.0" encoding="UTF-8"?> <project> <node name="MyWindows" description="Windows Server" tags="windows" hostname="192.168.1.13" osArch="amd64" osFamily="windows" osName="Windows Server" osVersion="6.3" username="winuser" winrm-password-storage-path="keys/winpassword" winrm-authtype="basic"/> </project> - Click Save to add the node to the project.
Note that the hostname attribute should match the hostname or IP address of the Windows remote node. The username corresponds to the Windows user, and the winrm-password-storage-path attribute refers to the Rundeck key storage path for the Windows user password. (We’ll be adding the actual password in a moment.)
Adding a Password to Key Storage
- Go to the Gear icon on the top right and select "Key Storage".
- Click on the "Add or Upload a Key" button.
- Select "Password" from the Key Type dropdown menu.
- Enter the Windows user password for the test machine in the "Enter a password" field.
- Enter "winpassword" in the "Specify a name" textbox.
- Save the password.
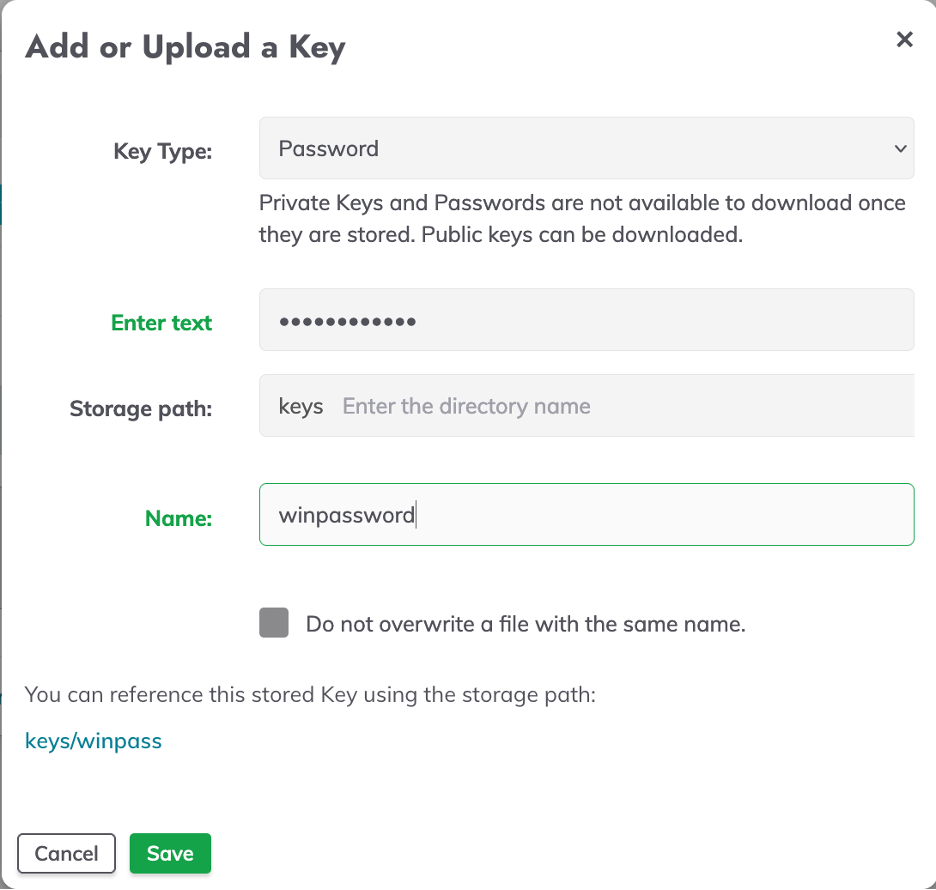
- Now the Windows user password is stored at the
keys/winpasswordKey Storage path (referenced previously by thewinrm-password-storage-pathattribute).
That's it! A Windows node is now available to dispatch commands and jobs.
Dispatching commands and scripts against Windows nodes
Once Nodes have been properly configured, it is possible to run commands or Jobs against those Nodes. This is a the clearest way to confirm that everything is configured correctly
To dispatch ad-hoc commands to your Windows node
- From the left-hand menu, navigate to the "Commands" section.
- Enter the name of the Windows machine in the "Nodes Filter" field, then press "Enter." The node should now be marked as "Node Matched".
- Enter a specific Windows command, such as "dir," then click the "Run on 1 Node" button.
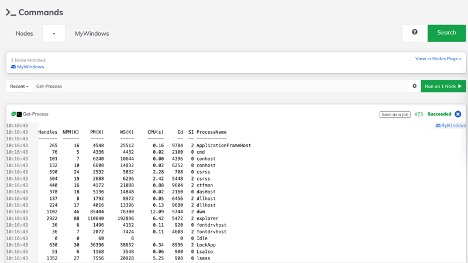
If a user has the ability to run commands in the project, this is a way to get details from a node without logging in directly or building a full job. It is also possible to take a command that has been run and use it to start job creation. Whether or not a user can run ad hoc commands and which nodes can be targeted are controlled by access control policies.
To dispatch Powershell scripts
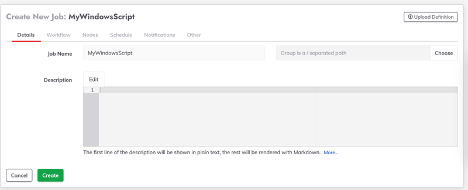
- Navigate to Jobs in the left hand menu
- Click create a new job and provide the job with a name
- Click on the "Nodes" tab, then select the "Dispatch to Nodes" radio button.
- Enter the name of the Windows node in the "Node Filter" field, then press "Enter."
The node should now be reflected in the "Matched Nodes" section.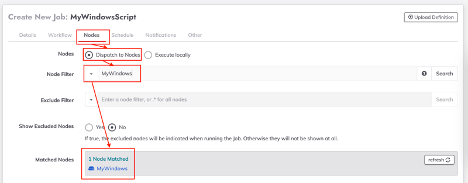
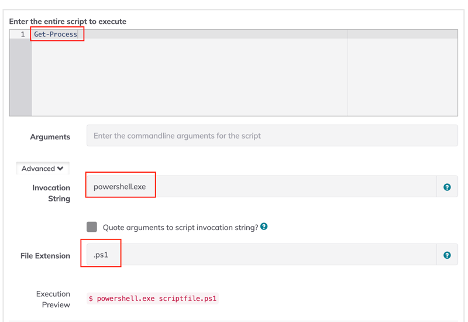
- Switch to the "Workflow" tab, then scroll down and click the "Script" step ("Script - Execute an inline script").
- Enter the Powershell command you wish to execute in the "Enter the entire script to execute" field (e.g., "Get-Process").
- Click the "Advanced" link. This will display two additional options: "Invocation String" and "File Extension."
- In the "Invocation String" field, enter powershell.exe. In the "File Extension" field, enter .ps1.
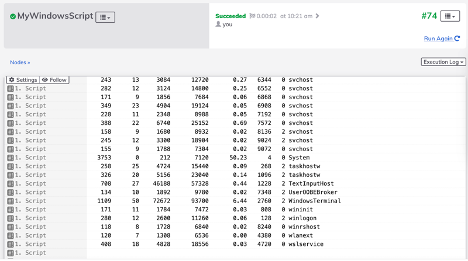
- Save the job, then run it.
Kerberos Authentication
Kerberos is the recommended authentication method for enterprise environments as it avoids sending passwords over the network. The PyWinRM plugin supports Kerberos authentication through the kerberos transport.
Prerequisites
The following requirements apply to the Rundeck server. For the full list see the py-winrm-plugin requirements.
- Linux, Mac OS X or Windows
- CPython 3.8+ or PyPy3
- pywinrm (
pip install pywinrm) - openssl 1.1.1 or higher
- requests-kerberos (required for Kerberos authentication — see installation instructions)
- requests-credssp (required for CredSSP authentication — see installation instructions)
Configuring krb5.conf
Instead of editing /etc/krb5.conf directly, the recommended approach is to place domain configuration as drop-in files under /etc/krb5.conf.d/. This keeps the main config file clean and makes it easy to add or remove domains independently — one file per domain, all in the same directory.
The main /etc/krb5.conf only needs to enable the include directory and set global defaults:
# /etc/krb5.conf
includedir /etc/krb5.conf.d/

[logging]
    default = FILE:/var/log/krb5libs.log
    kdc = FILE:/var/log/krb5kdc.log
    admin_server = FILE:/var/log/kadmind.log

[libdefaults]
    dns_lookup_realm = false
    ticket_lifetime = 24h
    renew_lifetime = 7d
    forwardable = true
    rdns = false
    pkinit_anchors = FILE:/etc/pki/tls/certs/ca-bundle.crt
    default_realm = DOMAIN1.EXAMPLE.COM
    default_ccache_name = KEYRING:persistent:%{uid}
For each domain, create a drop-in file under /etc/krb5.conf.d/. If you only have one domain, a single file is enough. For multiple domains, simply add one file per domain — Kerberos will load all of them automatically:
# /etc/krb5.conf.d/krb5-domain1.conf
[realms]
DOMAIN1.EXAMPLE.COM = {
    kdc = dc1.domain1.example.com
    admin_server = dc1.domain1.example.com
    default_domain = domain1.example.com
}

[domain_realm]
.domain1.example.com = DOMAIN1.EXAMPLE.COM
domain1.example.com = DOMAIN1.EXAMPLE.COM
# /etc/krb5.conf.d/krb5-domain2.conf  (add this only if you have a second domain)
[realms]
DOMAIN2.EXAMPLE.COM = {
    kdc = dc1.domain2.example.com
    admin_server = dc1.domain2.example.com
    default_domain = domain2.example.com
}

[domain_realm]
.domain2.example.com = DOMAIN2.EXAMPLE.COM
domain2.example.com = DOMAIN2.EXAMPLE.COM
The [domain_realm] section in each file is critical — it maps hostnames to their correct Kerberos realm so that kinit does not fall back to default_realm when connecting to nodes in other domains.
Node Configuration
Set the username in UPN format (user@REALM) so that kinit requests a ticket from the correct domain for each node. The node name, nodename, and hostname should all be set to the full FQDN of the target machine:
winnode.domain1.example.com:
  nodename: winnode.domain1.example.com
  hostname: winnode.domain1.example.com
  osFamily: windows
  winrm-password-storage-path: keys/project/kerberos/rundeck.password
  node-executor: WinRMPython
  file-copier: WinRMcpPython
  username: rundeck@DOMAIN1.EXAMPLE.COM
  tags: windows
winnode.domain2.example.com:
  nodename: winnode.domain2.example.com
  hostname: winnode.domain2.example.com
  osFamily: windows
  winrm-password-storage-path: keys/project/kerberos/rundeck.password
  node-executor: WinRMPython
  file-copier: WinRMcpPython
  username: rundeck@DOMAIN2.EXAMPLE.COM
  tags: windows
Important: Using
DOMAIN\userformat instead of UPN causes pywinrm to construct an incorrect Kerberos principal and fall back to NTLM. Always useuser@REALMformat when targeting nodes across multiple domains.
GPO Requirements
The following Group Policy settings are required on the Windows nodes. All credential delegation policies are found under:
Computer Configuration > Policies > Administrative Templates > System > Credentials Delegation
| Policy | Value |
|---|---|
| Allow delegating default credentials | Enabled — server list: WSMAN/*.yourdomain.com |
| Allow delegating fresh credentials | Enabled — server list: WSMAN/*.yourdomain.com |
| Allow delegating saved credentials | Enabled — server list: WSMAN/*.yourdomain.com |
| Allow delegating default credentials with NTLM-only server authentication | Enabled — server list: WSMAN/*.yourdomain.com |
| Allow delegating fresh credentials with NTLM-only server authentication | Enabled — server list: WSMAN/*.yourdomain.com |
| Allow delegating saved credentials with NTLM-only server authentication | Enabled — server list: WSMAN/*.yourdomain.com |
Computer Configuration > Policies > Administrative Templates > Windows Components > Windows Remote Management
| Policy | Value |
|---|---|
| WinRM Client > Disallow Kerberos authentication | Disabled |
| WinRM Service > Disallow Kerberos authentication | Disabled |
The first three policies cover credential delegation when the target server authenticates via Kerberos. The NTLM-only variants cover the same delegation but when the server falls back to NTLM — which can happen when Kerberos is temporarily unavailable, a DNS issue prevents SPN resolution, or a node is not yet fully enrolled in the domain. Enabling both sets ensures delegation works reliably across all nodes regardless of which authentication protocol is negotiated.
Important: Always use
WSMAN/*.yourdomain.com(notWSMAN/*) in the server list. Scoping to your domain restricts credential delegation to your own servers only, reducing the risk of credentials being delegated to an untrusted host.
Verifying Kerberos Configuration
Before running Rundeck jobs, verify that tickets can be obtained for each domain. For a single domain:
kinit rundeck@DOMAIN1.EXAMPLE.COM
klist  # should show a valid ticket for DOMAIN1.EXAMPLE.COM
If you have multiple domains, test each one — klist should show a ticket for every realm:
kinit rundeck@DOMAIN1.EXAMPLE.COM
kinit rundeck@DOMAIN2.EXAMPLE.COM
klist  # should show tickets for both realms
Resources
- PyWinRM plugin Github space.
- WinRM protocol documentation.