# Using AWS ALB as loadbalancer
Application Load Balancer overview An Application Load Balancer functions at the application layer, the seventh layer of the Open Systems Interconnection (OSI) model. After the load balancer receives a request, it evaluates the listener rules in priority order to determine which rule to apply, and then selects a target from the target group for the rule action.
You can add and remove targets from your load balancer as your needs change, without disrupting the overall flow of requests to your application.
You can configure health checks, which are used to monitor the health of the registered targets so that the load balancer can send requests only to the healthy targets.
For more information, see How Elastic Load Balancing works in the Elastic Load Balancing User Guide (opens new window).
# Creating an AWS ALB for you Rundeck Enterprise Cluster
# Health Checks
The web load balancer serving traffic to the Rundeck instance should be configured with a health check.
The default path for unauthenticated health checks is /health.
$host:$port/health
localhost:4440/health
node1.mydomain.com:4440/health
node2.mydomain.com:4440/health
172.31.5.111:4440/health
# Authenticated Health Checks
It is recommend to use unauthenticated health checks to reduce security exposure from load-balancer configurations. If you wish to use authenticated checks please ensure you are using the least privilege principle.
Please reference the documentation for more information about API Token Authorization Roles.
$host:$port/api/32/system/executions/status?authtoken=<TOKEN_VALUE>

$host:$port//api/32/system/executions/status?authtoken=<TOKEN_VALUE>
localhost:4440//api/32/system/executions/status?authtoken=<TOKEN_VALUE>
node1.mydomain.com:4440//api/32/system/executions/status?authtoken=<TOKEN_VALUE>
node2.mydomain.com:4440//api/32/system/executions/status?authtoken=<TOKEN_VALUE>
172.31.5.111:4440//api/32/system/executions/status?authtoken=<TOKEN_VALUE>
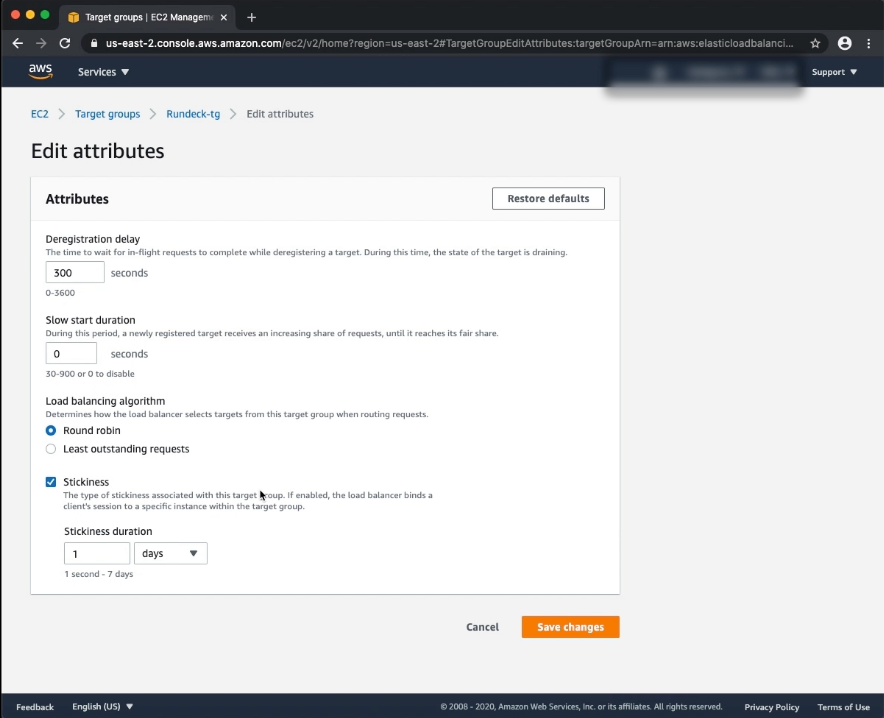
# IMPORTANT! STICKY SESSIONS MUST BE ENABLED.
Enable cookie stickiness via the AWS Console, EC2 -> Target Groups -> Your Target Group -> Group Details -> Attributes.
Enable cookie stickiness via the AWS CLI.
aws elbv2 modify-target-group-attributes \
--target-group-arn $AWS_ALB_TARGET_GROUP_ARN \
--attributes Key=stickiness.enabled,Value=true Key=stickiness.lb_cookie.duration_seconds,Value=86400