# Developing a custom Rundeck Java plugin
In this tutorial we'll learn:
- Why you might benefit from a custom Rundeck Java plugin
- How to set up your development environment to write, build and test Rundeck Java plugins
# Why create a Rundeck plugin in Java?
Rundeck is an open source ops automation platform that comes with a lot of functionality out of the box, like running script commands on your nodes with a command step. If you can already run commands with the default functionality, why would you want to write a new plugin to do that?
Several reasons:
- To encapsulate and reuse functionality across projects and jobs
- To expose parameters to the UI with descriptions, types and defaults
- To securely access secrets stored in Key Storage
These benefits apply to both script plugins and Java plugins. Additional benefits of writing a Java plugin would be:
- Fully crossplatform
- All code dependencies can be packaged with the plugin
- Robust access to Rundeck context data
- Testability
- Use any JVM language
# Fully crossplatform
Script plugins depend on a script interpreter like bash or powershell deployed on the node running your plugin. If you run a heterogeneous environment with nodes of different operating systems or different versions of the same operating system, you can avoid those inconsistencies using a Java plugin. Since Java can run on essential any platform, our plugin logic will run the same way regardless of what operating system it runs on.
# All code dependencies can be packaged with the plugin
Many scripts rely on external tools like awk, jq or your cloud provider's command line tool, requiring you to ensure that those tools are deployed everywhere your plugin will run, and are the correct version that your script expects. A Java plugin would be packaged into a single jar file that can also bundle any necessary third party library dependencies you might need alongside your plugin code so your dependencies are deployed atomically with your plugin logic.
# Robust access to Rundeck context data
Java step plugins can read data from the job context that previous jobs have written or write data to the job context so that other jobs have access to it. Accessing the job context data is exposed as a Java object, which is easier and less error prone than how script plugins read context data as environment variables and write context data via log capture parsing.
# Testability
Java plugins are testable in the same way any Java app is. You can use familiar libraries like JUnit and jMock to ensure that your plugin can be well-tested before being deployed. Tested code give developers who are new to the project more confidence in fixing bugs or adding features in the future.
# Use any JVM language
You can write Java plugins in more languages than just Java the language. You can use any JVM language to write your plugin, like Groovy, Scala or Kotlin.
# How to create a simple workflow step Java plugin
Now that we see the value in creating our own workflow step Java plugin, we can walk through a simple Hello World example. We will:
- Set up a simple Java development environment
- Create the plugin project structure
- Test that we can make changes to the plugin and see them take effect in a Rundeck instance
# Setting up your development environment
If you're not a Java programmer by trade, the thought of setting up a Java development environment might seem a little daunting. I'll try to walk you through a simple setup that may not have all the bells & whistles that a fully Java IDE might have, but will get you up and running quickly while still understanding each of the tools you're working with.
Our ultimate goal is to build an archive file of Java bytecode-compiled files that we can easily ship off to a Rundeck server instance. The archive file is a .jar file which is just a .zip file with extra metadata. The bytecode is compiled and packaged with Gradle, a DSL for building Java applications. We need to be able to write code and run the compiler to check that it compiles. Any other IDE features are icing on the cake.
# Installing the development dependencies
The easiest way to install all the dependencies on macOS is with Homebrew:
brew cask install java visual-studio-code docker
brew install gradle docker-compose make git
Otherwise you can install the dependencies manually:
# Install Visual Studio Code's Java Extension Pack
The editor we'll be using in this tutorial Visual Studio Code (vscode for short) has an extensible architecture to add support for whatever language or framework you need to work with. To get Java functionality, install the Java Extension Pack by pressing cmd+p then entering ext install vscjava.vscode-java-pack in the prompt.
# Bootstrapping the plugin project structure
# Download the rundeck-playground environment
If you don't already have the rundeck-playground project checked out, clone it now:
git clone https://github.com/clofresh/rundeck-playground.git
This project provides a sample Rundeck environment running in Docker on your workstation.
# Build and configure the rundeck-plugin bootstrap tool
Now that you have the rundeck-playground project, you can build the rundeck-plugin-bootstrap tool and make it executable in your environment:
make tools
eval $(make env)
To confirm that you have the bootstrap tool, run:
rundeck-plugin-bootstrap -h

Create a Verb artifact

The options available are:
        --destinationDirectory -d value : The directory in which the artifact directory will be generated
        --pluginName -n value : Plugin Name
        --pluginType -t value : Plugin Type
        --serviceType -s value : Rundeck Service Type
# Generate the Java plugin project structure
Now we're ready to generate the Java plugin project structure using the rundeck-plugin-bootstrap tool.
rundeck-plugin-bootstrap -d rundeck-plugins/ -n hellojava -t java -s WorkflowStep

Plugin generated at: rundeck-plugins/hellojava
Then we initialize the Gradle build script.
cd rundeck-plugins/hellojava
gradle wrapper

BUILD SUCCESSFUL in 1s
1 actionable task: 1 executed
# Verify that we can deploy the plugin
# Running the example tests
To verify that our environment is set up correctly, we can run the plugin tests that the bootstrap tool generated:
./gradlew test
Gradle knows to download the plugin dependencies and compile the plugin code before trying to run the tests. We can check that the plugin was compiled by looking in the build where Gradle puts the compiled bytecode files:
ls -lah build/classes/java/main/com/plugin/hellojava/

total 20K
drwxr-xr-x 2 carlo carlo 4.0K Dec 26 11:38  .
drwxr-xr-x 3 carlo carlo 4.0K Dec 26 11:38  ..
-rw-r--r-- 1 carlo carlo 1.2K Dec 26 11:38 'Hellojava$Reason.class'
-rw-r--r-- 1 carlo carlo 4.2K Dec 26 11:38  Hellojava.class
To package up the compiled files into a single .jar file that we can easily deploy, run:
./gradlew build
Now the build directory should have a .jar file:
ls build/libs/

hellojava-0.1.0.jar
We can view the contents of the .jar file to verify that our bytecode files got packaged correctly:
jar tf build/libs/hellojava-0.1.0.jar

META-INF/
META-INF/MANIFEST.MF
com/
com/plugin/
com/plugin/hellojava/
com/plugin/hellojava/Hellojava$Reason.class
com/plugin/hellojava/Hellojava.class
resources/
resources/icon.png
You can even extract the files from .jar to inspect them manually:
mkdir tmp
jar xf ../build/libs/hellojava-0.1.0.jar
diff ./com/plugin/hellojava/Hellojava.class ../build/classes/java/main/com/plugin/hellojava/Hellojava.class
# Deploying the plugin to a local environment
Now we can deploy the new plugin to the rundeck-playground Rundeck server to see it in action.
First, ensure that the rundeck-playground is up and running. This step may take a while to download if it's the first time you've run it.
cd /path/to/rundeck-playground
make compose
Then once the Rundeck server is up, in a separate terminal, push all the relevant Rundeck configuration, including your new plugin, by running:
cd /path/to/rundeck-playground
make rd-config
The rd-config Make task will see your new Java plugin and run the Gradle build and upload the plugin jar to the Rundeck server. It's smart enough to only do this if the plugin's source files have changed.
# Creating a job to use our plugin
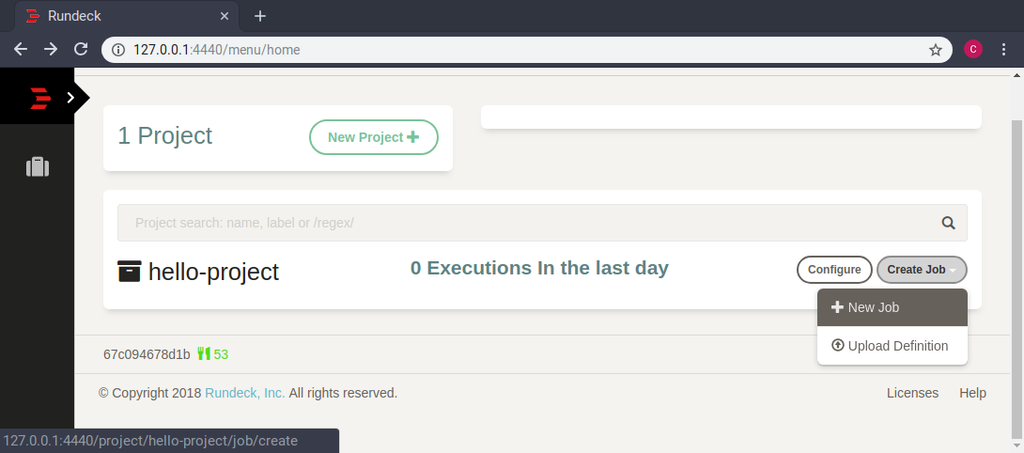
Now that we've deployed our plugin, we want to make sure that we can use it in a job. Log into the local Rundeck at http://127.0.0.1:4440/ with the default user admin and password admin. Then create a new job in the hello-project project:
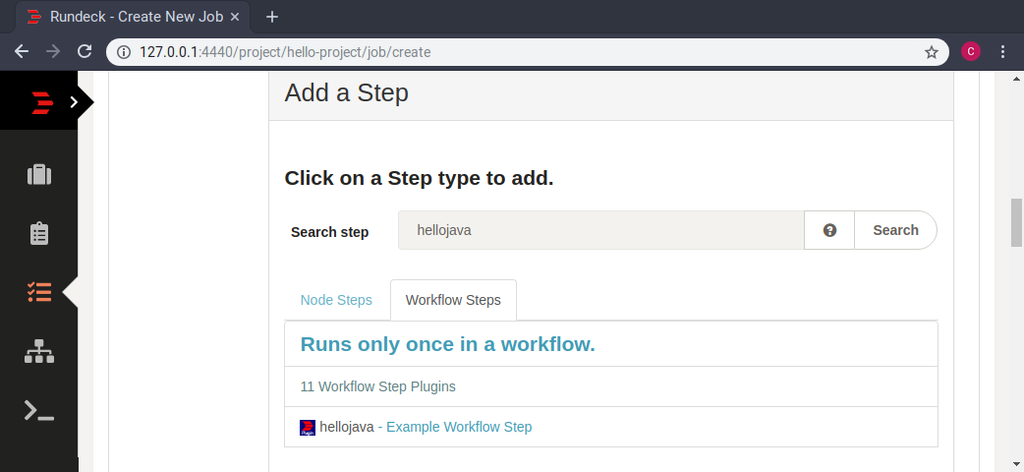
In the job creation screen, fill in some name like "My Java Plugin job" in Job Name. Then scroll to the "Add a Step" section, type "hellojava" in the search box and click the "Workflow Steps" tab to find the hellojava plugin.
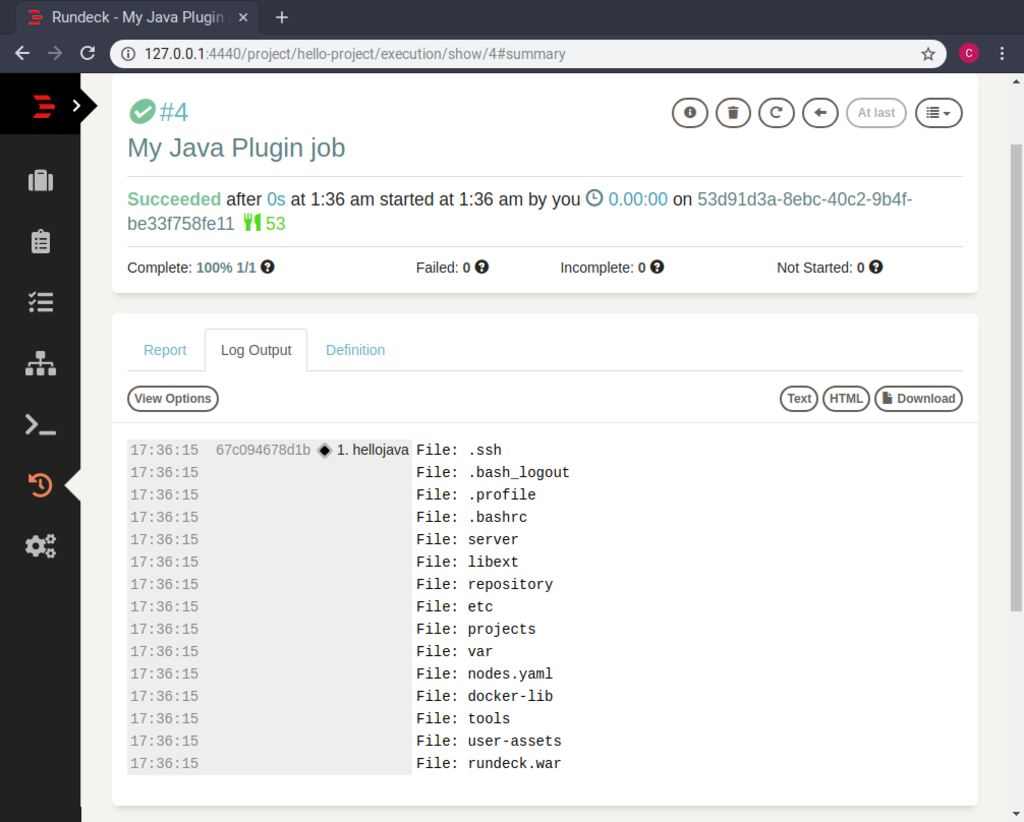
Click the hellojava plugin, fill in some text in the Example string parameter field, then click Save to add the step to the job. Then scroll to the very bottom and click Create to finish creating the job. On the next screen, click Run Job Now to trigger the job. Clicking the Log Output tab should show some sample log output from the plugin.

If the job succeeded with some output similar to the screenshot, then your Java plugin is working correctly!
# Verify that we can modify the plugin
Now we want to make changes to the plugin and see them take effect so we know how to iterate on the plugin. Open up Hellojava.java in vscode by pressing cmd+p and entering Hellojava.java in the prompt. This is the plugin class that the plugin bootstrap script generated. Some things to note:
- The
@PluginDescriptionannotation sets the title and description of the plugin as it should appear in Rundeck. - The
getDescription()method describes the parameters to the plugin that Rundeck will render as Rundeck GUI elements. - The
executeStep()method is where the plugin logic happens.
Let's update executeStep() to list the files in the current directory. Update Hellojava.java to the following:
package com.plugin.hellojava;

import com.dtolabs.rundeck.core.execution.workflow.steps.StepException;
import com.dtolabs.rundeck.core.plugins.Plugin;
import com.dtolabs.rundeck.plugins.descriptions.PluginDescription;
import com.dtolabs.rundeck.plugins.{PluginLogger, ServiceNameConstants};
import com.dtolabs.rundeck.plugins.step.{PluginStepContext, StepPlugin};
import java.io.File;
import java.util.Map;

@Plugin(service=ServiceNameConstants.WorkflowStep,name="hellojava")
@PluginDescription(title="hellojava", description="My WorkflowStep plugin description")
public class Hellojava implements StepPlugin {
   @Override
   public void executeStep(final PluginStepContext context, final Map<String, Object> configuration)
   throws StepException {
        PluginLogger logger = context.getLogger();
        File dir = new File(".");
        File[] filesList = dir.listFiles();
        for(File f : filesList) {
            logger.log(2, "File: " + f.getName());
        }
    }
}
We've replaced the sample code with some code to log the files in the current directory. Note that since we're using Java libraries to list the files, the plugin is platform-independent, unlike a script plugin that would rely on OS-specific tools like ls.
Then we can compile and deploy our plugin:
make rd-config

> Task :test FAILED

com.plugin.hellojava.HellojavaSpec > check Boolean parameter FAILED
    org.spockframework.runtime.WrongExceptionThrownError at HellojavaSpec.groovy:28

com.plugin.hellojava.HellojavaSpec > run OK FAILED
    org.spockframework.mock.TooFewInvocationsError at HellojavaSpec.groovy:41

2 tests completed, 2 failed


FAILURE: Build failed with an exception.
Whoops! Looks like the plugin bootstrap generated some sample tests, and we deleted the sample code that was making them pass. Lets find the tests and remove them. The fastest way to navigate to them is with cmd+p and entering HellojavaSpec.groovy, the file referenced in the errors above.
This test file is written in Groovy, a JVM-based dynamic language that's a little more lightweight than Java making it ideal for writing tests. For now, since the tests don't apply anymore, let's remove them by deleting the def "check Boolean parameter"() and def "run OK"() code blocks. HellojavaSpec.groovy should look like:
package com.plugin.hellojava

import com.dtolabs.rundeck.plugins.step.PluginStepContext
import com.dtolabs.rundeck.core.execution.workflow.steps.StepException
import com.dtolabs.rundeck.plugins.PluginLogger
import spock.lang.Specification

class HellojavaSpec extends Specification {
    def getContext(PluginLogger logger){
        Mock(PluginStepContext){
            getLogger()>>logger
        }
    }
}
We'll leave the getContext() helper method there so we can mock the context when writing tests later. But for now, we're ready to compile and deploy:
make rd-config

====[hellojava Java plugin] ERROR: Version 0.1.0 already exists. Update plugin version in rundeck-plugins/hellojava/build.gradle
Oops, there's one last step to remember: incrementing the plugin version number. The Rundeck server considers plugin versions to be immutable, so we need to increment the version number to be able to upload a new version of the plugin. The plugin version is in the rundeck-plugins/hellojava/build.gradle file referenced in the error message.
The build.gradle is also written in Groovy and describes how the plugin should get compiled. There's a lot going on here, but for now all you need to do is increment the version variable on the first line from 0.1.0 to 0.1.1.
At last, we can deploy without an error:
make rd-config
Then re-run the job from the Rundeck GUI and you should see it print out a list of files.
Success!
If you want to try your plugin on your live Rundeck server instead of on your workstation, see Installing plugins