
Creating Runners
Creating Runners
The Enterprise Runner can be used to dispatch automation to remote environments and to give teams flexibility with their automation with Projects.
To learn more about the Runner architecture and use-cases, see the Runner Overview.
Prerequisites
Before creating a Runner, ensure that you have read the prerequisites section of the Runner Overview.
- Runners can be installed on Windows, Linux or in containers.
- The operating systems that we officially support for the Runner are listed here.
- Note that the Runner can be installed on a different operating system than the self-hosted cluster.
- Java 11 or Java 17 JRE installed on the Runner's host.
- The Runner binary size is 164MB.
- The Runner requires a network path to reach the Runbook Automation cluster or SaaS instance over port 443. This is an outbound connection.
Resource Allocation
If setting up Enterprise Runners on virtualized environments, here are baseline recommendations. These are general guidelines and the actual resource requirements may vary based on the workload and the number of concurrent executions. It is recommended to monitor the Runner's performance - such as CPU, Memory, and Network Latency - and adjust the resources accordingly.
| Minimum | Medium | Large | |
|---|---|---|---|
| vCPU | 4 cores | 8 cores | 12 cores |
| Memory | 8 GiB | 16 GiB | 32 GiB |
| Java Heap | 6 GiB | 12 GiB | 24 GiB |
| Storage | 40 GiB | 40 GiB | 40 GiB |
Permissions
To create a Runner at the System level, users will need the following ACL permissions:
by:
  group: my-user-group-name
description: Allow creating of Runners at the System level
for:
  runner:
  - allow:
    - create
context:
  application: rundeck

---
by:
  group: my-user-group-name
description: Allow "write" access within Runner management at the System level
for:
  resource:
  - allow:
    - admin
    equals:
      kind: runner
context:
  application: rundeck
---
by:
  group: my-user-group-name
description: Allow creation of apitokens (general)
for:
  apitoken:
  - allow:
    - create
context:
  application: rundeck
---
by:
  group: my-user-group-name
description: Restrict apitoken creation to only generate_service_token to be used for Runners
for:
  resource:
  - allow:
    - generate_service_token
    equals:
      kind: apitoken
context:
  application: rundeck
To create a Runner within a Project, users will need the following ACL permissions:
by:
  group: my-user-group-name
description: Allow "write" for runner feature within specific project
for:
  resource:
  - allow:
    - admin
    equals:
      kind: runner
context:
  project: my-project-name

---
by:
  group: my-user-group-name
description: Allow [create, read] for runners within specific project
for:
  runner:
  - allow:
    - create
    - read
context:
  project: my-project-name
---
by:
  group: runneradmin
description: Allow creation of apitokens (general)
for:
  apitoken:
  - allow:
    - create
context:
  application: rundeck
---
by:
  group: runneradmin
description: Restrict apitoken creation to only generate_service_token to be used for Runners
for:
  resource:
  - allow:
    - generate_service_token
    equals:
      kind: apitoken
context:
application: rundeck- Change
my-user-group-namein the above ACL policy to the name of the user group that needs to have these permissions.
Error Without API Permissions
If the user does not have the necessary API permissions, the following error will be displayed when attempting to create a Runner:
Error: Failed to create runner due to server side error: Unauthorized: generate API token
To resolve this error, ensure that the user has the necessary API permissions.
Creating Runners at System Level
Creating Runners at the System level provides the flexibility of associating the Runner with multiple Projects.
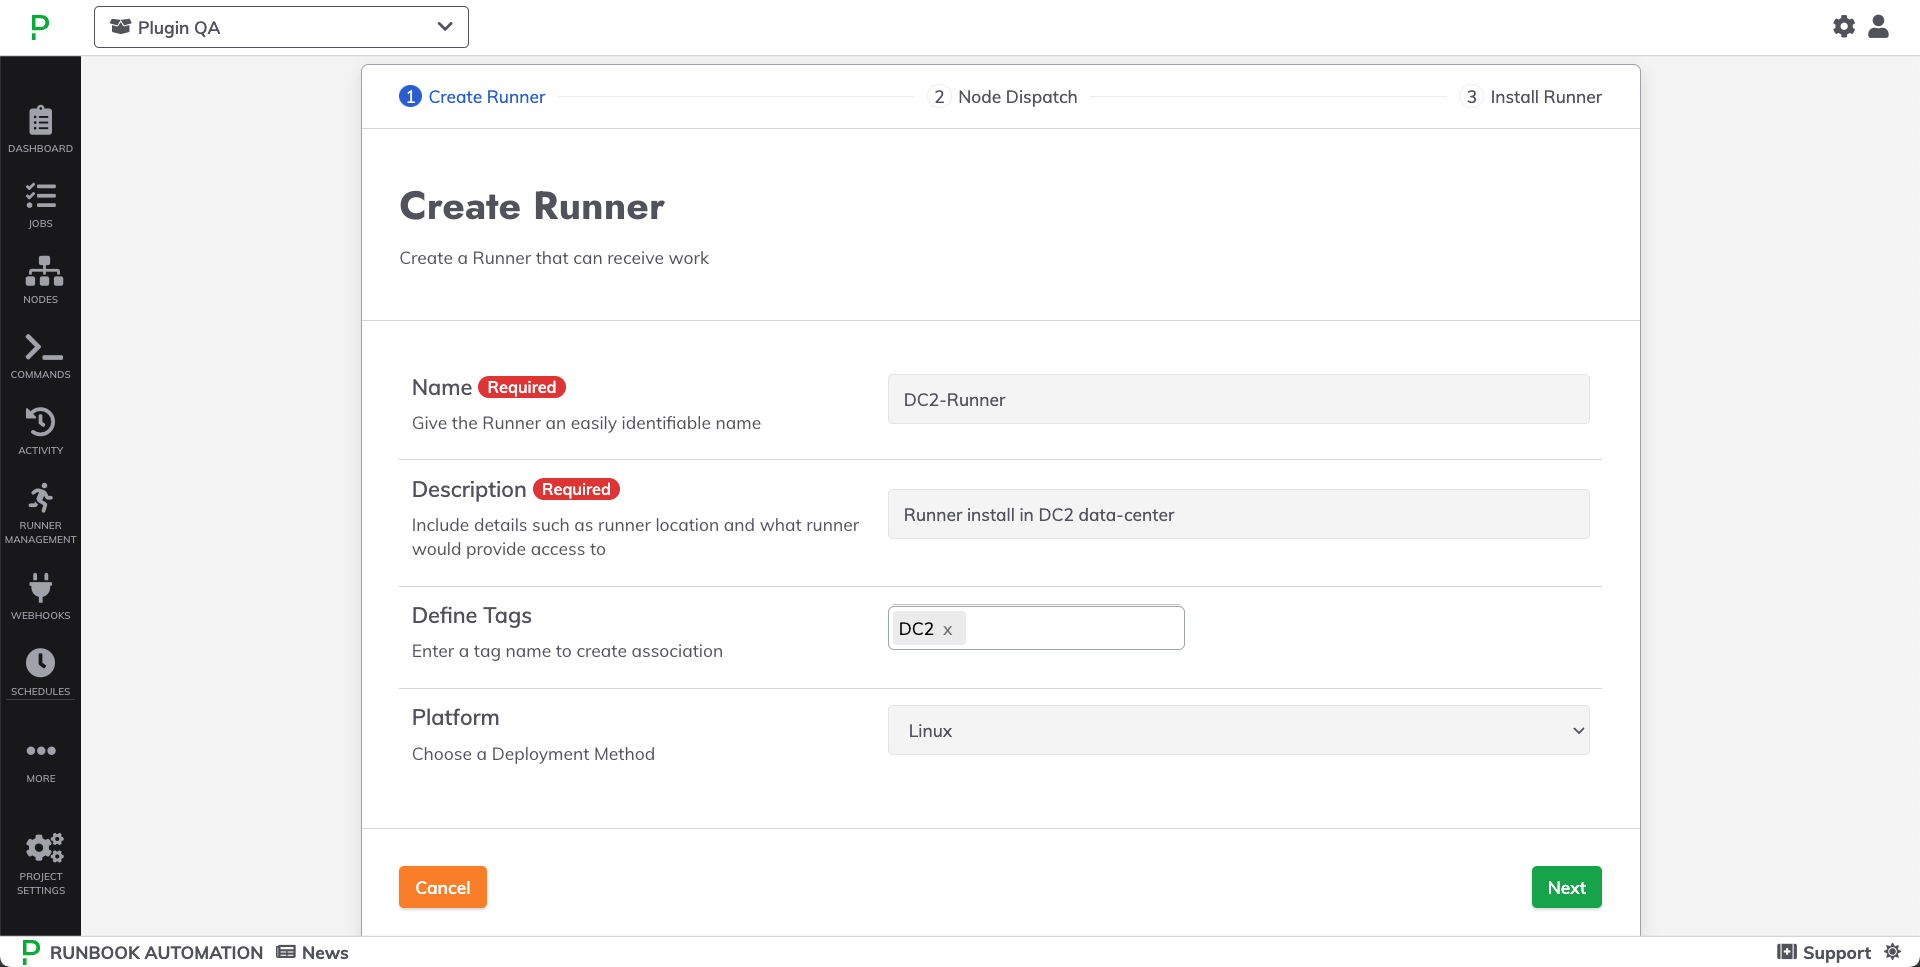
To create a Runner through at the System level:
- Navigate to the System menu (gear icon in the upper-right).
- Click Runner Management.
- Click Create Runner.
- Give the Runner a Name and a Description.
Unique Runner Names
Ensure that the Runner name is unique. If a Runner with the same name already exists, the system will not allow the creation of a new Runner with the same name.
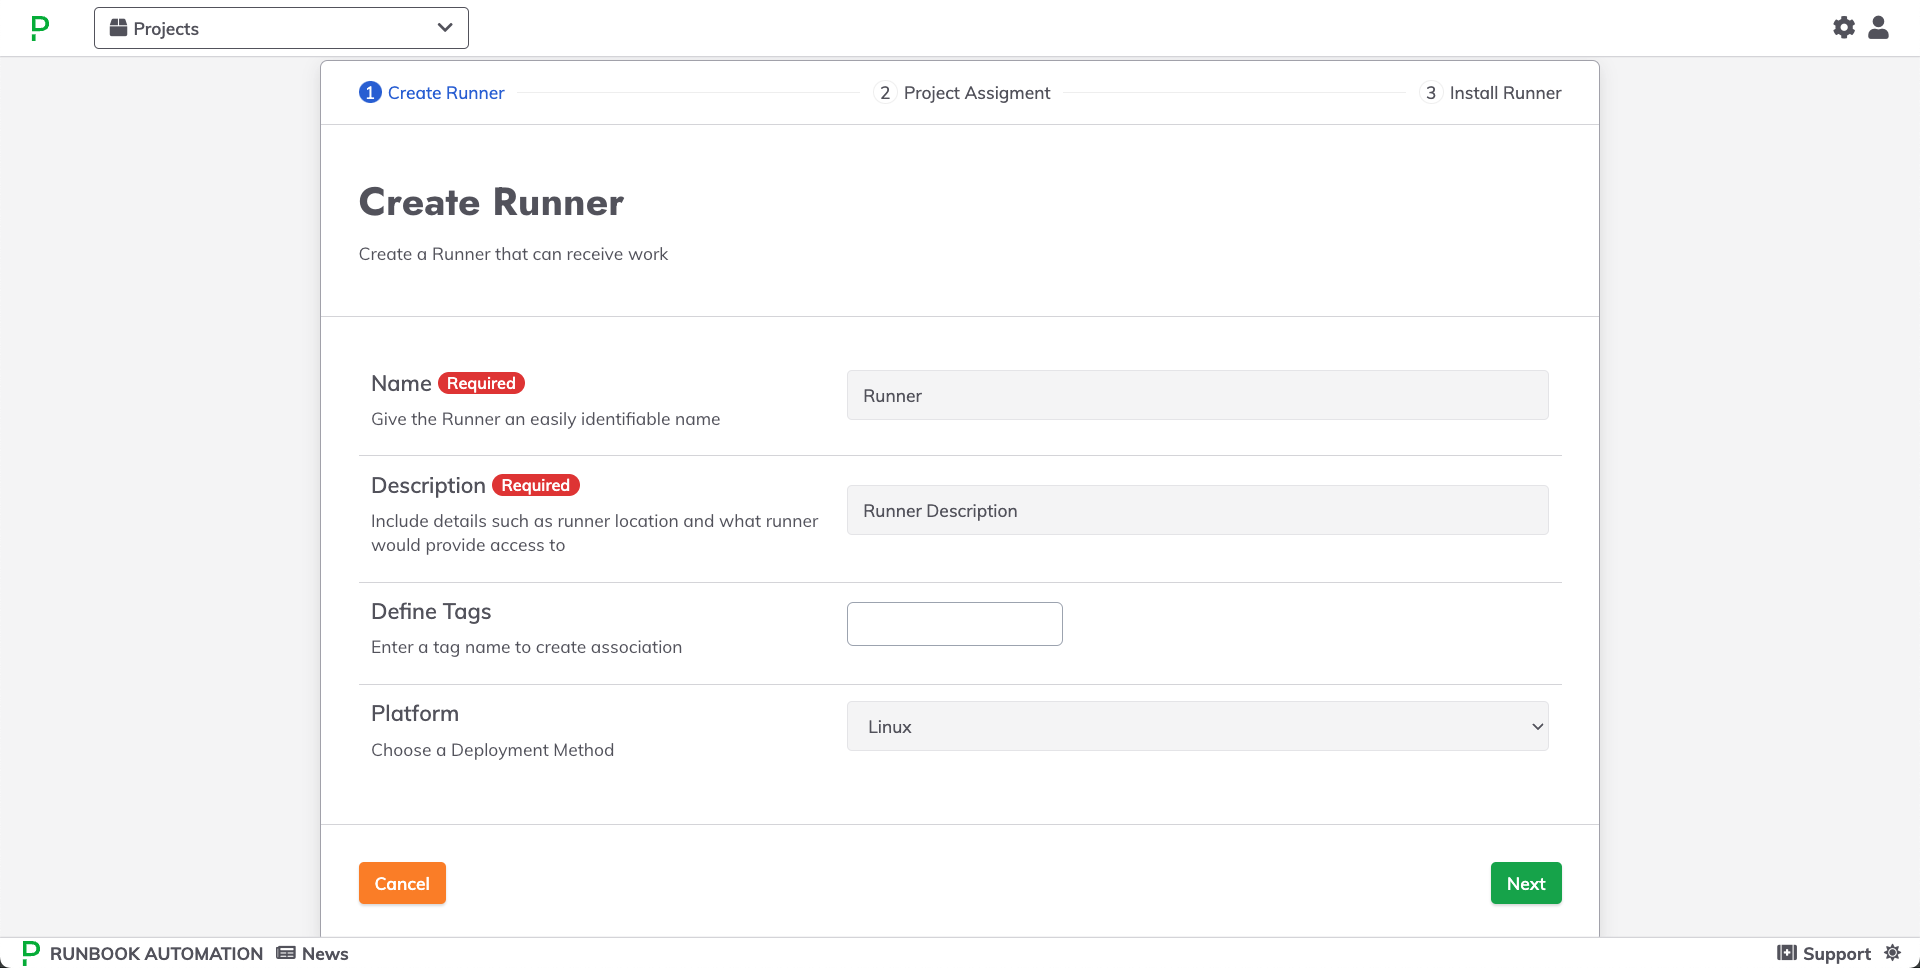
- Define Tags for the Runner. Tags are used to select the Runner for use within Jobs in the Manual mode or if the Runner will be used for node discovery. Tags can always be added later.
- Platform: Select the platform that the Runner will be hosted on. Options include:
LinuxWindowsDockerKubernetes
Platform Selection Implications
Once a platform is selected, it cannot be changed for a given Runner. If the platform needs to be changed in the future, a new Runner will need to be created.
- Click Next.
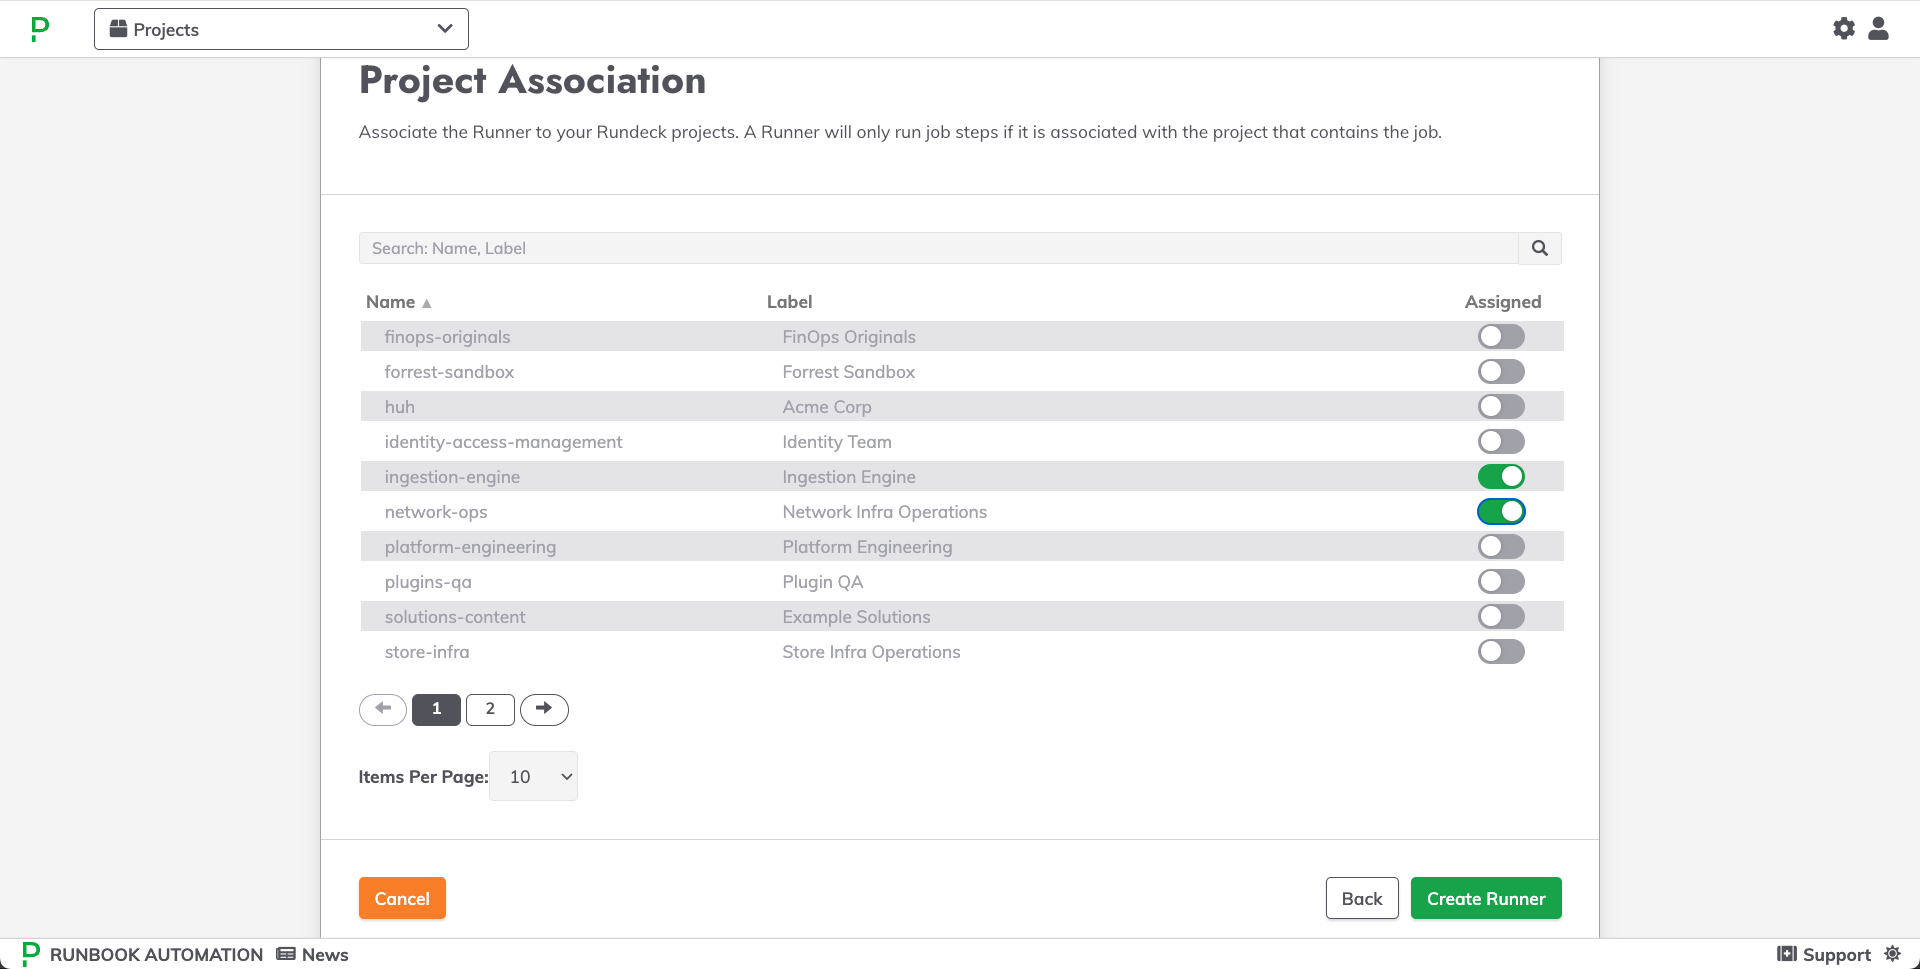
- In the Project Association step, select the Projects that can make use of this Runner. When a Runner is associated with a given Project, it will be visible in the Runner Management tab of that Project and users with Runner management permissions within that Project can specify how that Runner will be used for that particular Project.
- Click Create Runner to proceed to the installation step.
- Depending on the Platform chosen earlier, the instructions for installing the Runner will vary on the Install Runner screen:
- Linux: There are two options for the Download Artifact: copy and paste the
curlcommand or download the.jarfile locally. Thecurlcan be executed on the host that the Runner will be installed on.Note that the
curlcommand requires an API Token. Click here for steps to create an API Token.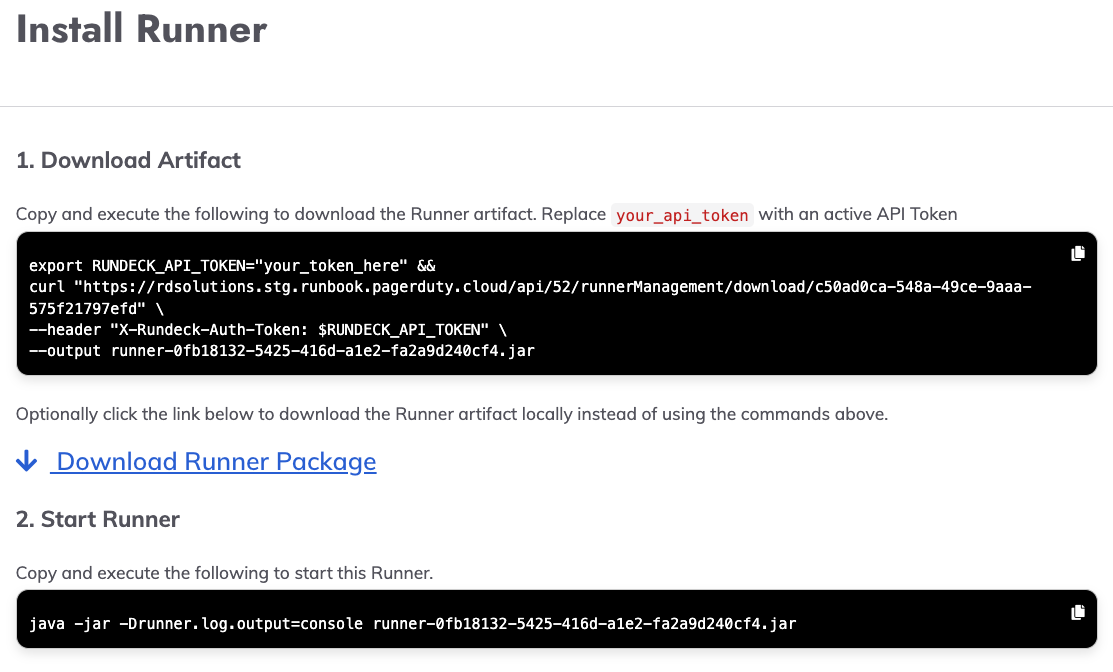
- Windows: There are two options for the Download Artifact: copy and paste the
Invoke-WebRequestcommand or download the.jarfile locally. TheInvoke-WebRequestcan be executed on the host that the Runner will be installed on.Note that the
Invoke-WebRequestcommand requires an API Token. Click here for steps to create an API Token.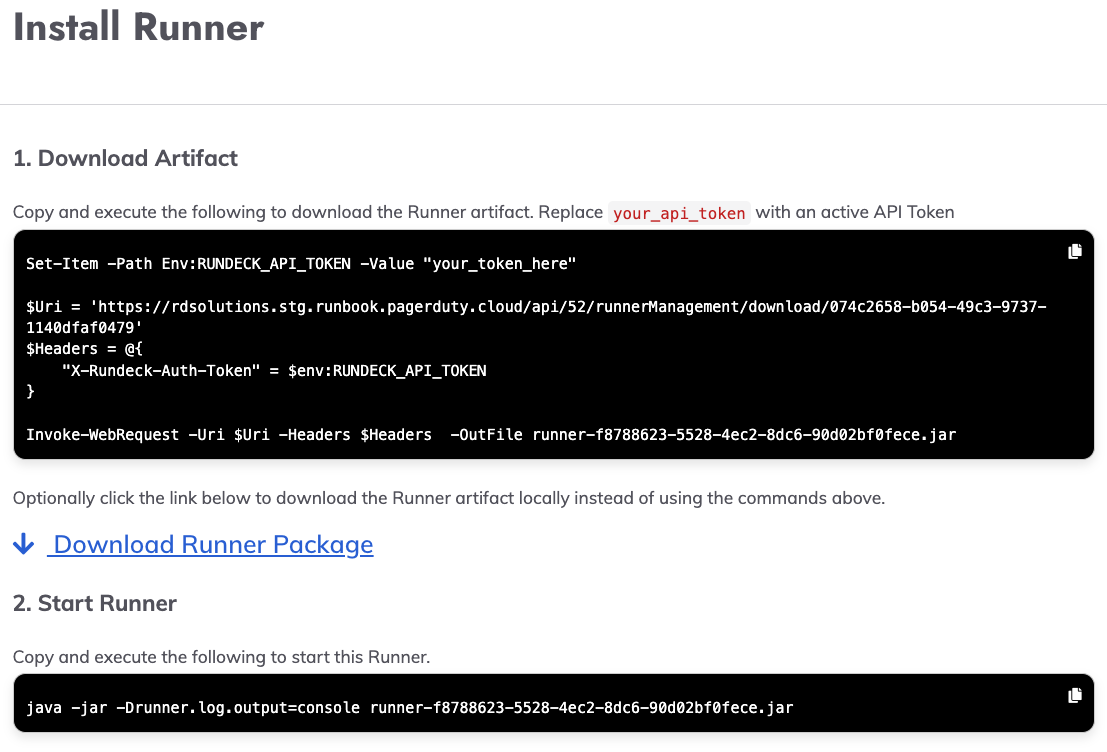
- Docker: The code snippet for installing and starting the Runner as a Docker container with
docker-composeis provided: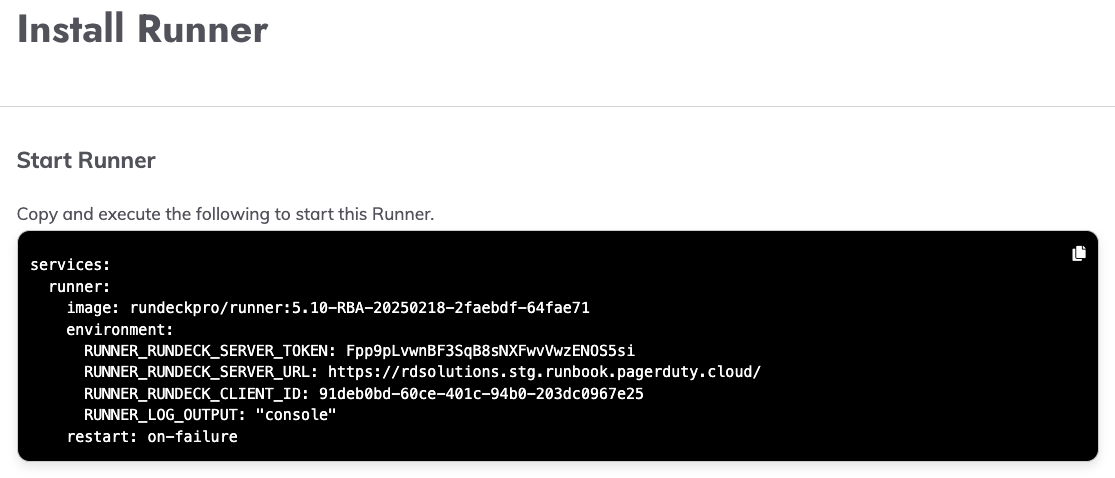
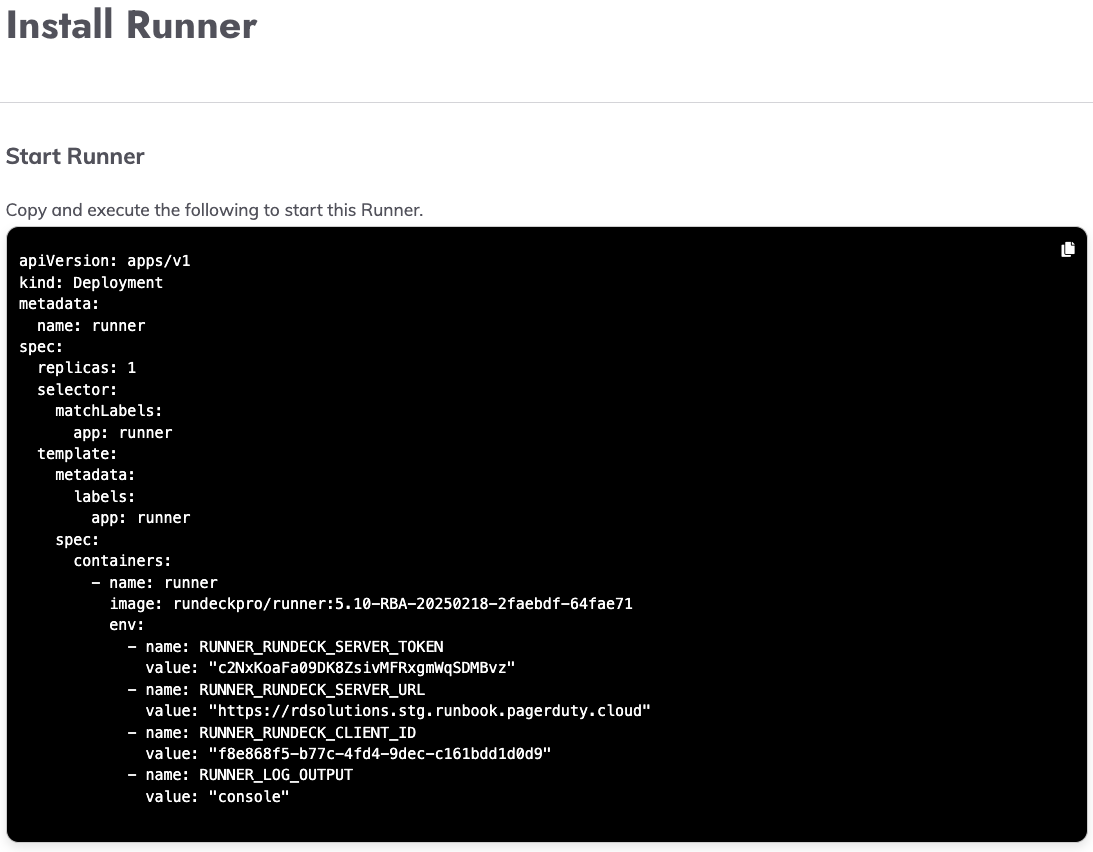
- Kubernetes: The code snippet for installing the Runner as a Kubernetes deployment is provided:
- Linux: There are two options for the Download Artifact: copy and paste the
Copy and paste the code snippet into the terminal of the host where the Runner will be installed.
- Click Close and Complete.
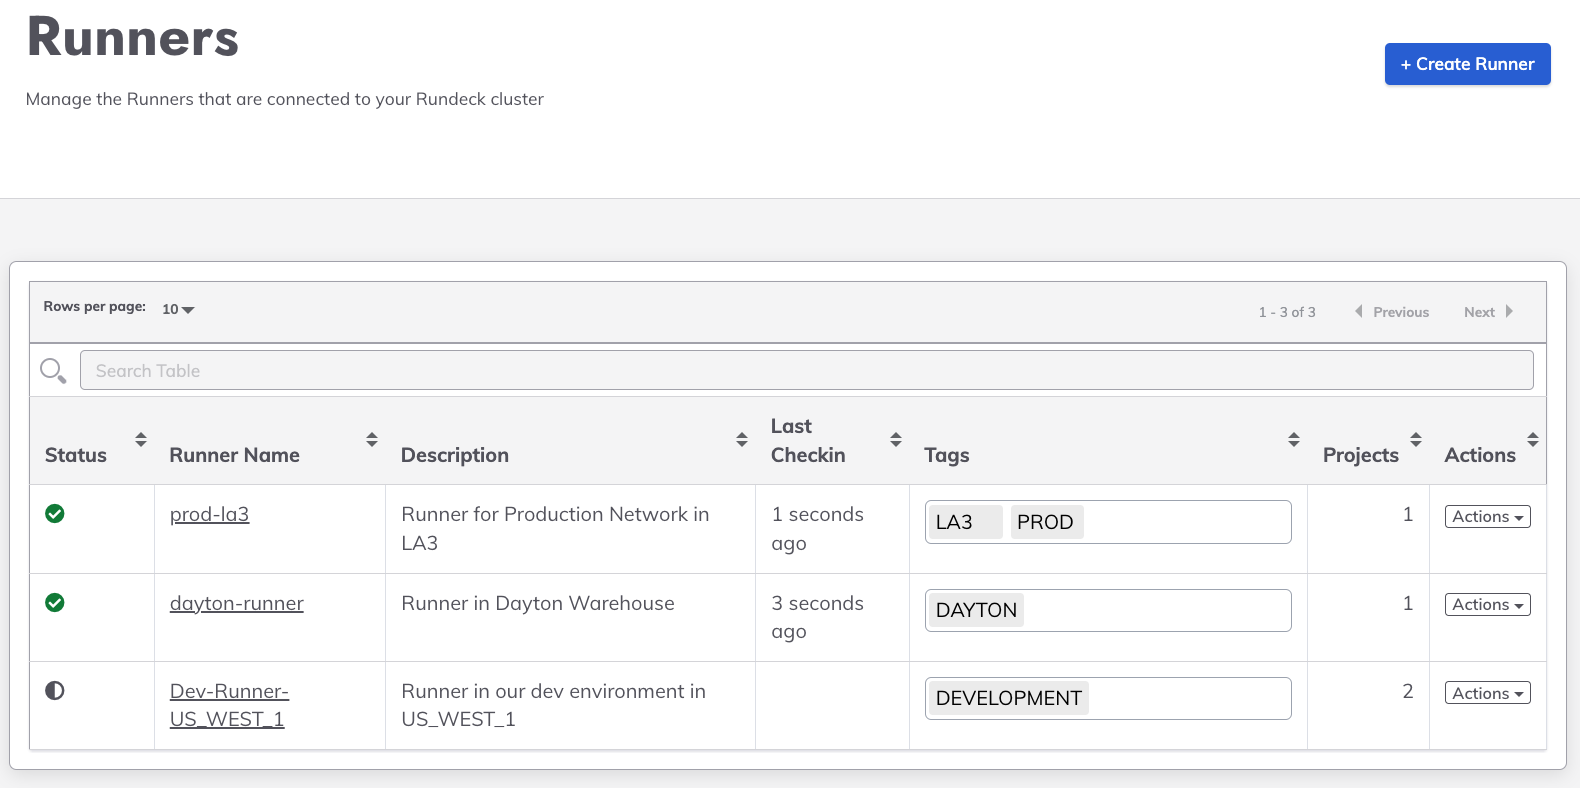
On the subsequent screen, the new Runner will be listed along with any other Runners that have been created:
Creating Runners within a Project
Runners created within a project are associated with that project only. This means that users within other projects will not be able to use this Runner for their automation tasks.
Changing Runners from Single to Multi Project Association
A Runner that is created within a project will not be visible to users within other projects. However, a user at the System level can change the association of a Runner from a single project to multiple projects. When this happens, then the Runner will be visible to users within the other projects.
To create a Runner within a Project:
- Navigate into the specific project.
- Click Runner Management.
- Click Create Runner.
- Give the Runner a Name and a Description.
Unique Runner Names
Ensure that the Runner name is unique. If a Runner with the same name already exists, the system will not allow the creation of a new Runner with the same name.
- Define Tags for the Runner. Tags are used to select the Runner for use within Jobs in the Manual mode or if the Runner will be used for node discovery. Tags can always be added later.
- Platform: Select the platform that the Runner will be hosted on. Options include:
LinuxWindowsDockerKubernetesPlatform Selection Implications
Once a platform is selected, it cannot be changed for a given Runner. If the platform needs to be changed in the future, a new Runner will need to be created.
- Click Next.
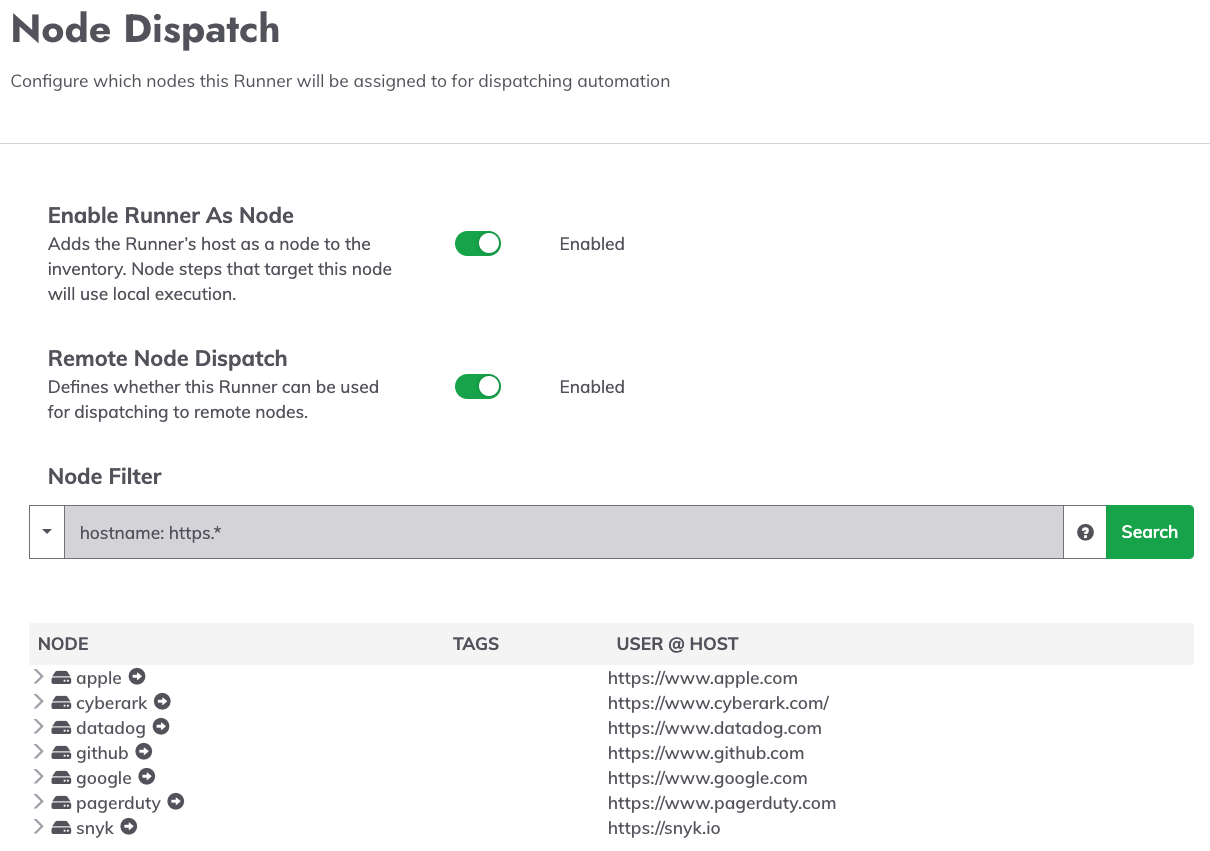
- On the Node Dispatch step, select whether this Runner should be added as a Node to the Node Inventory. Doing so allows you to target the Runner's host in Jobs and commands, scripts and plugins will execute locally on that node rather than use a remote-execution protocol - such as SSH or WinRM.
- Also on the Node Dispatch step, select whether this Runner should be used to target remote nodes and use the Node Filter to define the assignment of the subset of the node-inventory for this Runner:
- Click Create Runner to proceed to the installation step.
- Depending on the Platform chosen earlier, the instructions for installing the Runner will vary on the Install Runner screen:
- Linux: There are two options for the Download Artifact: copy and paste the
curlcommand or download the.jarfile locally. Thecurlcan be executed on the host that the Runner will be installed on.Note that the
curlcommand requires an API Token. Click here for steps to create an API Token.
- Windows: There are two options for the Download Artifact: copy and paste the
Invoke-WebRequestcommand or download the.jarfile locally. TheInvoke-WebRequestcan be executed on the host that the Runner will be installed on.Note that the
Set-Itemcommand requires an API Token. Click here for steps to create an API Token.
- Docker: The code snippet for installing and starting the Runner as a Docker container with
docker-composeis provided: - Kubernetes: The code snippet for installing the Runner as a Kubernetes deployment is provided:
- Linux: There are two options for the Download Artifact: copy and paste the
- Click Close and Complete to finish the Runner creation process.
On the subsequent screen, the new Runner will be listed along with any other Runners that have been created: