Jobs
This chapter covers how to run and create Jobs.
Why create a Job?
- One might find certain command executions are done repeatedly, and perhaps, represent what has become a routine procedure.
- Another user in your group needs a simple self-service interface to run a procedure across a set of nodes.
- Routine processes need to be encapsulated and become the basis for other routine procedures.
Overview
Jobs provide a means to encapsulate a process. A Job is a configuration representing input options, the steps in the process, a filter expression that matches the nodes where those steps will execute, and execution control parameters that specify if steps are run in parallel and what do do if an error occurs in one of the steps.
Job access is governed by an access control policy you define declaring how users are given privileges to read, create, edit, run and kill Jobs.
Rundeck lets you organize and execute Jobs and observe the progress as the Job is running. You can view a list of the currently running Jobs or drill down to see the output of individual executing steps. Job executions can also be aborted if they need to be stopped.
Each Job execution is stored and contains information about the nodes where steps executed, success and duration of each step. The job execution output can be downloaded, forwarded to an external log store or sent as part of a notification via email, IRC, ticketing system, or other destinations.
The next sections describe how to navigate and run existing Jobs. In later sections, the topic of Job creation will be covered where you will learn about steps and job options
If you want to skip ahead, you can go straight to Creating Jobs.
Job groups
As many jobs will accumulate over time, it is useful to organize Jobs into groups. A group is a logical set of jobs, and one job group can exist inside another. Rundeck displays job lists as a set of folders corresponding to the group structure your jobs define.
Beyond organizing jobs, groups assist in defining access control policy, covered in the Administrator guide - Access Control Policy.
Job UUIDs
When created, each new job will be assigned a unique universal identifier (UUID). If you are writing the Job definition using one of the supported formats you can assign the UUID yourself.
You can use the UUID to make sure that when you rename or change the group for your job in your job definition, it will modify the correct job in the server.
The UUID is also useful when porting Job definitions between Rundeck instances.
Listing and filtering Jobs
All Job activity begins on the main "Jobs" page inside Rundeck. After logging in, press the "Jobs" tab in the top navigation bar and any Jobs you are authorized to see will be displayed.
If the Jobs were defined inside groups, you will see the listing grouped into a folder like structure. These folders represent the Job groups described earlier. You can navigate these folders by pressing the folder icon to reveal its contents.
Once you have navigated to a Job, you will see its name, possibly its description and a summary total of how many times it has been executed.
Clicking on the job name will will expand the window to show the Job detail. You will see a button bar containing icons representing the actions you are able to perform. Other Job detail will include what command(s) it will run, filter expressions and other dispatcher options.
Filtering Jobs
The Job page lets you search for Jobs using the Filter option.
Click the "Filter" link to show the filter options:
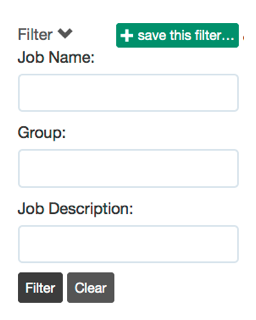
Job filter form
This will show the Filter fields. Enter a value in any of the filter fields:
- Job Name: the name of the job
- Group: the name of the job group
- Description: Job description text
You can type a substring or a regular expression in any of these fields.
After pressing the "Filter" button, the Job list will be filtered to include only the matching jobs.
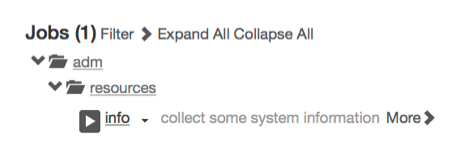
Job filtered list
To refine the filter, click on the blue-outlined Filter description, and change the filter fields.
To reset the filter and go back to the full job page, click the "Clear" button in the Filter fields.
Viewing Job detail
A Job's detail can be previewed by hovering the mouse pointer over the Job's name link. Click outside the popup to close it.
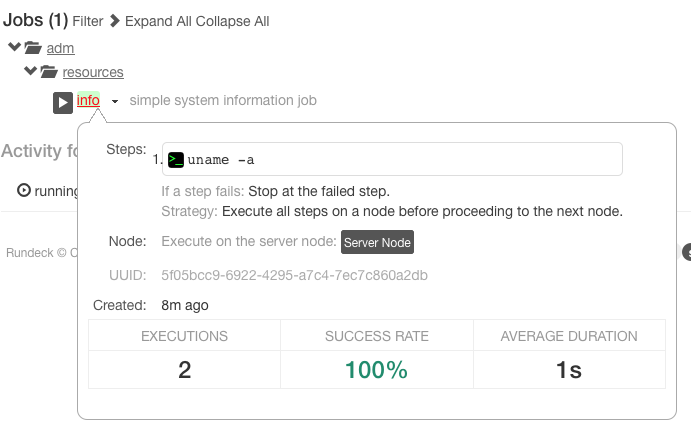
Job detail popup
Pressing the link for the Job name will navigate to a separate page where you can run the job or view the job definition.
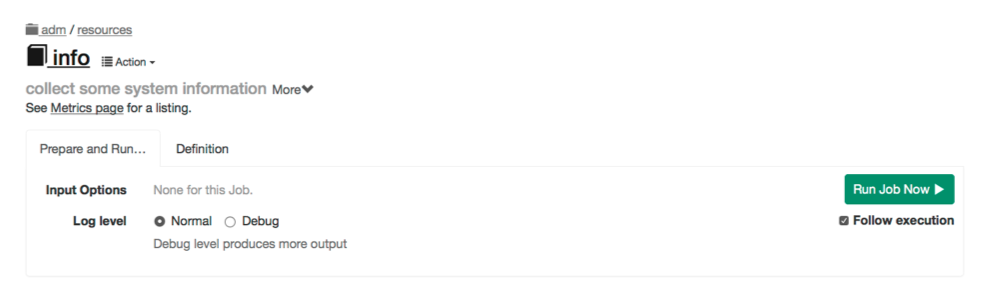
Job detail page
The information in the Job detail view includes:
- Steps the job will execute
- Options presented to the user at the time of job run
- Node filter expression with a button to show thematched nodes
- Job UUID
- Creation date
- Statistics about the job executions
Pressing the "Show Matches" link will display the list of Nodes where the Job will run.
Running a Job
Any stored job can be started from the Jobs page. Navigate to the desired Job from the filtered listing and then press the "Run" icon to immediately queue and run the Job. If you do not see the Run icon, it means your login does not have "run" privileges.
Job run button
If you navigated to the separate job page, press the "Run" button there.
Job run button
After the Run button has been pressed, a dialog will open where you can choose execution options.
Choose execution options
Jobs can be defined to prompt the user for options. This page contains a form presenting any of these Job options.
Some options will have default values while others may present you with a menu of choices. Some options are optional while others are required. Lastly, their might be a pattern governing what values are acceptable.
If there are any such Job options, you can change them here before proceeding with the execution.
When you are ready, press "Run Job Now". The job will enter the execution queue and you can track its execution in the Activity section of the page, or by going to the Activity page.
Following Running Jobs
Once you have started running a Job, you can follow the Job's output in the Execution Follow page.
On the Jobs page, look in the "Running" tab in the Activity section of the page and click the progress bar.
If you pressed the "run" button from the Job's detail page, or you selected to "Follow execution" when you ran the job, your browser will already have been directed to the Execution Follow page.
Creating Jobs
From the Jobs, page press the "Create Job" menu to begin creating a Job. Then menu contains items to create a job definition or upload a definition from a file.

Create Job menu
For the first Job example, create a Job that calls the info script.
Like in the earlier example, begin by pressing the "New Job" menu item.
Within the new job form:
For "Job Name", enter "info" and for the "Group", enter "adm/resources". If you want to specify your own UUID you can enter it in the field. Otherwise a unique value will be set for you. Providing a description will be come helpful to other users to understand the intent and purpose for the Job.
Give the job a description. It's best practice to give a short description on the first line. Create one blank line and all subsequent lines can use markdown format. You can see line 3, has text that show a URL link in markdown format. When Rundeck shows the job, this extra information can be displayed to the user. Rich text is useful to link to external tools or even charts and graphs. Anything useful to support the job user.
Check the box for "Dispatch to Nodes". Choose the "Node Exclude Filters" and enter the name of your Rundeck server. This will cause the job to run on just the remote Nodes (eg., centos54 and ubuntu).
Type in shell script that produces some information (eg, uname -a)
Save the Workflow step.
Press the "Create" button at the bottom of the page.

Simple saved job form
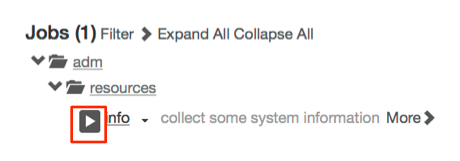
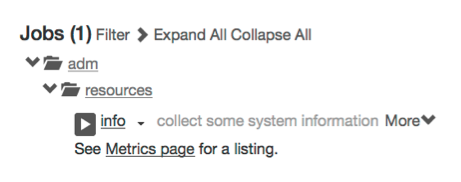
After the the job is created, the browser is directed to the Jobs page. You will see folder icons reflecting the Job's group. Navigate through to the adm/resources folder. Notice the extra information is displayed, markdown now rendered as HTML.
Notice the play button before the job name.
Press the play button to run the Job.
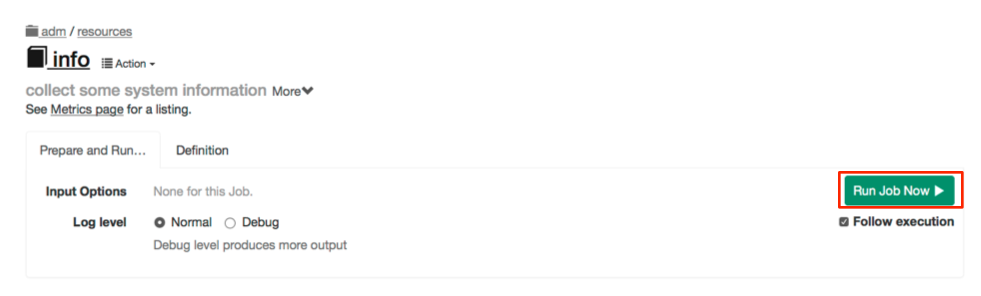
Simple saved job
Press the "Run Job Now" button to begin execution. The job will be queued and executed.
Look in the "Now running" section. Press the progress bar in the Activity area to go to the execution follow page.
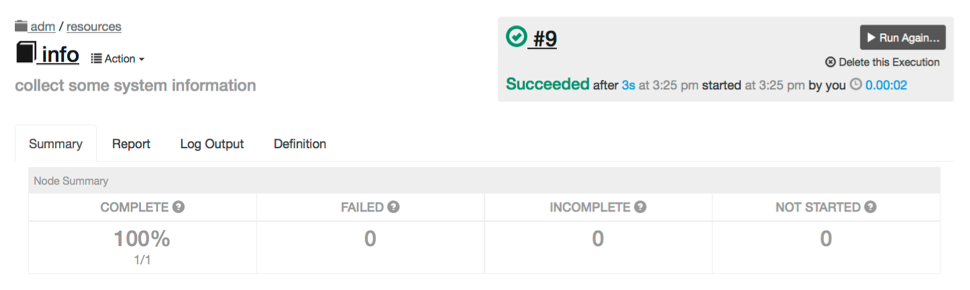
Simple saved job output
Multiple Executions
By default, a job runs as a "Single Execution" -- it can only have a single execution running at a time. This is useful if the steps the Job performs might be interfered with if another separate process was also performing them on the same Node(s).
However, in some cases it is useful to allow a Job to be executed more than once simultaneously.
You can make a job allow "Multiple Executions" by toggling the value to Yes in the Job editor field shown below:

Multiple executions
Timeout
You can set a maximum runtime for a job. If the runtime exceeds this value, the job will be halted (as if a user had killed it.) (Note: Timeout only affects the job if is invoked directly, not if it is used as a Job Reference.)

Job Timeout field
The value for the timeout can be:
- A number of seconds, such as
240 - A string indicating numbers and units, such as "1d 12h 30m 24s". Each number must have a unit letter next to it. The total timeout duration will be the sum of the values. Available units are "d" (days) "h" (hours) "m" (minutes) and "s" (seconds, default if unspecified.)
- An embedded property reference such as
${option.timeout}. This allows a Job Option to be used to change the timeout for the job.
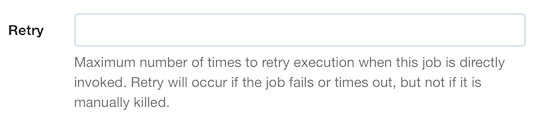
Retry
You can set a maximum number of retries for a job. If a job fails or times out, it will be executed again up to the specified number of times until it succeeds. (Note: Retry only affects the job if is invoked directly, not if it is used as a Job Reference.)
Job Retry field
The value for the timeout can be:
- A specific integer number
- An embedded property reference such as
${option.retryMax}. This allows a Job Option to be used to change the retry count for the job.
Each execution will be started with context variables indicating the current retry attempt and whether it was a retry.
See Context Variables.
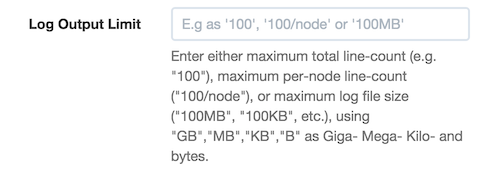
Log Limit
You can specify a log limit, which can perform an action depending on how much log output the Job produces.
The limit can be set in one of three ways:
- Maximum total number of log lines
- Maximum total log file size
- Maximum number of log lines for a single node
Job Log limit
Enter a value in the "Log Output Limit" field. The syntax of the value you enter determines the type of limit:
###If you specify a number, that is treated as the "Maximum total number of log lines"###/nodeIf you specify a number followed by/node, the number is treated as the "Maximum number of log lines for a single node"###[GMK]BIf you specify a number followed by a filesize suffix, that is treated as the "total log file size". The file size suffixes allowed are "GB" (gigabyte), "MB" (megabyte), "KB" (kilobyte) and "B" (byte).
And one of three actions can be performed if the limit is exceeded:
- Halt - the job will halt with a certain status
- Enter a status string in the field, such as "failed" or "aborted", or any custom status
- Truncate and Continue - the job will not halt, but no more log output will be produced.

Job Log limit action
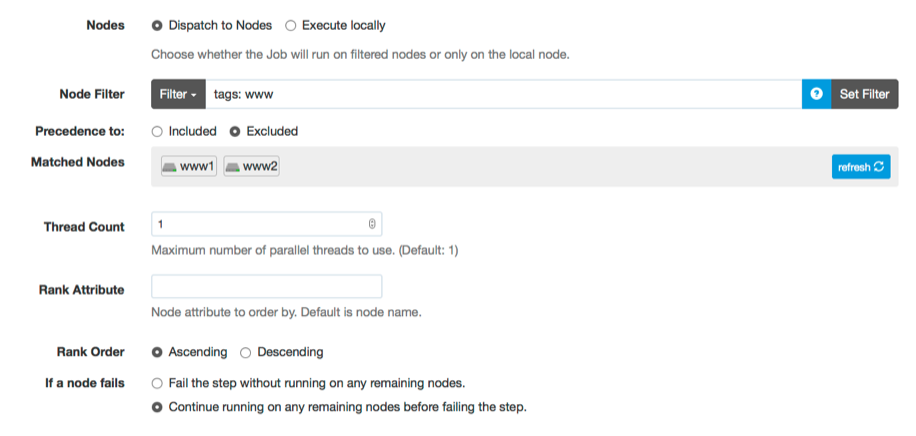
Node dispatching and filtering
When you create a job you can choose between either running the job only locally (on the Rundeck server), or dispatching it to multiple nodes (including the Rundeck server if you want).
In the GUI, the "Dispatch to Nodes" checkbox lets you enable node dispatching. When you click this box you are presented with the Node Filtering interface:
Node Filtering interface
Filters
You can click the different filter fields "Name", and "Tags" to enter filter values for those fields. As you update the values you will see the "Matched Nodes" section updated to reflect the list of nodes that will match the inputs. You can click "More" to see more of the available inclusion filters, and you can click "Extended Filters" to enter exclusion filters for the same fields.
Threadcount
You can set the maximum number of simultaneous threads to use by changing the "Thread Count" box. A value of 1 means all node dispatches happen sequentially, and any greater value means that the node dispatches will happen in parallel.
Rank order
You can change the order in which nodes are executed on by setting the "Rank Attribute" and "Rank Order". By default nodes are ordered by name ("nodename" attribute) in ascending order. You can change the node attribute to sort on by entering it here, for example "rank", and you can change the order to descending to sort in reverse.
If the attribute you use has an integer number value, then the nodes will be sorted numerically by that attribute, rather than lexically. Otherwise the sort is based on the string value rather than the integer value.
Any nodes without the specified attribute will then be sorted by their names.
Keepgoing
If you set "Keep going on error?" to "Yes", then if any node dispatches fail for any reason, the rest will continue to be executed until all have been executed. At the end of the workflow for all nodes, the Job Execution will fail if any of the nodes had failed.
If you leave it at the default value of "No", then if any node dispatches fail for any reason, no further dispatches will be executed and the Job Execution will fail immediately.
Dynamic node filters
In addition to entering static values that match the nodes, you can also use more dynamic values.
If you have defined Options for the Job (see Job Options), you can use the values submitted by the user when the job is executed as part of the node filtering.
Simply set the filter value to ${option.name}, where "name" is the name of the option.
When the job is executed, the user will be prompted to enter the value of the option, and that will then be used in the node filter to determine the nodes to dispatch to.
Note, Since the dynamic option value is not set yet, the "Matched Nodes" shown in the node filtering input may indicate that there are "None" matched. Also, when the Job is executed, you may see a message saying "Warning: The Node filters specified for this Job do not match any nodes, execution may fail." The nodes matched will be determined after the user enters the option values.
Orchestrator
Orchestrators define how a Job orchestrates the dispatching of executions to multiple nodes.
The default behavior is to dispatch based on these Job configuration values:
- Threadcount: how many nodes to process in parallel
- Rank Order: which node attribute to use to sort the nodes (default is the node name.), and whether to sort ascending or descending
You can select an Orchestrator plugin to use instead, which can choose its own logic for how many and what order to process the nodes.
Scheduled Jobs
Jobs can be configured to run on a periodic basis. If you want to create a Scheduled Job, select Yes under "Schedule to run repeatedly?"

Scheduled job simple form
The schedule can be defined in a simple graphical chooser or Unix crontab format.
To use the simple chooser, choose an hour and minute. You can then choose "Every Day" (default), or uncheck that option and select individual days of the week. You can select "Every Month" (default) or unselect that option and choose specific months of the year:
If the crontab time and date format is preferred, enter a cron expression.
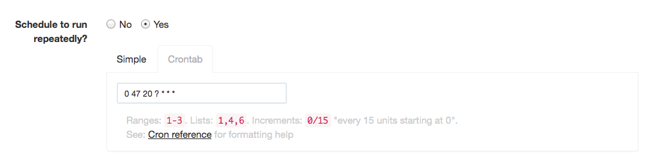
Scheduled job crontab form
Use the crontab syntax referenced here: Quartz Scheduler crontrigger.
After the Job has been updated to include a schedule, a clock icon will be displayed when the Job is listed:

Scheduled job icon
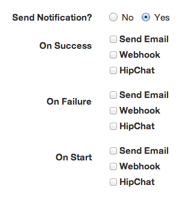
Job Notifications
Job notifications are messages triggered by a job event. You can configure notifications to occur when a Job Execution starts or finishes, with either success or failure. The notification form will list all the installed notification plugins.
If you want to receive notifications, click Yes under "Send Notification?".
Notification form
You can enable notifications for either Start, Success or Failure events and choose the notifier, using a builtin like mail, or webhook. Alternatively, you can use a notification plugin like HipChat (shown above), Jira, Jabber, IRC, PagerDuty, or script your own.
Click the checkbox next to the type of notification to enable.
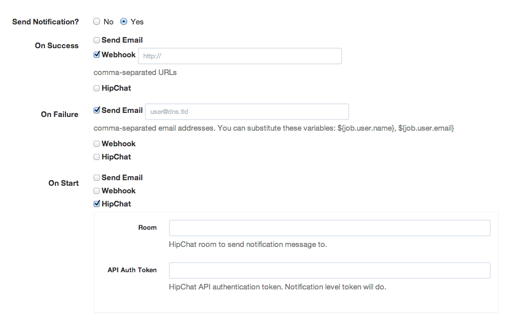
Notifications enabled
Enter either comma-separated email addresses for email notification, or comma-separated URLs for webhook notification.
In the field for "Send Email to" you can also use these variables as property references:
${job.user.name}- the user who executed the job${job.user.email}- the email of the executing user if set in their user profile
When the Job starts, all "start" notifications will be triggered.
When the Job finishes executing, all "success" notifications will be triggered if the Job is successful. Otherwise, all "failure" notifications will be triggered if the Job fails or is cancelled.
To configure a custom email template, see the Administration - Configuration File Reference - Custom Email Templates chapter.
Webhooks
Rundeck Jobs can be configured to POST data to a webhook URL when they succeed or fail.
- For more info about configuring jobs to use webhook notifications, see the chapter Job Notifications.
- For more info about webhooks in general see: http://webhooks.pbwiki.com/
When a Rundeck Job webhook notification is triggered, the server will send a POST request to one or more configured URLs. The request will contain XML content containing information about the Execution that has finished. The request will also contain special HTTP Headers to include some information about the notification and the Execution. You can also configure your URLs to have property tokens that will be replaced with specific details about the Job, Execution or Notification prior to the webhook request being submitted.
Execution Notification Content
The content of the POST request will be XML, with a single <notification> root element. This element will contain <executions..><execution>...</execution></executions> content. This inner content is of the same format as the XML returned from the Web API for Execution information. See the chapter API - Listing Running Executions for more information.
Attributes of the notification element will include:
triggerThe type of notification trigger. Either "success" or "failure".
executionIdThe ID of the Execution
statusThe result status of the Execution. Either "succeeded", "failed" or "aborted".
Example
<notification trigger="success" executionId="[ID]" status="[STATUS]">
    <executions count="1">
        <execution ...>
            ...
        </execution>
    </executions>
</notification>
Execution Notification Headers
The POST request will also contain several custom HTTP headers, providing another way to receive some of the webhook information:
X-Rundeck-Notification-TriggerThe notification trigger type, either "success" or "failure".
X-Rundeck-Notification-Execution-IDThe Execution ID
X-Rundeck-Notification-Execution-StatusThe status of the execution, either "succeeded", "failed", or "aborted".
Execution Notification URL Token Expansion
As well, the URLs configured for the webhook notification may contain tokens that will be expanded with values taken from the associated job and execution, such as ${job.name}.
Available tokens for expansion are:
job.PROPERTYProperties about the Job, including:
namethe Job name
groupThe Job group, or a blank string
idthe Job Id
projectthe Project name
execution.PROPERTYProperties about the Execution, including:
idThe Execution ID
userThe user who executed the job
statusThe execution status, one of "succeeded","failed",or "aborted"
notification.triggerThe trigger associated with the notification, one of "success" or "failure".
So for example, this URL:
http://server/callback?id=${execution.id}&status=${execution.status}&trigger=${notification.trigger}Will have the tokens replaced with the appropriate values prior to making the webhook request.
Job history
In the Job page, you can see the outcome of previous executions of Jobs by looking at the Activity section.
You can click on any past execution in the list to see the full execution for that job run.
You can also navigate to the Acitity page from the top navigation bar and use the search filter to find executions by typing in the job name.
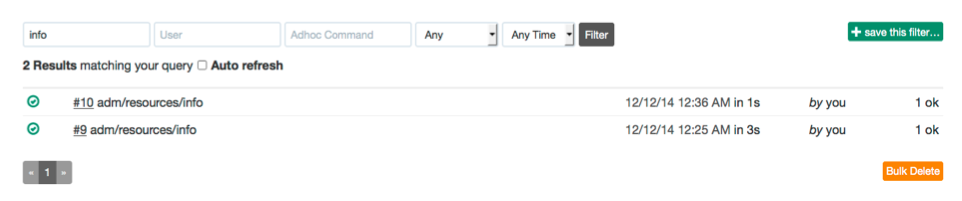
Job executions matches
The Jobs page also contains all executions for the job group shown.
Killing Jobs
Jobs that are currently running can be Killed immediately.
WARNING: This feature should be used with caution, as it forcibly kills the Java Thread that the Job is running on.
From the Activity view Now Running section, or in the Job execution follow page, click on the "Kill Job Now" button for the running Job.
When prompted "Really kill this job?" Click the "Yes" button.
The Job will terminate with a "Killed" completion status.
See also: rd-queue.
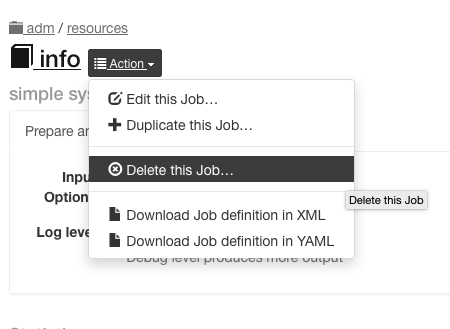
Deleting Jobs
In the Job view page, click the Action button for a menu of actions, and select "Delete this Job..." to delete the Job.
Job delete button
Click "Yes" when it says "Really delete this Job?"
If you have access, you can choose to delete all executions for the job as well.
Updating and copying Jobs
All of the data you set when creating a job can be modified (except UUID). To edit a Job, you can click the "edit job" icon:
edit job button
Similarly, to Copy a Job definition to a new Job, press the "duplicate to a new job" button.
duplicate job button
Exporting Job definitions
Job definitions created inside the Rundeck graphical console can be exported to XML or YAML file formats and be used for later import.
Two methods exist to retrieve the Job definitions: via Rundeck's graphical interface, and via the rd-jobs shell tool.
In the Job definition tab, locate the "Download Definition" menu button. Clicking on the icon will let you choose either XML or YAML format to download the definition.
Job export button
Click the preferred format to initiate the file download to your browser.
Importing Job definitions
If you have a job definition file (See above) and want to upload it via the GUI web interface, you can do so.
Click on the "Create Job" menu button in the Job list.
Click the item that says "Upload Definition...":
Job import button
Click the Choose File button and choose your job definition file to upload.
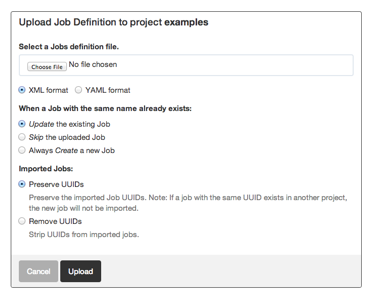
Job import form
Choose an option where it says "When a job with the same name already exists:":
- Update - this means that a job defined in the xml will overwrite any existing job with the same name.
- Skip - this means that a job defined in the xml will be skipped over if there is an existing job with the same name
- Create - this means that the job defined in the xml will be used to create a new job if there is an existing job with the same name.
Choose an option where it says "Imported Jobs:":
- Preserve UUIDs - this means that UUIDs defined in the imported jobs will be used when importing them. UUIDs must be unique, so if you have a Job with the same UUID defined in any project, your import may fail.
- Remove UUIDs - this means that imported Job UUIDs will be ignored, and the imported jobs will either update an existing job, or be created with a new UUID.
Click the Upload button. If there are any errors with the Job definitions in the XML file, they will show up on the page.
Job Options
Rundeck Jobs can be configured to prompt a user for input by defining one or more named options. An option models a named parameter that can be required or optional and include a range of choices that will be presented to the user when the Job is run.
Users supply options by typing in a value or selecting from a menu of choices. A validation pattern ensures input complies to the option requirement. Once chosen, the value chosen for the option is accessible to the commands called by the Job.
Option choices can be modeled as a static set or from a dynamic source. Static choices can be modeled as a comma separated list in the job definition. When option values must be dynamic, the Job can be defined to use a URL to retrieve option data from an external source. Enabling Jobs to access external sources via URL opens the door to integrating Rundeck with other tools and incorporating their data into Job workflows.
Prompting the user
The obvious effect from defining Job options is their appearance to the user running the Job. Users will be presented a page called "Choose Execution Options..." where input and menu choices must be configured.
Command line users executing Jobs via the run shell tool also will specify options as an argument string.
Note, the
runcommand does not prompt the user for required options so you must specify them directly.
It is worth spending a moment to consider how options become part of the user interface to Jobs and give some thought to this next level of procedure formalization.
- Naming and description convention: Visualize how the user will read the option name and judge its purpose from the description you supply.
- Required options: Making an option required means the Job will fail if a user does not specify a non-blank value. In other words, a blank or missing value is not allowed for the option.
- Input restrictions and validation: If you need to make the option value be somewhat open ended consider how you can create safeguards to control their choice.
Input Types
Option Input Types define how the option is presented in the GUI, and how it is used when the Job executes.
Input types:
- "Plain" - a normal option which is shown in clear text
- "Secure" - a secure option which is obscured at user input time, and the value of which is not stored in the database. See secure-options.
- "Secure Remote Authentication" - a secure option which is used only for remote authentication and is not exposed in scripts or commands. See secure-remote-authentication-options.
Options editor
Options can be created for any stored Job. The Job edit page contains an area displaying a summary to existing options and a link to add new ones or edit existing ones.
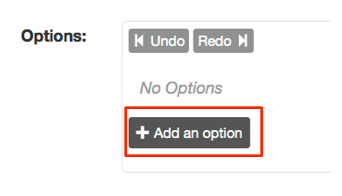
Add option link
The option summary shows each option and its default value if it defines them.
Clicking the "edit" link opens the options editor.

Option editor
The options editor displays an expanded summary for each defined option. Each option is listed with its usage summary, description, values list and any restrictions. Pressing the "Add an option" link will open a form to define a new parameter. Pressing the "Close" link will collapse the options editor and return back to the summary view.
Moving the mouse over any row in the options editor reveals links to delete or edit the highlighted option. Pressing the remove icon will display a prompt confirming you want to delete that option from the Job. Clicking the "edit" link opens a new form that lets you modify all aspects of that option.
Options can also be defined as part of a job definition and later loaded to the Rundeck server. See job-xml and job-yaml and rd-jobs pages if you prefer using an textual Job definition.
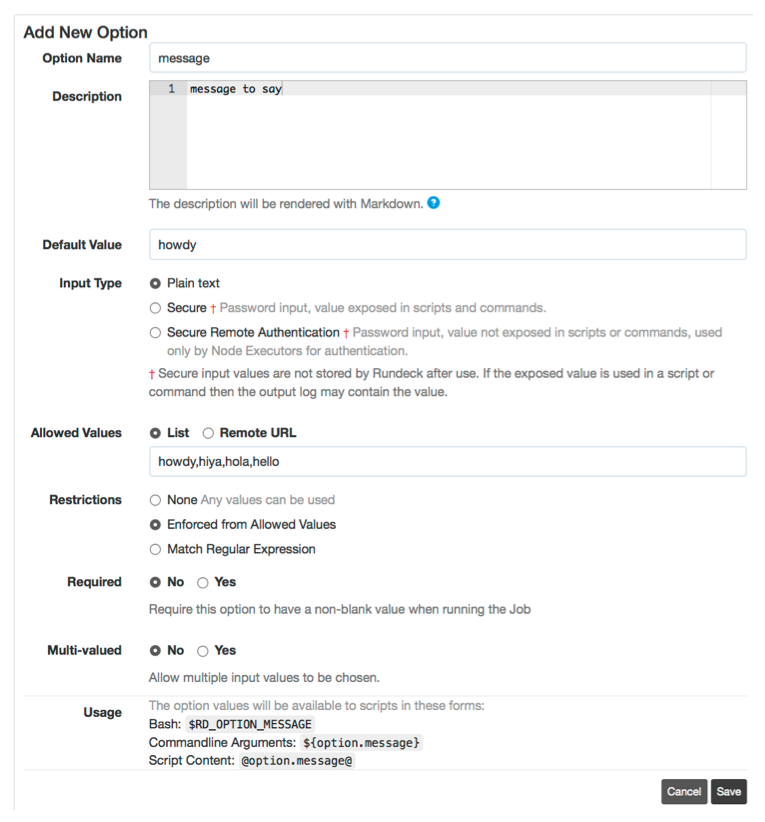
Defining an option
New options can be defined by pressing the "Add an option" link while existing ones can be changed by pressing their "edit" link.
Option edit form
The option definition form is organized into several areas:
- Identification
Here you provide the option's name and description. The name becomes part of acceptable arguments to the Job while the description will be provided as help text to users running the Job.
The Default Value will be pre-selected in the GUI when the option is presented.
- Input Type
Choose between "Plain", "Secure" and "Secure Remote Authentication". For input types other than "Plain", the multi-valued option will be disabled.
- Default Value
A Default Value will automatically be set for the option if it is not otherwise specified by the user, even if not specified among the arguments when executing a job via the command-line or API. Note that a blank value can be specified via the command-line or API, which will override the use of the Default Value.
- Allowed values
Allowed values provide a model of possible choices. This can contain a static list of values or a URL to a server providing option data. Values can be specified as a comma separated list as seen above but can also be requested from an external source using a "remote URL".
- Restrictions
Defines criteria on which input to accept or present. Option choices can be controlled using the "Enforced from values" restriction. When set "true", Rundeck will only present a popup menu. If set "false", a text field will also be presented. Enter a regular expression in the "Match Regular Expression" field the Job will evaluate when run.
- Requirement
Indicates if the Job can only run if a non-blank value is provided for that Option. Choose "No" to indicate that a blank value is allowed, and choose "Yes" to indicate that a blank value is not allowed.
If a Default Value is set, then it will be used when no value is provided, unless a blank value is allowed and is explicitly specified.
- Multi-valued
Defines if the user input can consist of multiple values. Choosing "No" states that only a single value can chosen as input. Choosing "Yes" states that the user may select multiple input values from the Allowed values and/or enter multiple values of their own. The delimiter string will be used to separate the multiple values when the Job is run.
Once satisfied with the option definition, press the "Save" button to add it to the Job definition. Pressing the "Cancel" button will dismiss the changes and close the form.
Script usage
Option values can be passed to scripts as an argument or referenced inside the script via a named token. Each option value is defined in the Options context variables as option.NAME.
See the Context Variables Section.
Example:
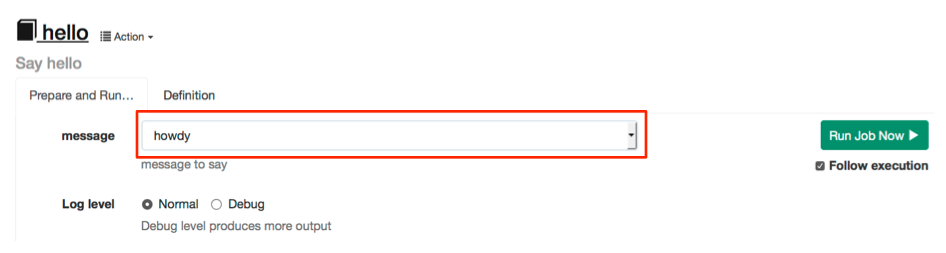
A Job named "hello" and has an option named "message".
The "hello" Job option signature would be: -message <>.
Option usage
The arguments passed to the script are defined as ${option.message}.
Here's the content of this simple script that shows the various forms to access the value of the "message" option.
1 2 3 4 | |
When the user runs the "hello" job they will be prompted for the "message" value.
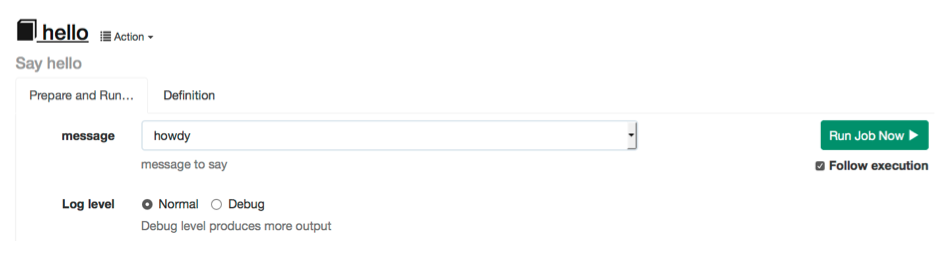
Option entered
Let's assume they chose the word "howdy" in response. The output of the Job will be:
envar=howdy
args=howdy
message=howdy
If you define the option to be Required, then the Job will fail to run unless the user supplies a value that is not blank.
If you define the option to not be Required, then the option value is allowed to be blank, and specifying a blank value would result in:
envar=
args=
message=
You can use the Default Value of an option to provide a value in the case where the user doesn't specify it. In the GUI, the Default Value will automatically be presented in the Job Execution page. From the CLI or API, leaving off a -option argument to a job will use the default value.
You can also handle default values within a script, if your option doesn't specify one, or the user specifies a blank value for the option:
Environment variable:
As a precaution you might test existence for the variable and perhaps set a default value. To test its existence you might use:
test -s "$RD_OPTION_NAME"You might also use a Bash feature that tests and defaults it to a value:
${RD_OPTION_NAME:=mydefault} Replacement token
If the option is blank or unset the token will be replaced with a blank string. You might write your script a bit more defensively and change the implementation like so:
message="@option.message@"
if [ -z "$message" ]
then
   message=mydefault
fi
Note, The replacement token syntax is only supported in inline script steps (ie, not script file or command steps).
Escaped values
When the arguments to script or the contents of a Command execution string are evaluated, embedded property references like ${option.name} are replaced by the values entered by a user.
To prevent any user input from including shell-special characters (accidentally or maliciously), any argument which has embedded references will be quoted for the shell.
You should also be careful in how arguments to scripts are used within a script.
For example, if you have a Shell script step with argument string ${option.message}, and script:
#!/bin/bash

echo $1
Then this script will partially expand the ${option.message} value a second time, even though it was correctly quoted to pass to your script.
You should do something like this instead:
#!/bin/bash

echo "$1"
Which allows the shell will correctly handle the input value by quoting it.
Secure Options
Options can be marked as Secure, to show a password prompt in the GUI, instead of a normal text field or drop down menu. Secure option values are not stored with the Execution as are the other option values.
There are two types of Secure options:
- Secure - these option values are exposed in scripts and commands.
- Secure Remote Authentication - these option values are not exposed in scripts and commands, and are only used by Node Executors to authenticate to Nodes and execute commands.
Secure Options do not support Multi-valued input.
Secure Options cannot be used as authentication input to Node Executors, you must use a Secure Remote Authentication option described below.
Important Note
"Secure" option values are not stored in the Rundeck database when the Job is executed, but the value that is entered is exposed to use in scripts and commands. Make sure you acknowledge these security implications before using them. Secure options are available for use in scripts and command like any other option value:
- as plaintext arguments using
${option.name}- Using the option value as an argument to a command could expose the plaintext value in the system process table
- as plaintext environment variables in remote and local script execution as
$RD_OPTION_NAME- Local and possibly remote scripts may be passed this value into their environment
- as plaintext tokens expanded in remote scripts as
@option.name@.- Inline Script workflow steps that contain a token expansion will be expanded into a temporary file, and the temp file will contain the plaintext option value.
Note, When passed as arguments to Job References, they can only be passed as the value of another Secure option. See Using Secure Options with Job References.
Secure Remote Authentication Options
The built-in SSH Provider for node execution allows using passwords for SSH and/or Sudo authentication mechanisms, and the passwords are supplied by Secure Remote Authentication Options defined in a Job.
Secure Remote Authentication Options have some limitations compared to Plain and Secure options:
- The values entered by the user are not available for normal script and command option value expansion. This means that they can only be used for the purposes of the Remote Authentication.
Using Secure Options with Job References
When you define a Job Reference step in a workflow, you can specify the arguments that are passed to it. You can pass Secure Option values and Secure Remote Authentication Option values from a top-level job to a Job Reference, but option values cannot be passed into another option of a different type. So a parent job can only pass option values to the Job reference if the option type is the same between the jobs.
This constraint is to maintain the security design of these options:
- Secure options should not to be stored in the Rundeck execution database, so must not be used as plain option values.
- Secure Remote Authentication options should not be used in scripts/commands, so must not be used as Secure or Plain option values.
As an example, here is are two jobs, Job A and Job B, which define some options:
- Job A
- Option "plain1" - Plain
- Option "secure1" - Secure
- Option "auth1" - Secure remote authentication
- Job B
- Option "plain2" - Plain
- Option "secure2" - Secure
- Option "auth2" - Secure remote authentication
If Job A defines a Job reference to call Job B, then the only valid mapping is shown below:
- plain1 -> plain2
- secure1 -> secure2
- auth1 -> auth2
So the arguments for the Job Reference might look like this:
-plain2 ${option.plain1} -secure2 ${option.secure1} -auth2 ${option.auth1}Note, If you define arguments in the wrong manner, then the Secure and Secure Remote Authentication options will not be set when the Job reference is called. Plain options will behave the way they do in Command or Script arguments, and be left as-is as uninterpreted property references.
Secure Options using Key Storage
Secure options can specify a Storage Path in lieu of a default value. This path to the Key Storage Facility will be loaded as the option value when one is not supplied.
The path must indicate a stored password entry in the storage facility.

Storage Path for Secure Option
Remote option values
A model of option values can be retrieved from an external source called an option model provider. When the valuesUrl is specified for an Option, then the model of allowed values is retrieved from the specified URL.
This is useful in a couple of scenarios when Rundeck is used to coordinate process that depend on other systems:
- Deploying packages or artifacts produced by a build or CI server, e.g. Jenkins.
- A list of recent Jenkins build artifacts can be imported as Options data, so that a User can pick an appropriate package name to deploy from a list.
- Selecting from a set of available environments, defined in a CMDB
- Any situation in which input variables for your Jobs must be selected from some set of values produced by a different system.
Option model provider
The Option model provider is a mechanism to allow the Options defined for a Job to have some of the possible input values provided by a remote service or database.
Option model providers are configured on a per-Option basis (where a Job may have zero or more Options).
Requirements
- Options model data must be JSON formatted.
- It must be accessible via HTTP(S) or on the local disk for the Rundeck server.
- It must be in one of two JSON structures, either:
- An array of string values
- OR, an array of Maps, each with two entries,
nameandvalue.
Configuration
Each Option entry for a Job can be configured to get the set of possible values from a remote URL. If you are authoring the Jobs via job.xml file format, simply add a valuesUrl attribute for the <option>. If you are modifying the Job in the Rundeck web GUI, you can entry a URL in the "Remote URL" field for the Option.
e.g.:
<option valuesUrl="http://site.example.com/values.json" ... />Note, File URL scheme is also acceptable (e.g,
file:/path/to/job/options/optA.json).
The value data must be returned in JSON data format described below.
JSON format
Three styles of return data are supported: simple list, simple object, and a name/value list. For a simple list, the list values will be displayed in a pop-up list when running the Job. If a simple object or name/value pairs are returned, then the name will be displayed in the list, but the value will be used as the input.
Examples
Simple List:
["x value for test","y value for test"]This will populate the select menu with the given values.
Simple Object:
{ "Name": "value1", "Name2":"value2" }This will populate the select menu to show the names and use the values.
Name Value List:
[
  {"name":"X Label", "value":"x value"},
  {"name":"Y Label", "value":"y value"},
  {"name":"A Label", "value":"a value"}
]
URL connection parameters
You can configure timeouts globally as described in Configuration - Job Remote Option URL connection parameters.
You can also specify these connection parameters on a per-URL basis:
timeoutsocket timeout in seconds
contimeoutconnection timeout in seconds
retryretry count if no response from server
To set this in an Option's remote URL, add them as the "fragment" portion of the URL, after the # character like so:
http://host/mypath#timeout=60;contimeout=5;retry=1Use key=value for a parameter, and separate multiple parameters with the ; character.
Cascading Remote Options
Cascading options allow an option's Remote values URL to embed the values entered by the user for other options when executing a Job. When the user enters or selects a value for one of the other options, then the remote JSON is refreshed for the current option.
This provides a mechanism for declaring hierarchical or dependent sets of option values.
E.g. if you wanted one option to choose a "repository", and another option to select a specific "branch" within that repository. Define your option provider to respond correctly based on the selected "repository" value, and define your Remote option URL to include a reference to the "repository" option value. The Rundeck GUI will then reload the JSON values from the remote URL and insert the correct value of the "repository" option when loading the "branch" option values. If the user changes the selected repository, then the branch values will be automatically refreshed.
You can declare a dependency of one option to another by embedding property references within the remote values URL. The property reference is of the form ${option.[name].value}. If you declare an option with a remote values URL like "http://server/options?option2=${option.option2.value}", then that option will depend on the value of the "option2" option.
In the GUI, when the options are loaded, option2 will be shown first, and the remote values for option1 will only be loaded once a value has been selected for option2, and the value will be placed in the URL when it is loaded.
If an option has dependencies on other options that do not have a value set, then the embedded references will evaluate to "" (empty string) when loading the URL.
If an option has dependencies on other options and the remote values JSON data is empty (empty list or empty object), then the option shown in the GUI will indicate that the user should select values for the necessary options. This allows Option model providers to indicate that some or all of the dependent option values are necessary for the current option before showing the input for the option.
It is possible to have dependencies on more than one option, and any change to one of the dependencies will cause the option values to be reloaded from the remote URL.
Note, It is also possible to declare a cycle of dependencies between option values, which will cause the automatic reloading to be disabled. In this case the user must manually click the reload button to reload the option values if a dependency has changed.
Variable expansion in remote URLs
The URL declared for the "valuesUrl" can embed variables which will be filled with certain job context items when making the remote request. This helps make the URLs more generic and contextual to the Job.
Two types of expansions are available, Job context, and Option context.
To include job information in the URL, specify a variable of the form ${job._property_}.
Properties available for Job context:
name: Name of the Jobgroup: Group of the Jobdescription: Job descriptionproject: Project nameuser.name: User executing the jobrundeck.nodename: Name of the Rundeck server noderundeck.serverUUID: UUID of the Rundeck server node (cluster mode)rundeck.basedir: File path of the Rundeck base dir (file://URLs only)
Additionally the rundeck.* properties can be specified without the job. prefix, e.g. ${rundeck.basedir}.
To include Option information in the URL, specify a variable of the form ${option.property}:
Properties available for Option context:
name: Name of the current option
To include Cascading remote option values information in the URL, specify a variable of the form ${option.name.value}:
option.[name].value: substitutes the selected value of another option by name. If the option is not set, then a blank string ("") will be substituted.
Examples
http://server.com/test?name=${option.name}Passes the option name as the "name" query parameter to the URL.
http://server.com/test?jobname=${job.name}&jobgroup=${job.group}Passes the job name and group as query parameters.
http://server.com/branches?repository=${option.repository.value}Passes the value of the selected "repository" option, or "" (blank) if it is not set. This option becomes a dependent of the "repository" option, and if the "repository" value changes, the remote option values for this option will be reloaded.
Remote request failures
If the request for the remote option values fails, then the GUI form will display a warning message:

In this case, the option will be allowed to use a textfield to set the value.
Job Workflows
The Job's most basic feature is its ability to execute one or more steps. This sequence of steps is called a workflow.
The steps of the Job workflow are displayed when viewing a Job's detail from a Job listing or within the Job editor form.
Workflow definition
Workflows can be defined within the Rundeck graphical console or as an XML or YAML document that is loaded to the server.
The graphical console provides an authoring environment where steps can be added, edited, removed or reordered.
Users preferring to define Jobs in a text format should refer to the two format definitions:
It is also possible to author Jobs inside the graphical console and then export the definition as a file using the rd-jobs shell tool (rd-jobs).
See Exporting Job definitions and Importing Job definitions.
Workflow control settings
Workflow execution is controlled by two important settings: Keepgoing and Strategy.

Workflow controls
Keepgoing: This manages what to do if a step incurs an error:
- Stop at the failed step: Fail immediately (default).
- Run remaining steps before failing: Continue to next steps and fail the job at the end.
The default is to fail immediately but depending on the procedure at hand you can choose to have the execution continue.
Strategy: Controls the order of execution of steps and command dispatch to nodes: Node-oriented and Step-oriented.
- Node-oriented: Executes the full workflow on each node before the next node. (default)
- Step-oriented: Executes each step on all nodes before the next node.
The following illustrations contrast the strategies showing how three steps proceed across two nodes.
Node-oriented flow illustrated:
1.   NodeA    step#1
2.     "      step#2
3.     "      step#3
4.   NodeB    step#1
5.     "      step#2
6.     "      step#3
Step-oriented flow illustrated:
1.   NodeA    step#1
2.   NodeB      "
3.   NodeA    step#2
4.   NodeB      "
5.   NodeA    step#1
6.   NodeB      "
The process you are automating will determine which strategy is correct, though the node-oriented flow is more commonplace.
Workflow steps
The following sections describe how to construct a workflow as a set of steps of different types.
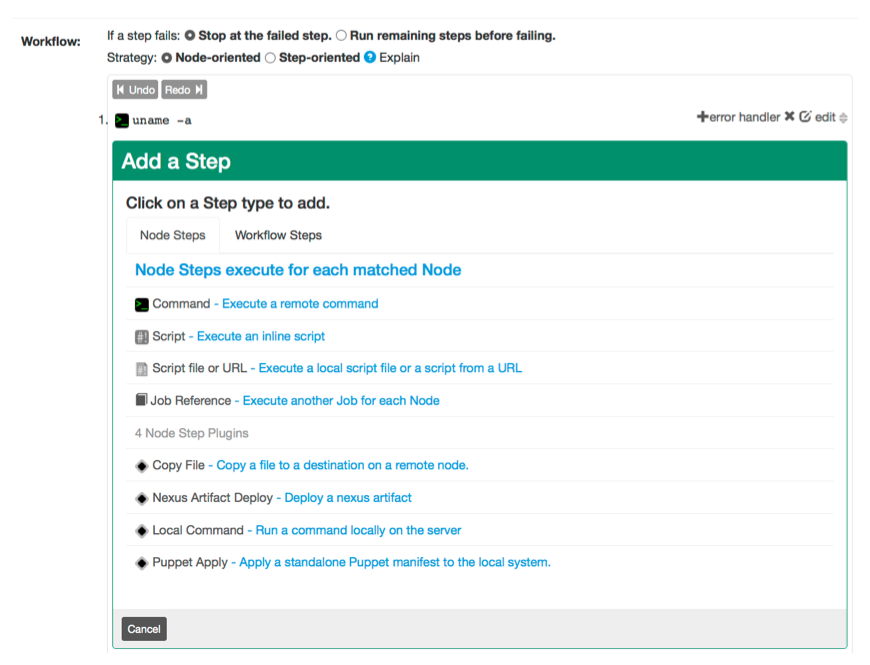
When creating a new Job definition, the Workflow form will be set with defaults and have no workflow steps defined. The workflow editor will have a form open asking to choose a stype type to add.
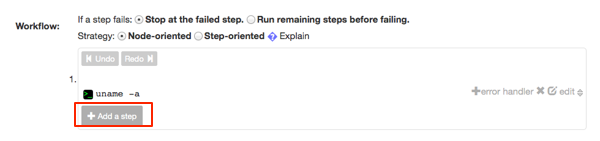
Add a step
To add new steps simply press the "Add a step" link inside the workflow editor form. This will prompt you with a dialog asking which kind of step you would like to add. Each kind of step has its own form. When you are done filling out the form, press "Save" to add it to the sequence. Pressing "Cancel" will close the form and leave the sequence unchanged.
Add a step form
New steps are always added to the end of the sequence. See Reordering steps for directions on moving steps into a new order.
Each step can have a "Description" to give it a more logical name or description to be displayed in the Rundeck GUI.
The next several sections describe the specification of each kind of workflow step.
Types of Steps
Steps in a workflow can be either Node Steps or Workflow Steps.
- Node Steps operate once on each Node, which could be multiple times within a workflow
- Workflow Steps operate only once in the workflow
Step Plugins
You can create or install third-party plugins which provide new Steps for your workflows.
- See the chapter on Plugins.
Command step
Use the command step to call system commands. Enter any command string you would type at the terminal on the remote hosts.

Command step type
This is similar to calling the command with [dispatch]:
dispatch [filter-options] -- commandScript step
Execute the supplied shell script content. Optionally, can pass an argument to the script specified in the lower text field.
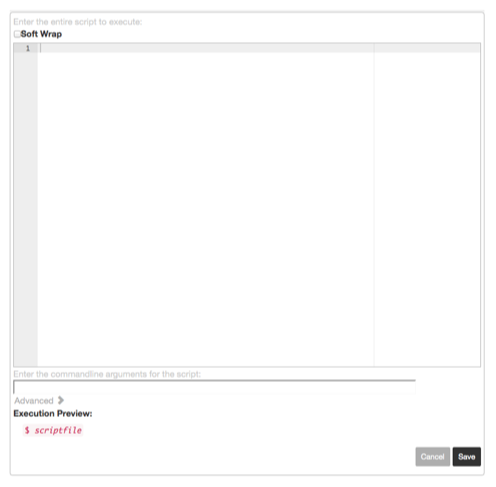
Script step type
This is similar to calling the command with [dispatch]:
dispatch [filter-options] --stdin -- args <<EOF
script content here
EOF
Script file step
Executes the script file local to the sever to the filtered Node set. Arguments can be passed to the script by specifying them in the lower text field.
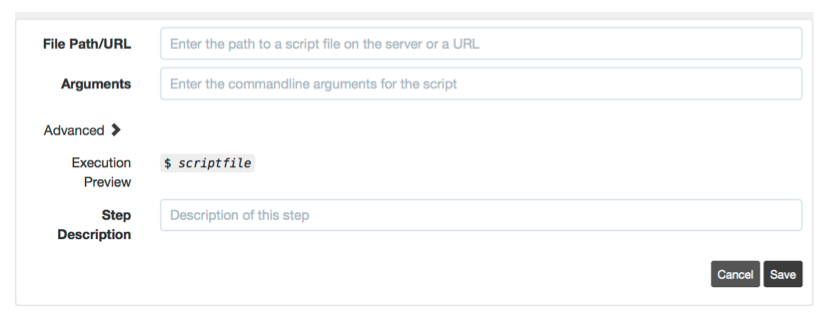
Script file step type
This is similar to calling the script file with dispatch:
dispatch [filter-options] -s scriptfile -- argsScript URL step
Downloads a script from a URL, and executes it to the filtered Node set. Arguments can be passed to the script by specifying them in the lower text field.
Script URL step type
This is similar to calling the script URL with dispatch:
dispatch [filter-options] -u URL -- argsThe URL can contain Context Variables that will be expanded at runtime.
Advanced Script options
For Script steps, Script file steps, and Script URL steps, you can specify an optional Invocation string to declare how the script should be executed.
Click on the "Advanced" link to reveal the input.
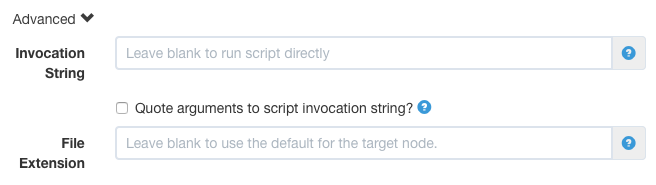
Advanced Script Settings
Enter a command that will be used as the invocation to run the script, by including ${scriptfile} to define where the resulting file will appear in the invocation command. For example, you can execute the script using sudo by entering:
sudo -u username ${scriptfile}This will then allow your script to make use of Sudo authentication.
The effecitve commandline for your script will become:
sudo -u username [scriptfile] arguments ...If necessary, you can check the "Quote arguments to script invocation string?" checkbox, which will then quote both the scriptfile and arguments before passing to the invocation command:
[invocation string] "[scriptfile] arguments ..."Changing the File extension
You can also change the file extension set on the temporary file when it is invoked. This might be necessary if your command expects a file with a certain extension.
Set the "File Extension" field to the desired extension. The . is optional, e.g. .ps or sh. The default is determined by the type of target node. Unix uses .sh and Windows uses .bat.
Job reference step
To call another saved Job, create a Job Reference step. Enter the name of the Job and its group.
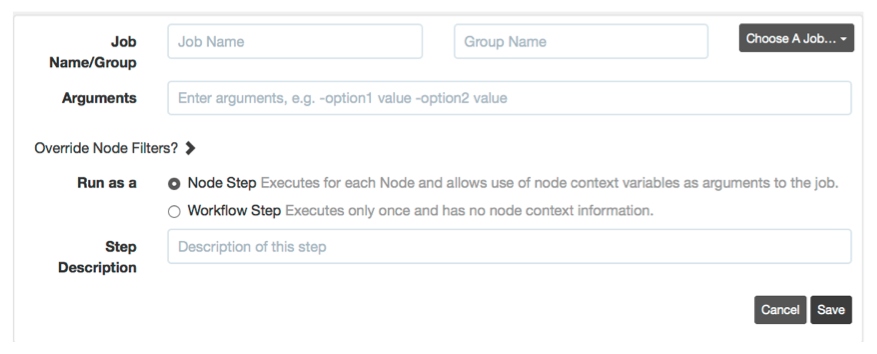
Job reference step type
The Job Reference form provides a Job browser to make it easier to select from the existing set of saved Jobs. Click the "Choose A Job..." link and navigate to the desired Job.
Finally, if the Job defines Options, you can specify them in the commandline arguments text field and can include variable expansion to pass any input options for the current job. Format:
-optname <value> -optname <value> ...The format for specifying options is exactly the same as you would pass to the run commandline tool, and you can substitute values of input options to the current job. For example:
-opt1 something -opt2 ${option.opt2}This would set the value "something" for the Job's "opt1" option, and then pass the "opt2" option directly from the top-level job to the Job reference.
This is similar to calling the other Job with run:
run [filter-options] -j group/jobname -- -opt1 something -opt2 somethingelseIf the Job has required Options that are not specified on the arguments line, then a "defaultValue" of that option will be used if it is defined. If a required option does not have a default value, then the execution will fail because the option is not specified.
Job References can be run as either Node Steps or Workflow Steps (see Workflow Steps : Types of Steps). When you choose to use a Job Reference as a Node Step, you can use the Node context variables within the arguments string to the Job.
Overriding Node Filters
You can override the Node Filters used in the referenced Job. Click the "Override Node Filters?" button to expand the Node Filter area.
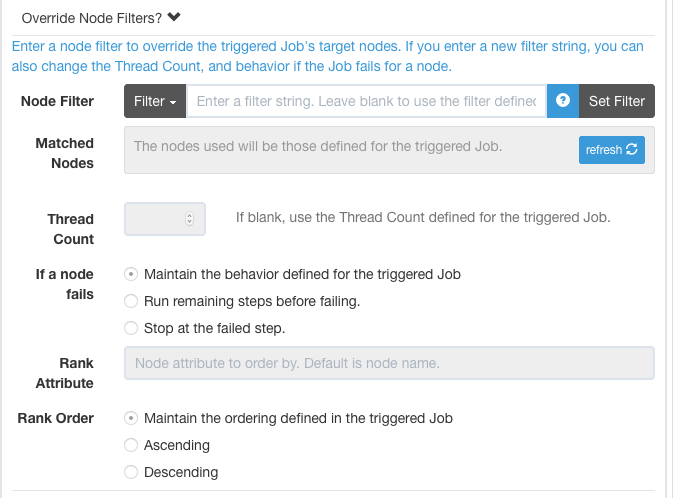
Job Reference Node Filter Override
Enter a new filter in the "Node Filter" input field to preview the matched nodes.
Once you enter a new filter, you can modify the other aspects for the Node Dispatching used by the Job Reference:
- Thread Count
- Node failure behavior
- Node Rank attribute
- Node Rank order
Quoting arguments to steps
When you define a Command or arguments to any Script or Job reference step, your arguments are interpreted as a space-separated sequence of strings. If you need to use spaces or quotes within the argument, here are some rules for quoting arguments:
- If you have an argument with a space character, you can use either double or single quotes:
"my argument": interpreted asmy argument'my argument': interpreted asmy argument
- If you need to embed quotes within a quoted argument, you can wrap it in the opposite kind of quote (double or single):
'"double quotes"': interpreted as"double quotes""'single quotes'": interpreted as'single quotes'
- Or use doubled-up quote characters
"""double quotes""": interpreted as"double quotes"'''single quotes''': interpreted as'single quotes'
Reordering steps
The order of the Workflow steps can be modified by hovering over any step and then clicking and dragging the double arrow icon to the desired position. A blue horizontal bar helps highlight the position where the Job will land.
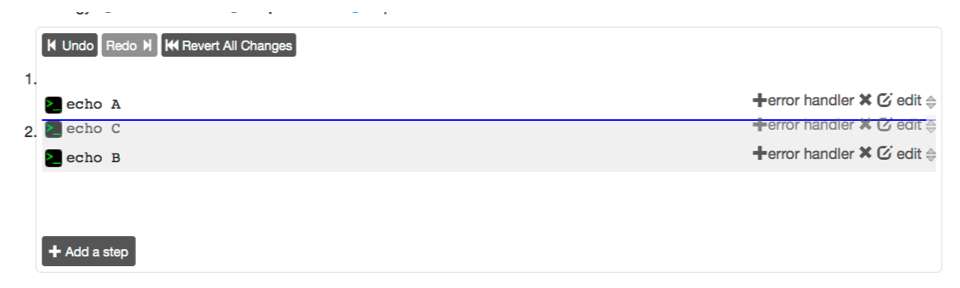
Job step reorder
After releasing the select Job, it will land in the desired position and the step order will be updated.
If you wish to Undo the step reordering, press the "Undo" link above the steps.
The "Redo" button can be pressed to reapply the last undone change.
Press the "Revert All Changes" button to go back to the original step order.
Error Handlers
Each step in a Workflow can have an associated "Error Handler" action. This handler is a secondary step of any of the available types that will execute if the Workflow step fails. Error Handler steps can be used to recover the workflow from failure, or simply to execute a secondary action.
This provides a few different ways to deal with a step's failure:
- Print additional information about a failure
- Roll back a change
- Recover the workflow from failure, and continue normally
When a Workflow step has a failure, the behavior depends on whether it has an Error Handler or not, and the value of the "keepgoing" setting for the Workflow, and the value of the "keepgoingOnSuccess" for the Error Handler.
- When a step fails without an Error Handler
- the Workflow is marked as "failed"
- If
keepgoing="false"- then the entire Workflow stops
- Otherwise, the remaining Workflow steps are executed in order
- the Workflow ends with a "failed" result status
If you define an Error Handler for a step, then the behavior changes. The handler can recover the step's failure by executing successfully, and a secondary option "keepgoingOnSuccess" will let you override the Workflow's "keepgoing" value if it is false.
- When a step fails with an Error Handler
- The Error Handler is executed
- If the Error Handler was successful and has
keepgoingOnSuccess="true"- The workflow
keepgoingis ignored, - The Workflow failure status is not marked, and it will continue to the next step
- The workflow
- Else if
keepgoing="false"- The Workflow is marked as "failed"
- Then the entire Workflow stops
- Else if
keepgoing="true"- If the Error Handler failed then the Workflow is marked as "failed"
- Otherwise, the Workflow is not additionally marked
- the remaining Workflow steps are executed in order (including other triggered Error Handlers)
- when the Workflow ends, its status depends on if it is marked
Essentially, the result status of the Error Handler becomes the result status of its Step, if the Workflow has keepgoing="true" or if the Error Handler overrides it with keepgoingOnSuccess="true". If the Error Handler succeeds, then the step is not considered to have failed. This includes scripts, commands, job references, etc. (Scripts and commands must have an exit status of 0 to return success.)
It is a good practice, when you are defining Error Handlers, to always have them fail (e.g. scripts/commands return a non-zero exit-code), unless you specifically want them to be used for Recovery.
Note, Error-handlers can be attached to either Node Steps or Workflow Steps, and the type of step and the Strategy of the Workflow determines what type of Error-handler steps can be attached to a step. The only restriction is in the case that the Workflow is "Node-oriented", which means that the workflow is executed independently for each node. In this case, Node Steps can only have other Node steps as Error Handlers. In other cases, the Error Handler can be other Workflow steps.
To add an error handler press the "+ error handler" button on the step you want to handle. The form presened includes the normal set of steps you can add to a workflow.
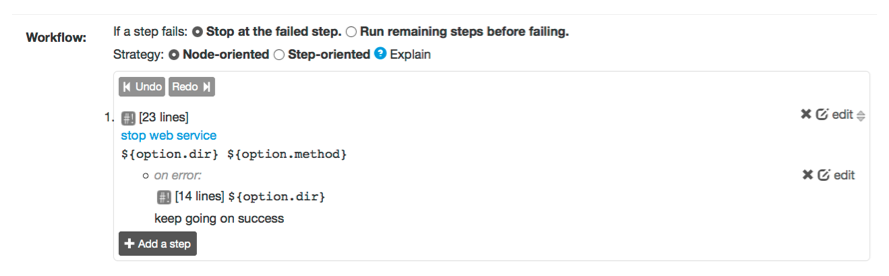
Adding an error handler
The example below shows an error handler that calls a script by URL.
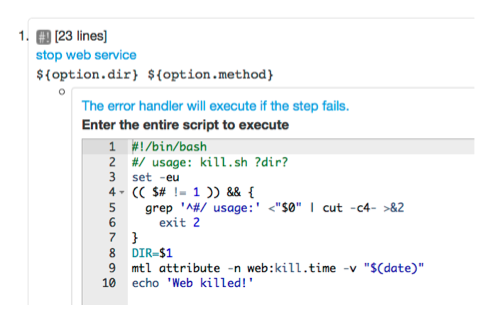
Example error handler
Context information
When the Error-handler step is executed, its execution context will contain some information about the nature of the failure that occurred for the original step.
In the case where a Node Step has a Workflow Step as an Error Handler, then the failure data for multiple nodes is rolled up into a single failure reason to be used by the Workflow Step.
See the section on Context Variables for more information.
Save the changes
Once the Workflow steps have been defined and order, changes are permanently saved after pressing the "Create" button if new or the "Update" button if the Job is being modified.
Context Variables
When a Job step is executed, it has a set of "context" variables that you can access in the Job step. There are several sets of context variables, including: the Job context job, the Node context node, and the Option context option.
Job context variables:
job.name: Name of the Jobjob.group: Group of the Jobjob.id: ID of the Jobjob.execid: ID of the current Executionjob.username: Username of the user executing the Jobjob.project: Project namejob.loglevel: Logging level, one of: 'ERROR','WARN','INFO','VERBOSE','DEBUG'job.user.email: Executing user's email address set in User profile.job.retryAttempt: A number indicating the attempt, if this execution is a retry.job.wasRetry:trueif this execution is a retry, otherwisefalse. See: retry.
Node context variables:
node.name: Name of the Node being executed onnode.hostname: Hostname of the Nodenode.username: Usernae of the remote usernode.description: Description of the nodenode.tags: Comma-separated list of tagsnode.os-*: OS properties of the Node:name,version,arch,familynode.*: All Node attributes defined on the Node.
Additional Error-handler context variables:
result.reason: A code indicating the reason the step failed- Common reason code strings used by node execution of commands or scripts:
NonZeroResultCode- the execution returned a non-zero codeSSHProtocolFailure- SSH protocol failureHostNotFound- host not foundConnectionTimeout- connection timeoutConnectionFailure- connection failure (e.g. refused)IOFailure- IO errorAuthenticationFailure- authentication was refused or incorrect
- Reason code strings used by Job references
JobFailed- referenced Job workflow failedNotFound- referenced Job not foundUnauthorized- referenced Job not authorizedInvalidOptions- referenced Job input options invalidNoMatchedNodes- referenced Job node dispatch filters had no match
- Reason code used from a failed Node Step if the handler is a Workflow Step
NodeDispatchFailure- one or more nodes failed the step
- Common reason code strings used by node execution of commands or scripts:
result.message: A string describing the failureresult.resultCode: Exit code from an execution (if available)result.failedNodes: Comma-separated list of node names that failed for aNodeDispatchFailure
Option context variables are referred to as option.NAME (more about Job Options.)
Context Variable Usage
Context variables can be used in a few ways in a Job step, with slightly different sytanxes:
- Commands, Script Arguments and Job Reference Arguments
${ctx.name}
- Inline Script Content (see note)
@ctx.name@
Note, The "Inline Script Content" variable expansion is not available for "Script File" steps. The Script File is not rewritten at all when used for execution.
- Environment Variables (see note)
$RD_CTX_NAME
The syntax for Environment variables is that all letters become uppercase, punctuation is replaced with underscore, and the name is prefixed with
RD_.Note, See the chapter Plugins - SSH - Passing Environment Variables Through Remote Commands for information about requirements of the SSH server.