Using Log Filters
In this tutorial we’ll learn how to use Rundeck’s log filters to
- Capture key value data for use in subsequent jobs
- Highlight important output to improve job output readability
- Suppress potentially sensitive information from leaking into the logs
Use case: packaging and distributing a binary
To illustrate the log filter functionality, we’ll create a project to package and distribute a binary. We’ll be using the Rundeck Playground environment to simulate a data center locally on your workstation.
A common workflow for distributing binaries is to create an OS package on a builder machine that’s optimized for packaging code, upload the built package to a package repository, and then have the destination machines pull the latest version of the package from the repository. In this tutorial, our OS is Ubuntu Linux so we’ll be building .deb packages. We’ll be using S3 to store the packages. To avoid needing an AWS account when doing the tutorial, we provision a mock S3 server that mirror’s S3’s API. Lastly, to allow our destination machines to download the package, we’ll be passing them a presigned S3 download url which acts as temporary credentials and removes the need for an AWS SDK on the destination machine.
Side note: In a traditional data center, you might just install the AWS CLI tool on the destination host and either authorize that host’s IAM role to download from your S3 bucket, or pass a set of AWS credentials from Rundeck’s Key Storage to the AWS S3 client at download time. But maybe we have a less common setup, like an IoT deployment of low powered Raspberry Pi’s which would struggle to print the help text of the AWS CLI tool.
Building the package
First, we need to create a script to build the package. For convenience, let’s say we want to distribute the Hashicorp Consul binary.
First we need to download the binary we want to distribute:
$!/bin/bash -xe

# Change to a new temporary directory
cd $(mktemp -d)

# Create the download url
NAME=consul
VERSION="1.2.3"
URL="https://releases.hashicorp.com/$NAME/3.1.0/$NAME_3.1.0_linux_amd64.zip"

# Download the url to the current directory
echo "INFO - Downloading $URL"
curl -sOL "$URL"

# Unzip the downloaded file. In this case we know it's a single file: the consul binary.
unzip $(basename "$URL")
Then we need to package the binary into a .deb format. We’ll use the very handy fpm utility to abstract the gory details into a one-liner:
# Call fpm with a directory as the source and a deb as the target. Name the package consul and give it the same version as what we downloaded.
fpm -s dir -t deb --name "$NAME" --version "$VERSION" "$PKG_DIR"
We want the consul binary to be executable in the system’s executable path, so we create that directory structure before calling fpm:
PKG_DIR=usr
mkdir -p "$PKG_DIR/bin"
install ./consul "$PKG_DIR/bin"
fpm -s dir -t deb --name "$NAME" --version "$VERSION" "$PKG_DIR"
The full script so far looks like:
$!/bin/bash -xe

# Change to a new temporary directory
cd $(mktemp -d)

# Create the download url
NAME=consul
VERSION="1.2.3"
URL="https://releases.hashicorp.com/$NAME/3.1.0/$NAME_3.1.0_linux_amd64.zip"

# Download the url to the current directory
echo "INFO - Downloading $URL"
curl -sOL "$URL"

# Unzip the downloaded file. In this case we know
it's a single file: the consul binary.
echo "INFO - Packaging $NAME version $VERSION"
unzip $(basename "$URL")

# Create the appropriate directory structure
PKG_DIR=usr
mkdir -p "$PKG_DIR/bin"
install ./consul "$PKG_DIR/bin"

# Call fpm with a directory as the source and a deb as the target. Name the package consul and give it the same version as what we downloaded.
fpm -s dir -t deb --name "$NAME" --version "$VERSION" --deb-no-default-config-files "$PKG_DIR"
If you run that you might get:
+ fpm -s dir -t deb --name consul --version 1.2.3 --deb-no-default-config-files usr
Created package {:path=>"consul_1.2.3_amd64.deb"}
“Oh,” you might be thinking, “Maybe I should use the Key Value Data log filter to capture that path output to capture that outputed filename to pass to an upload script.”
You could do that, especially if you had a custom script plugin to do uploads. However for this tutorial, we’ll just do the uploading from the same script, so we’ll capture the outputted filename like this:
DEB_FILE=$(fpm -s dir -t deb --name "$NAME" --version "$VERSION" --deb-no-default-config-files  "$PKG_DIR" \
    | ruby -e 'puts eval(STDIN.read)[:path]')
Here we’re piping the fpm output into a Ruby snippet to parse the map and print out the path key, which we capture in the DEB_FILE bash variable.
Now we upload the .deb file using the AWS CLI tool and a set of AWS credentials passed into the script:
S3_URL="s3://rundeck-playground/consul/${DEB_FILE}"
echo "INFO - Uploading $DEB_FILE to $S3_URL"
export AWS_ACCESS_KEY_ID=$1
set +x # Don't log the secret key
export AWS_SECRET_ACCESS_KEY=$2
set -x # Continue verbose bash logging
aws s3 cp --quiet "$DEB_FILE" "$S3_URL"
In the Rundeck Playground environment, you don’t need to create the bucket beforehand because it’s a mock s3 server, but in the real AWS environment, you do.
Lastly, we want to generate a presigned url that we want Rundeck to pass to the destination nodes that will install the package. To do that:
echo "INFO - Generating presigned url for $S3_URL"
DOWNLOAD_URL=$(aws s3 presign "$S3_URL")
echo "RUNDECK:DATA:DOWNLOAD_URL = $DOWNLOAD_URL"
echo "RUNDECK:DATA:DEB_FILE = $DEB_FILE"
The aws s3 presign command takes an S3 path that you have access to and creates a url that anyone can read from but expires in a fixed amount of time, in this case the default is 1 hour. It prints out the presigned url which we capture in the DOWNLOAD_URL bash variable.
Now, we print out the variables we want to use in subsequent Rundeck steps in a format that Rundeck can capture: RUNDECK:DATA:$VARIABLE = $VALUE
The full build.sh script:
#!/bin/bash -xe

S3_BASE=rundeck-playground/consul/

cd $(mktemp -d)

_pkgdir="pkg"

NAME=consul
BIN_NAME=${BIN_NAME-$NAME}
VERSION="1.2.3"
URL="https://releases.hashicorp.com/consul/3.1.0/consul_3.1.0_linux_amd64.zip"

mkdir -p "$_pkgdir"

echo "INFO - Downloading $URL"
curl -sOL "$URL"

echo "INFO - Packaging $NAME version $VERSION"
unzip $(basename "$URL")
touch $BIN_NAME
mkdir -p "${_pkgdir}/usr/bin"
install "$BIN_NAME" "${_pkgdir}/usr/bin"
cd ${_pkgdir}
DEB_FILE=$(fpm -s dir -t deb --name "$NAME" --version "$VERSION" . | ruby -e 'puts eval(STDIN.read)[:path]')

S3_URL="s3://${S3_BASE%%/*}/${DEB_FILE}"
echo "INFO - Uploading $DEB_FILE to $S3_URL"
export AWS_ACCESS_KEY_ID=$1
set +x
export AWS_SECRET_ACCESS_KEY=$2
set -x
aws s3 cp --quiet "$DEB_FILE" "$S3_URL"

echo "INFO - Generating presigned url for $S3_URL"
echo -n "RUNDECK:DATA:DOWNLOAD_URL = "
aws s3 presign "$S3_URL"
echo "RUNDECK:DATA:DEB_FILE = $DEB_FILE"
Wrap the build script in a custom script step plugin
To trigger build script we just created, we could use a Rundeck script step. However, since the script needs credentials, it’s better practice to wrap the script in a custom script step plugin so that you can securely pass secrets from Key Storage into the script.
The build script’s plugin.yaml would look like:
name: deb builder
version: 1
rundeckPluginVersion: 1.2
author: Carlo Cabanilla
date: 2018-09-21
url: http://rundeck.org/
providers:
  - name: BuildDeb
    service: RemoteScriptNodeStep
    plugin-type: script
    script-interpreter: /bin/bash -xe
    script-file: build.sh
    script-args: ${config.aws_access_key_id} ${config.aws_secret_access_key}
    config:
      - name: aws_access_key_id
        type: String
        renderingOptions:
          valueConversion: "STORAGE_PATH_AUTOMATIC_READ"
      - name: aws_secret_access_key
        type: String
        renderingOptions:
          valueConversion: "STORAGE_PATH_AUTOMATIC_READ"
Note the renderingOptions:valueConversion: "STORAGE_PATH_AUTOMATIC_READ" settings on the credential values. That lets us pass in Key Storage paths and the plugin will pull the values and pass it into the script. For a more detailed tutorial on custom script step plugins, see Custom Script Plugin - Hello World.
Create the job
Now we need a job to trigger the script step. It might look like this:
- uuid: PackageDeb
  name: PackageDeb
  nodefilters:
    filter: fpm
  sequence:
    commands:
    - type: BuildDeb
      nodeStep: true
      configuration:
        aws_access_key_id: keys/projects/hello-project/aws/access-key-id
        aws_secret_access_key: keys/projects/hello-project/aws/secret-access-key
The new config here are the Key Storage paths to the AWS credentials and the nodefilter to select the node to run the build.
Highlighting high level log output
If we test it out in the web UI, the output might look like:
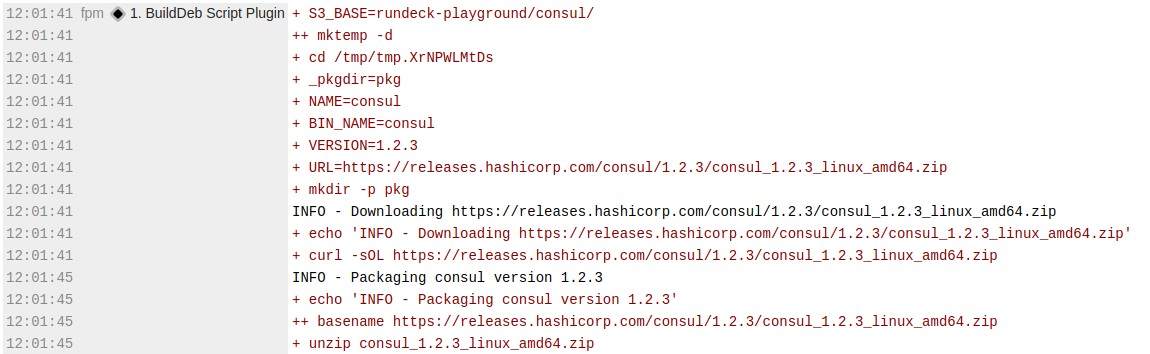
Here we can apply our first log filter to call out our high level logging output so that it stands out from the low level script commands.
- uuid: PackageDeb
  name: PackageDeb
  nodefilters:
    filter: fpm
  sequence:
    pluginConfig:
      LogFilter:
      - type: highlight-output
        config:
          bgcolor: yellow
          mode: bold
          regex: ^INFO\s*-\s*(.*)$
    commands:
    - type: BuildDeb
      nodeStep: true
      configuration:
        aws_access_key_id: keys/projects/hello-project/aws/access-key-id
        aws_secret_access_key: keys/projects/hello-project/aws/secret-access-key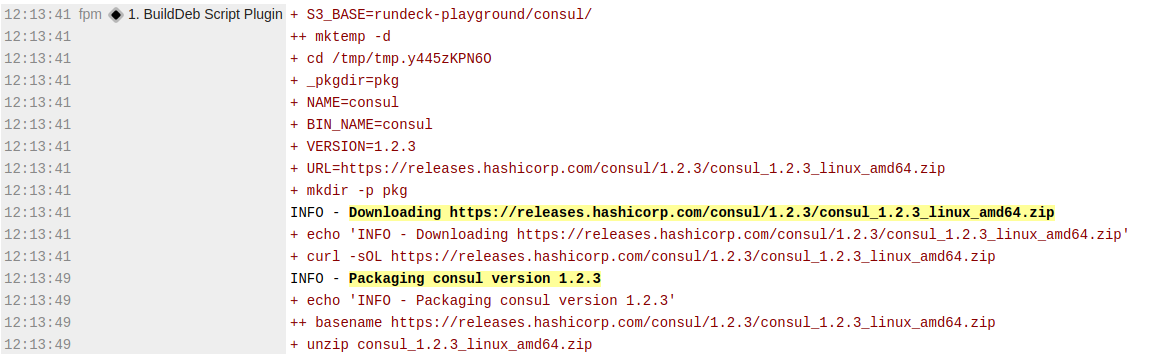
Now we can more easily skim the log output for the important steps.
Prevent accidental leakage of secrets
Remember this snippet of our build script?
Since we’re running the script with bash -x, it prints out each command that it’s running and the values of the variables we assign. The above snippet explictly suppresses that verbose logging when we set the secret key to avoid exposing it in the logs.
What if we didn’t have the foresight to supress that output? Could we prevent ourselves from shooting ourselves in the foot?
We can partially protect ourselves using the quiet-output log filter:
  sequence:
    pluginConfig:
      LogFilter:
      - type: quiet-output
        config:
          loglevel: debug
          matchLoglevel: all
          quietMatch: 'true'
          regex: AWS_SECRET_ACCESS_KEY
Here we’re saying at any log level, if you see the string AWS_SECRET_ACCESS_KEY, change that log line’s log level to debug. This would have prevented us leaking the the key from bash -x output, assuming we were running under the default log level. However, the filter wouldn’t hide it if you ran it with the debug log level.
Additionally, it won’t prevent something like:
Because bash -x logging would have evaluated the variable already and it will show up as:
So while the quiet-output shouldn’t be your main protection from hiding secrets, it’s another possible safeguard and better than nothing.
Running jobs on different sets of nodes
We want to install the package on different nodes than we built it on, but there’s no way to specify a different set of nodes for different steps, so how can we proceed?
We can create another job to install the package and reference the build job to trigger the build. Here is the new job:
- name: InstallDeb
  nodefilters:
    filter: web_.*
  sequence:
    commands:
    - jobref:
        uuid: PackageDeb
    - script: |
        #!/bin/bash -xe
        WORKING_DIR=$(mktemp -d)
        echo "INFO - Downloading $2 to $WORKING_DIR"
        cd $WORKING_DIR
        curl -sL "$1" > $2
        echo "INFO - Installing $2"
        dpkg -i "$2"
        rm "$2"
The new node filter points to the web nodes, our destination for the package.
jobref lets us call other jobs and let them use their own node filter. In this case we call PackageDeb to package the deb on the fpm node.
The second step is an inline script to download and install the package. We don’t need to wrap it in a custom script step plugin because there’s no credentials to deal with.
Passing data from one job to another
But wait, how does this job know what the download url and the name of the package file are? At last, this is where the key value log filter comes into play:
- name: InstallDeb
  nodefilters:
    filter: web_.*
  sequence:
    pluginConfig:
      LogFilter:
      - type: key-value-data
        config:
          logData: 'false'
          regex: ^RUNDECK:DATA:(.+?)\s*=\s*(.+)$
    commands:
    - jobref:
        uuid: PackageDeb
    - args: ${data.DOWNLOAD_URL} ${data.DEB_FILE}
      script: |
        #!/bin/bash -xe
        WORKING_DIR=$(mktemp -d)
        echo "INFO - Downloading $2 to $WORKING_DIR"
        cd $WORKING_DIR
        curl -sL "$1" > $2
        echo "INFO - Installing $2"
        dpkg -i "$2"
        rm "$2"
Here we define a regex to capture that simple format we used in the build script. The variables get stored in the data context where we can refer to them later on in the job.
However! If the InstallDeb’s own log output printed out RUNDECK:DATA:DOWNLOAD_URL = ... then this would work, but the above configuration won’t work because the parent job doesn’t have access to the job reference’s data.
Instead, we need to export the variables from the build job so that the install job has access to them. Modifying the PackageDeb job:
- uuid: PackageDeb
  name: PackageDeb
  nodefilters:
    filter: fpm
  sequence:
    pluginConfig:
      LogFilter:
      - type: key-value-data
        config:
          logData: 'true'
          regex: ^RUNDECK:DATA:(.+?)\s*=\s*(.+)$
    commands:
    - type: BuildDeb
      nodeStep: true
      configuration:
        aws_access_key_id: keys/projects/hello-project/aws/access-key-id
        aws_secret_access_key: keys/projects/hello-project/aws/secret-access-key
    - type: export-var
      nodeStep: false
      configuration:
        export: DOWNLOAD_URL
        group: export
        value: ${data.DOWNLOAD_URL@fpm}
    - type: export-var
      nodeStep: false
      configuration:
        export: DEB_FILE
        group: export
        value: ${data.DEB_FILE@fpm}
The key here is the export-var steps to move the data.DOWNLOAD_URL and data.DEB_FILE values captured with the key-value-data log filter into the export global variable group.
Now our InstallDeb job can use those global variables:
- name: InstallDeb
  nodefilters:
    filter: web_.*
  sequence:
    commands:
    - jobref:
        uuid: PackageDeb
    - args: ${export.DOWNLOAD_URL} ${export.DEB_FILE}
      script: |
        #!/bin/bash -xe
        WORKING_DIR=$(mktemp -d)
        echo "INFO - Downloading $2 to $WORKING_DIR"
        cd $WORKING_DIR
        curl -sL "$1" > $2
        echo "INFO - Installing $2"
        dpkg -i "$2"
        rm "$2"
And now the web nodes have the presigned url generated by the fpm node. Magic!
To recap, running this job would:
- Run a script on a build node to package a binary into a deb and securely upload it to S3.
- Pass a temporary url from the build node to let a different set of nodes without AWS credentials or a special S3 client download and install the package.